Introduction
We created gloves that allow users to type on any hard surface as if they were using a QWERTY keyboard. The gloves recognize the standard QWERTY keyboard layout by recognizing which finger is pressed, and how bent the finger is. It is limited to recognizing the three primary rows along the keyboard, from “q” in the top left to “?” in the bottom right. For the index fingers, the gloves also distinguish when the left index finger is away from the other fingers to distinguish between “t-g-b” and “r-f-v” keys, and similarly for the right hand. Furthermore, the gloves act just like a keyboard, meaning that a user can use our product on to type on any program that they want.
While touch screens are a good alternative for portable computer mouses, keyboards on touch screens give little haptic feedback, and are frequently small. This makes it difficult for people accustomed to normal keyboards to use. Although there are other projects that have tried to use gloves as a computer interface, such as CyberGlove and KeyGlove, most are either (1) gesture based, (2) generic sensor gloves, or (3) prototypes that have not been completed. The most similar project that we could find is KITTY, but it is still in early development. For a list of popular glove-based input devices, we refer the reader to the KeyGlove website. Our project is unique because we propose to create a glove input that acts as a generic QWERTY keyboard, rather than a general input sensor. A pictures with all components is shown in Figure 1.
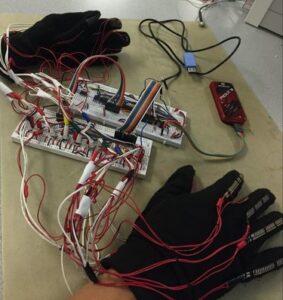
Our keyboard gloves do have some limitations. For example, we do not support operator keys, like SHIFT or CTRL, nor do we support numbers. Because of the frequency of BACKSPACE, we replaced the semicolon and forward slash keys with BACKSPACE. Also, the mobility of the user is impeded by the wires that connect the glove to the computer.
High Level Design
Hardware
The hardware consists of 10 push buttons, one per finger/thumb, as well as one flex sensor for each finger (where “finger” excludes the thumb). We also have copper contacts between the index and middle finger of each hand. These contacts determine which column of the keyboard the index fingers are pressing. We use two 8-to-1 analog multiplexers (muxes) to reduce the number of pins needed to read in the flex sensor and push button values. We also have a non-inverting amplifier circuit that amplifies the output of the mux for the flex sensor readings, providing a larger dynamic range from which the voltage can be used to distinguish between the three possible key rows for a given finger. Voltage divider circuits were created for each of the above mentioned inputs. Diagrams for each component can be found in the Hardware section, along with more detailed descriptions of the components.
Software
The responsibility of the software is to convert the sensor data into a UART message that indicates what key is pressed. For this project, we limit possible keys to lowercase letters, a comma, a period, and a backspace. We base our keyboard on a standard QWERTY keyboard and replace the semicolon and slash with a backspace. Note that we do not support SHIFT, ALT, or CTRL keys.
In order to perform this task, the software scans each button sensor to check if any of them are pressed. If so, we select one finger (prioritized from right to left) that was pressed. We change the select lines for the analog mux to select for the finger that was pressed. We then use the PIC32’s on board ADC to read the voltage across the flex sensor, which changes as the user bends their finger. Based on this value and predefined thresholds, we figure out if that finger was pressing the top row (‘q’ through ‘p’), the middle row (‘a’ through ‘;’), or the bottom row (‘z’ through ‘/’) of the keyboard. We then package this information in a UART message that is sent to a Python script. This Python script read the serial input and converts it to a keyboard event that behaves as if a user pressed a key on an actual keyboard.
Gloves
We sewed the flex sensors onto the back of the 8 fingers (excluding thumbs). We also sewed the buttons onto the tips of the finger tips. The copper tape comes with its own adhesive, which we use to stick it to the gloves. We also sewed additional stress relief loops near the wrists that help prevent the wires to the flex sensors from being pulled apart. See the results section for pictures.
Hardware
Buttons
In order to detect when a user has pressed a key, we have push buttons at the end of the finger tips. Not only does this make the hardware simple (as opposed to some sort of pressure sensor), but it also gives the user tactile feedback so that they know when they have pushed a button. We also have push buttons on the thumbs to register when the user pushes the space button. We use an 8-to-1 analog mux for the 8 push buttons for the fingers and two additional microcontroller (MCU) pins for those of the thumbs. For the 8-to-1 analog mux buttons, we added a pulldown resistor shown in Figure 2. For the thumb buttons, we used the PIC32’s internal pulldown resistors.
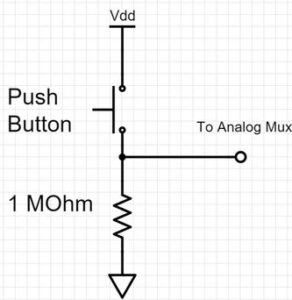
Although we initially wanted to use a digital encoder instead of an 8-to-1 mux, we did not have access to a digital encoder and did not want to wait until one arrived.
Flex Sensors
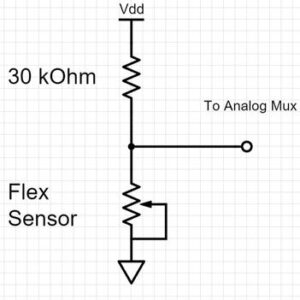
To detect which row of a keyboard the user has pushed, we have flex sensors spanning the two knuckles of each finger (closest to the finger tips), excluding the thumbs. The user’s fingers will either be extended, half bent, or bent. We use another 8-to-1 analog mux to read in one of the flex sensor readings at a time, and this value is first amplified with the op-amp circuit before being input to the MCU. Thus the flex sensors are able to distinguish between the three modes corresponding to the three possible key rows. Voltage divider circuits, shown in Figure 3, were created. We used a 30kΩ resistor to match the flex sensors’ resistance of approximately 30kΩ. This maximizes the dynamic range of the output.
Index Finger Sensor
To detect whether or not the index finger is extended towards the center portion of the QWERTY keyboard (for example, for keys “f” versus “g”), we use copper tape between the index finger and the middle finger. Two additional voltage divider circuits were created, one for each hand. When the copper tape pieces touch, the two wires are shorted together, indicating the index finger is close to the middle finger. Otherwise, we know that the index finger is extended towards the center of the keyboard, so we know that one of the middle group keys is pressed. This takes 2 pins, one for each hand. The copper contacts for each hand are connected directly to the MCU pins, which have the internal pull-down resistors enabled, and as a result, no external resistors are needed.
Amplifier Circuit
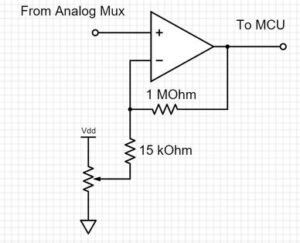
To increase the dynamic range of the flex sensor reading from the analog mux, we created a tunable non-inverting amplifier circuit using an opamp, several resistors, and a trimpot. This made it possible for the software to distinguish between the different rows of keys using the amplified flex sensor input to the MCU. The circuit diagram is shown in Figure 4. We needed the trimpot in order to dynamically adjust the voltage being subtracted from the input. Because each flex sensor’s base resistor value is slightly different, the range and starting voltages for the across the different flex sensors varied. The trimpot needed to be adjusted so that none of the flex sensor values were saturated, while the resistor values were chosen to maximzes the dynamic range of the ADC.
USB Cable
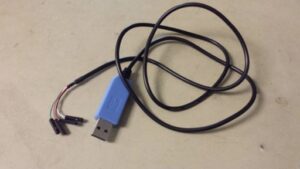
We use a serial cable like in Figure 5 to communicate via USB to the computer. We use GND and VDD to power our PIC32. The data lines are connected directly to PIC32 pins.
Pinout
Table 1 is a list of each specific MCU pin assignment with respect to the above mentioned hardware inputs and outputs.
| Component | Description | PIC32 Pin |
| Analog Mux for Flex Sensors | Bit 0 for mux select | 16 (B7) |
| Analog Mux for Flex Sensors | Bit 1 for mux select | 17 (B8) |
| Analog Mux for Flex Sensors | Bit 2 for mux select | 18 (B9) |
| ADC | ADC input from amplifier | 24 (PPS AN11) |
| Analog Mux for Push Buttons | Bit 0 for mux select | 4 (B0) |
| Analog Mux for Push Buttons | Bit 1 for mux select | 5 (B1) |
| Analog Mux for Push Buttons | Bit 2 for mux select | 6 (B2) |
| Analog Mux for Push Buttons | Input from push button mux | 26 (B15) |
| CPU Communication | UART receive pin | 22 |
| CPU Communication | UART transmit pin | 21 |
| Index Finger Sensor | Input for right finger | 9 (A2) |
| Index Finger Sensor | Input for left finger | 10 (A3) |
| Space Bar Button | Input from either thumb | 7 (B7) |
Table 1: The pinout for the PIC32 and the keyboard glove.
PICkit 3 Setup
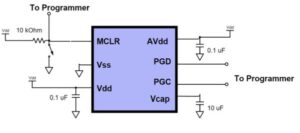
Instead of using a PIC Microstick, we decided to put the PIC32 directly on the breadboard and program it with the PICkit 3, making the final product cheaper and more compact. To run the PIC32 on a breadboard, we added the following components:
- 10 kΩ resistors between PIC32’s MCLR and VDD.
- (optional) switch between PIC32’s MCLR and GND for easy resetting of the PIC32.
- 0.1 uF disk ceramic capacitor between PIC32’ VDD and ground, close to the PIC32.
- 0.1 uF disk ceramic capacitor between PIC32’s AVDD and ground, close to the PIC32.
- 10 uF tantalum capacitor between PIC32’s VCAP and ground
- Connect PIC32’s Vss to GND
The above bullets describe how to run the PIC32 on a breadboard. To program the PIC32, we need to connect it to the PICkit 3, which is then connected to a computer via a USB cable. A summary of the pin connections to the PICkit 3 are shown in Table 2. The complete setup is summarized in Figure 6.
| PIC32 Signal | PIC32 Pin | PICkit 3 Pin | PICkit 3 Signal |
| MCLR | 1 | 1 | MCLR / VPP |
| N/A | N/A | 2 | VDD Target |
| N/A | N/A | 3 | VSS Ground |
| PGED1 | 4 | 4 | PGD (ICSPDAT) |
| PGEC1 | 5 | 5 | PGC (ICSPCLK) |
Table 2: The pinout to connect the PIC32MX250F128B to the PICkit 3.
VDD and GND can be supplied by the PICkit 3. To do so, follow the these instructions. They are copied below for convenience:
- Go to Run > Set Project Configuration > Customize…
- In “Categories” window click once on PICkit 3.
- In the right side you have “Option Categories” drop down box, click on “Power“.
- Now check the box for “Power target circuit from PICkit 3“.
- Choose the “voltage level” from the drop down menu.
Otherwise, VDD and GND should we powered externally. We used the USB cable to power our PIC32 externally.
Software
PIC32 Code
Setup
There are several components of the PIC32 that we need to set up, and each is described below in detail.
ADC
The ADC is set up with the following code:
Code Snippet 1: How to set up the ADC.
We refer the reader to the PIC32 Peripheral Reference manual for details on choosing the parameters.
Digital In/Out
It is the responsibility of the software to control the select lines of the analog mux units. This is done by setting the appropriate port pins to be outputs. Similarly, to detect if a space bar was pushed or if the index fingers are separated, we configure ports to be digital inputs. For the digital inputs, we enable pulldown resistors, simplifying the external circuit. Code to perform the above functions is given below.
Threads
We then use the Protothreads library to schedule the following three threads in a round-robin fashion:
- Computer Interface – Responsible for sending data over UART to a Python program
- Glove – Responsible for converting sensor input from the glove to a character to press
- Debug – A thread used to display data
Calibration
Although we initially had global thresholds shared across every finger, we found that each flex sensor is slightly different. Therefore, to figure out whether a finger is pressed at the top, middle, or bottom row, we needed different threshold values for different fingers. To determine these values, we implemented a calibration phase, which can be optionally turned on by setting the CALIBRATION preprocessor constant to 1.
Calibration is implemented by prompting the user to press a key, and then storing flex sensor value in an array. For each key, we request a fixed number of samples from the user. Once the user has finished providing samples for each keys, we take an average of the samples to give us the average flex sensor value for each finger. The threshold between consecutive rows is halfway in between the two average flex sensor values for that finger. For example, if the sample flex sensor value is 50 when the user presses ‘q’ is 50, and 70 when the user presses ‘a’, then the threshold between the top row and middle row for the left pinky is set to (70+50)/2 = 60.
Computer Interface Thread (UART + Python)
To send a message to the computer, we use UART communication protocol. We spawn a thread that uses direct memory access to send a message via a USB cable. We spawn a thread to avoid blocking the main program. The format of the message uses the protocol described in Table 3.
| Message Format | Meaning | Example |
| “k “ | user pressed key | “k a” |
| “c “ | prompt user to press to calibrate. | “c a” |
| “d DATA” | DATA is any data, probably used for debugging. DATA should be a space-separated list of “:” strings. There is no space between the colon and the key nor the value. | “d sample1:50 sample2:60” |
| “s” | user pressed the spacebar | “s” |
Table 3: UART message protocol between PIC32 and Computer.
In calibration mode, the computer interface sends a character to the computer to prompt the user to press a certain key. Otherwise, it sends either a character or a spacebar message. Note that we needed a separate message format for space bars because the Python script expects space-delimited input.
The computer interface thread waits until a flag called new_key_pressed is true to look at the next key_pressed value and react accordingly. The Protothreads library is a cooperative operating system, so it is the responsibility of the Glove thread to set this new_key_pressed flag true and also update the key_pressed variable.
Glove Thread
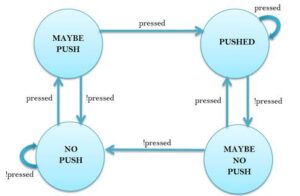
The gloves thread is responsible for convert the sensor data into character pressed. It scans each of the finger buttons by setting the control bits of button analog mux, waiting 3 milliseconds to let the output of the mux to change, and then reading in the value to see if a button is pushed. If so, we set a variable called pressed to indicate that a button was pressed in this pass through the thread. To prevent a single button press being registered as multiple button pressed, we debounce the input based on this pressed variable.
Figure 7 has a diagram of the state machine used to debounce a button pressed. The variable pressed is the input. Each time there is a transition to the PUSHED state, the detected keypad input is valid and is handled according to the specific button that was pushed.
Once a valid key has been pressed, we know which finger has been pressed. This tells us which column of the keyboard was pressed. If the index finger was pressed, then there is ambiguity on which column is pressed. To disambiguate this result, we read whether or not the respect index finger is close to the middle finger on the same hand by reading the index finger sensor. Together, this tells us which column of the keyboard was pressed.
We change the flex sensor analog mux to select the line for the appropriate finger. Based on the flex sensor value and the thresholds, we determine which row was pressed. Once we have the row and column, we look up the character in a predefined array, store it into the key_press variable, and set the new_key_pressed variable to true.
The exception to the above execution is if we are in calibration mode. In that case, the only difference is that we store the flex sensor value into an array of samples and simply set new_key_pressed to be true.
Debug Thread
We reuse the UART communication thread to send data to the computer. This is done by setting the first character to ‘d’ in the messages. For our uses, we used this to print out the measured samples from calibration as well as the calculated threshold values.
Python Code
We use Python 2.7 and the pySerial and pywin32 libraries to convert the serial input from the PIC32 to keyboard commands. The serial module from pySerial library allows us to connect our Python program to a serial port, e.g. COM5. This is done by creating a serial object, configuring it, and then opening the port, as shown below:
Code Snippet 3: Python code to set up serial communication.
We can then use the ser.readline() method to read a new line from UART. We defined a simple message format for Python to parse the input. See Software – PIC32 > Computer Interface Thread for more detail on this protocol. If a message indicates that a key needed to be pressed, we use the win32com module from the pywin32 library to create a Windows keyboard press event as shown below:
Code Snippet 4: Python code to create a keyboard event on Windows.
By implementing this part of the code in Python, it allows for greater flexibility since one can now connect the gloves directly to a Python program. Although this implementation limits the use to windows computers, similar Python modules exist for Linux and Mac.
Initially, we were hoping to register the PIC32 as a HID/USB device so that we could plug it into any computer and have it work, without needing to run a Python script. However, with our time and budget constraints, we decided that this would not be feasible and found that the Python script was sufficient.
Source: Keyboard Gloves
