Home Automation has always been inspiring projects for most of us. Toggling an AC load from the comfort of our chairs or bed of any room without reaching for the switch in another room sounds cool doesn’t it!!. And now in the era of IoT, thanks to the ESP8266 module which made it easy to control anything from anywhere in the world.
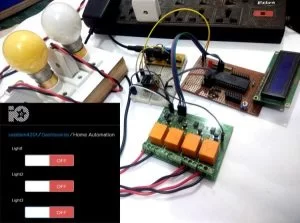
In this IoT based project, we will use Adafuit IO to control Home appliaces from a webpage using ESP8266 and PIC microcontroller. We have connected three AC light as loads and they can be controlled remotely using either your phone or computer. Here ESP8266 is used with PIC microcontroller so learn about Interfacing ESP8266 with PIC16F877A Microcontroller before proceeding. Also check IoT projects section to learn more ESP8266 Wi-Fi module.
Component Required
- ESP8266
- PIC microcontroller(PIC16f877A)
- 12V 5A Electromagnetic Relay Module -1
- 12v Power supply (12V/1A or above) -1
- LM7805 Voltage Regulator -1
- LM317 Regulator -1
- 10k ohm Resistor -1
- 1k Resistor – 3
- 10k Pot – 1
- 1k Pot -1
- 16×2 LCD
- 1000uF capacitor -1
- 10uF capacitor -2
- Wires for connection
- 18.432 MHz Crystal oscillator -1
- LED -2
- 22pF capacitor -2
- BreadBoard or PCB (optional)
Circuit Diagram
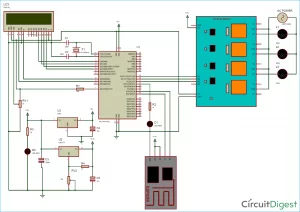
In Web controlled Home Automation project, we have used PIC microcontroller PIC16F877A for performing all the operations. It will communicate with ESP8266 Wi-Fi module to send and receive data from the Adafruit server and take action accordingly to turn ON/OFF relay or load and displaying the status of loads over LCD. We have used 16×2 LCD display for displaying the status of connected AC appliances.
In this project we have three power supplies:
- As we have used a 12v relay module we need 12v so we have used a 12v adaptor to power the relay.
- We needed 5v for powering the PIC microcontroller, LCD and some of the relay module circuit. So we have used a 7805 voltage regulator connected with a 12v supply. This voltage regulator provides 5v output.
- A 3.3v power supply is used for powering the ESP8266 as it works on 3.3v. This supply is made by using LM317 voltage regulator which can be configurable to 3.3v by using some voltage divider circuitry with this. Learn more about creating a LM317 based variable power supply.
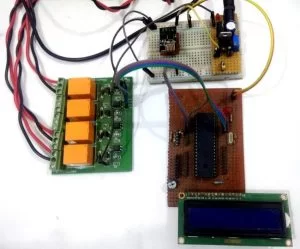
All the connections for this project have been shown in the circuit diagram. The final setup will look like this:
Setup Adafruit IO for IoT Home Automation
In this project, we are going to control some home AC appliance via a web page crated using Adafruit IO. Adafruit IO is a simple to use internet service that easily enables IoT devices to GET and POST data. Additionally, it can be used to create GUI interfaces for viewing data, controlling devices, and triggers for alerts/warnings.
Follw below steps to setup Adafruit IO for IoT Home Automation
Step 1: in this step, we have to create an account on adafruit.io or if you already have an account just login into it.
Step 2: Create a dashboard by clicking on ‘Dashboards’ at the left side of the page and then click on ‘Action’ and then on ‘Create a New Dashboard’.
Source: IoT based Web controlled Home Automation using PIC Microcontroller and Adafruit IO