


Summary of Interfacing PIC12F1822 with ST7735 SPI TFT display
This post demonstrates interfacing a PIC12F1822 microcontroller with an ST7735 SPI 1.8" TFT display using the CCS PIC C compiler. It references a downloadable ST7735 driver, lists required hardware, shows using the PIC12F1822 internal oscillator with PLL to run at 32 MHz, and notes using TFT_BlackTab_Initialize for ST7735R/ ST7735S (Black Tab) modules. The project uses the PIC's single SPI module and was compiled with CCS PIC C compiler v5.051.Parts used in the PIC12F1822 and ST7735 SPI TFT Example:
- PIC12F1822 Microcontroller
- ST7735R or ST7735S 1.8 inch SPI TFT Display (Black Tab shown)
- 5 x 1K Resistors
- +5V Power Supply Source
- Breadboard
- Jumper Wires
- CCS PIC C compiler (used to compile code, v5.051 mentioned)
- ST7735 SPI TFT display driver C file (downloaded and placed in project folder)
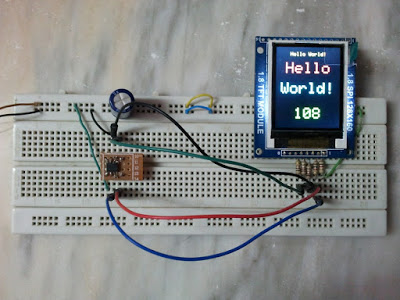
This post shows how to interface PIC12F1822 microcontroller with ST7735 SPI TFT display using CCS PIC C compiler.
For this interfacing we need a driver for the TFT display. Driver topic at the following link:
ST7735 SPI TFT Display Driver for CCS PIC C compiler
Or you can just download it directly from the following link:
ST7735 SPI TFT Display Driver
Put the downloaded C file in your project folder.
Required Components:
- PIC12F1822 Microcontroller
- ST7735R (or ST7735S) 1.8" SPI TFT Display
- 5 x 1K Resistors
- +5V Power Supply Source
- Breadboard
- Jumper Wires
PIC12F1822 and ST7735 SPI TFT Example Circuit:
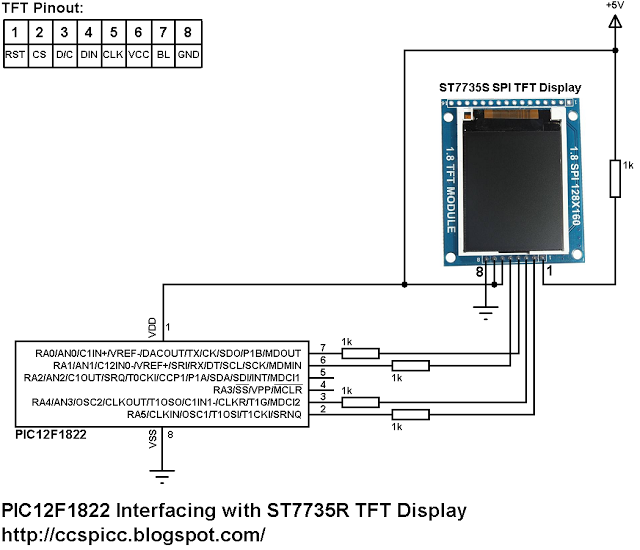
In this project PIC12F1822 internal oscillator is used and MCLR pin function is disabled.
PIC12F1822 and ST7735 SPI TFT Example CCS C code:
PIC12F1822 Has 1 SPI module, this module is used in this interfacing.
My TFT display is ST7735R Black Tap (ST7735S) and for initializing this type of TFT display I used the following line:
TFT_BlackTab_Initialize();
If you have a TFT display with green or red tabs or a TFT with ST7735B controller read the driver topic above.
Note that green, red and black tabs have the same controller ST7735R.
The following line enables internal oscillator @ 8MHz and also the PLL which makes the microcontroller runs at 32MHz (8MHz x 4).
setup_oscillator(OSC_8MHZ | OSC_PLL_ON);
This code is compiled with CCS PIC C compiler versions 5.051.
for more detail: PIC12F1822 and ST7735 SPI TFT Example
Quick Solutions to Questions related to PIC12F1822 and ST7735 SPI TFT Example:
- What driver is required for the ST7735 SPI TFT display?
The ST7735 SPI TFT display driver for CCS PIC C compiler is required and can be downloaded as a C file for the project. - Which initialization function is used for a Black Tab ST7735 display?
The code uses TFT_BlackTab_Initialize() for ST7735R / ST7735S Black Tab displays. - Can the PIC12F1822 use its internal oscillator for this project?
Yes, the project uses the PIC12F1822 internal oscillator with PLL enabled to run at 32MHz. - What oscillator setup line is used to run the PIC12F1822 at 32MHz?
The line setup_oscillator(OSC_8MHZ | OSC_PLL_ON); enables the internal 8MHz oscillator and PLL to run at 32MHz. - How many SPI modules does PIC12F1822 have for this interfacing?
PIC12F1822 has one SPI module which is used for the TFT interfacing. - Are green, red, and black tab ST7735 displays using the same controller?
Yes, green, red, and black tab displays use the same ST7735R controller, though initialization may differ. - What compiler version was used to compile the example code?
The example was compiled with CCS PIC C compiler version 5.051. - Where should the downloaded ST7735 driver file be placed?
The downloaded C driver file should be placed in the project folder.
Related projects
RFID Reader – Access Control System
This device is a simple access control system which uses RFID cards. It is designed with PIC12F1822 microcontroller running on internal oscillator...
Wireless & IoT · PIC12F1822Wireless Communication Using Cheap 433MHz RF Modules and Pic Microcontrollers. Part 2
On the first part of this instructable, I demonstrated how to program a PIC12F1822 using MPLAB IDE and XC8 compiler, to send...
Sensors & Temperature · PIC12F1822DHT11 Interfacing with PIC12F1822 microcontroller
In this blog there are some topics talking about the DHT11 relative humidity and temperature sensor and how to interface it with...
LCD & Display ProjectsLeveraging Blockout Banners for Effective Electronics and Tech Product Displays
Blockout banners have become a popular and effective tool for displaying electronics and tech products in various settings, from trade shows and...
LCD & Display Projects · PIC18F4520Interfacing PIC18F4520 microcontroller with an HD44780 LCD
Introduction Being able to display data from a microcontroller visually has many advantages. It allows for menus, status indicators, and instructions to...
LCD & Display ProjectsVideo Project Development in the Midst of an Impromptu Online Semester
Receiving robot parts in the mail was an unexpected conclusion to the Winter 2020 semester for students. However, when faced with a...

Ibrar Ayyub
I am an experienced technical writer holding a Master's degree in computer science from BZU Multan, Pakistan University. With a background spanning various industries, particularly in home automation and engineering, I have honed my skills in crafting clear and concise content. Proficient in leveraging infographics and diagrams, I strive to simplify complex concepts for readers. My strength lies in thorough...