


Summary of How to display text on 16×2 LCD using PIC18F4550 Microcontroller
This article details the process of displaying text messages on a 16x2 LCD using a PIC18F4550 microcontroller. It outlines programming steps including configuring the LCD, storing strings in character arrays, and iterating through characters to display them. The guide provides specific C code for initialization, pin definitions for control and data lines, and logic to send commands and data sequentially with delays.Parts used in the Display Text on 16x2 LCD Project:
- PIC18F4550 Microcontroller
- 16x2 Character LCD
- High Speed (HS) Oscillator
- Port A Pins (F0, F1, F2)
- Port B Pins
Several automated and semi-automated devices require a message to be displayed in order to indicate their working status. In continuation to LCD interfacing with PIC18F4550, this article explains how to display a message or string on a 16x2 character LCD.
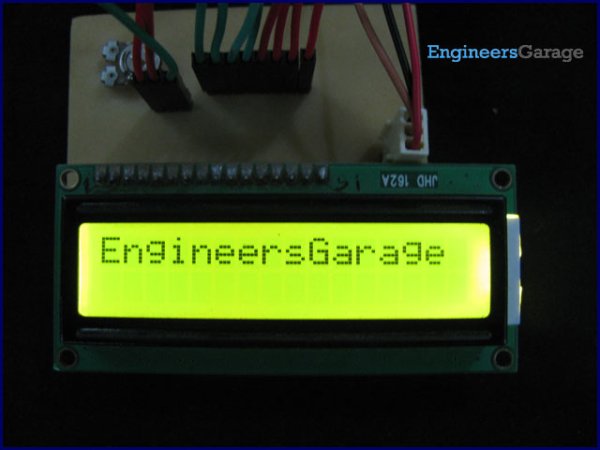 Programming steps:
Code:
while(data[i]!='\0')
{ lcddata(data[i]);
i++; Delay_ms(300); }
// Program to display text on 16x2 LCD using PIC18F4550 Microcontroller
// Configuration bits
/* _CPUDIV_OSC1_PLL2_1L, // Divide clock by 2
_FOSC_HS_1H, // Select High Speed (HS) oscillator
_WDT_OFF_2H, // Watchdog Timer off
MCLRE_ON_3H // Master Clear on
*/
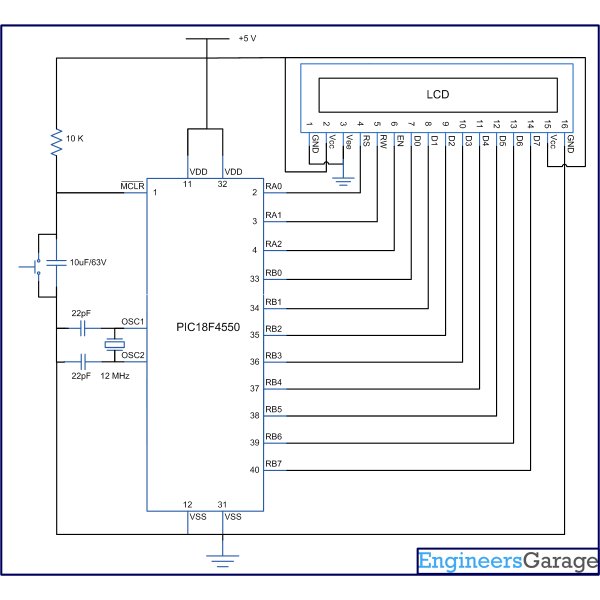
//LCD Control pins
#define rs LATA.F0
#define rw LATA.F1
#define en LATA.F2
//LCD Data pins
#define lcdport LATB
void lcd_ini();
void lcdcmd(unsigned char);
void lcddata(unsigned char);
unsigned char data[20]="EngineersGarage";
unsigned int i=0;
 void main(void)
{
TRISA=0; // Configure Port A as output port
LATA=0;
TRISB=0; // Configure Port B as output port
LATB=0;
lcd_ini(); // LCD initialization
while(data[i]!='\0')
{ lcddata(data[i]); // Call lcddata function to send characters
// one by one from "data" array
i++; Delay_ms(300);
}}void lcd_ini()
{ lcdcmd(0x38); // Configure the LCD in 8-bit mode, 2 line and 5x7 font
lcdcmd(0x0C); // Display On and Cursor Off
lcdcmd(0x01); // Clear display screen
lcdcmd(0x06); // Increment cursor
lcdcmd(0x80); // Set cursor position to 1st line, 1st column}
void lcdcmd(unsigned char cmdout)
{ lcdport=cmdout; //Send command to lcdport=PORTB
rs=0;
rw=0;
en=1;
Delay_ms(10);
en=0;
For more detail: How to display text on 16x2 LCD using PIC18F4550 Microcontroller
Quick Solutions to Questions related to Display Text on 16x2 LCD Project:
- How is the LCD configured in the provided code?
The LCD is configured in 8-bit mode, 2 line, and 5x7 font using command 0x38. - Can the string be stored in a character array?
Yes, the article shows storing the string EngineersGarage in an unsigned char data array. - What function sends individual character values to the LCD?
The lcddata function is used to send individual character values from the string array. - Does the loop run until a null character is encountered?
Yes, the while loop continues running until the loop counter encounters the null character . - What is the purpose of the Delay_ms(300) command?
The delay is placed inside the loop to manage timing between displaying each character. - How are the LCD control pins defined in the code?
The RS, RW, and EN pins are defined as LATA.F0, LATA.F1, and LATA.F2 respectively. - What command clears the display screen?
The lcdcmd(0x01) command is used to clear the display screen. - Where does the cursor position start after initialization?
The cursor is set to the first line and first column using the lcdcmd(0x80) command.
Related projects
PICDEM FS USB CDC Evaluation Board using PIC18F4550 with Proteus Simulation
Introduction The PICDEM FS USB CDC Evaluation Board is a practical microcontroller project built around the PIC18F4550, designed to demonstrate USB communication...
Peripheral Tutorials · PIC18F4550PICDEM FS USB Mass Storage Device using PIC18F4550 with Proteus Simulation
Introduction This microcontroller project demonstrates how to simulate a USB Mass Storage Device (MSD) using the PIC18F4550 in a Proteus simulation environment....
Development Boards & Kits · PIC18F2550Pinguino Project: A PIC Microcontroller Based Arduino
This is a complete tutorial to make a PIC Microcontroller based Arduino. This is a complete tutorial to make PIC microcontroller based...
LCD & Display ProjectsLeveraging Blockout Banners for Effective Electronics and Tech Product Displays
Blockout banners have become a popular and effective tool for displaying electronics and tech products in various settings, from trade shows and...
LCD & Display Projects · PIC18F4520Interfacing PIC18F4520 microcontroller with an HD44780 LCD
Introduction Being able to display data from a microcontroller visually has many advantages. It allows for menus, status indicators, and instructions to...
LCD & Display ProjectsVideo Project Development in the Midst of an Impromptu Online Semester
Receiving robot parts in the mail was an unexpected conclusion to the Winter 2020 semester for students. However, when faced with a...

Ibrar Ayyub
I am an experienced technical writer holding a Master's degree in computer science from BZU Multan, Pakistan University. With a background spanning various industries, particularly in home automation and engineering, I have honed my skills in crafting clear and concise content. Proficient in leveraging infographics and diagrams, I strive to simplify complex concepts for readers. My strength lies in thorough...