Summary of ESP8266 Troubleshooting Guide
This article guides users on troubleshooting the NodeMCU flasher for ESP8266 boards. It covers downloading the tool from GitHub, default settings, and resolving two common issues: the device not entering flash mode or insufficient current from the FTDI programmer. Solutions include connecting GPIO 0 to GND during power-up, toggling the reset pin, or using an external power supply.
Parts used in the NodeMCU Flasher Project:
- NodeMCU flasher software
- ESP8266 board
- Windows PC (32-bit or 64-bit)
- FTDI Programmer
- GPIO 0 pin connection wire
- GND connection point
- Reset pin
- VCC connection point
- External power supply (optional)
ESP8266 Troubleshooting – NodeMCU Flasher
Where do I download the NodeMCU flasher?
Go to the NodeMCU flasher GitHub repository and download the flasher for your Windows PC bit version by clicking the button that says “Raw”:
- NodeMCU flasher Windows 64 bits
- NodeMCU flasher Windows 32 bits
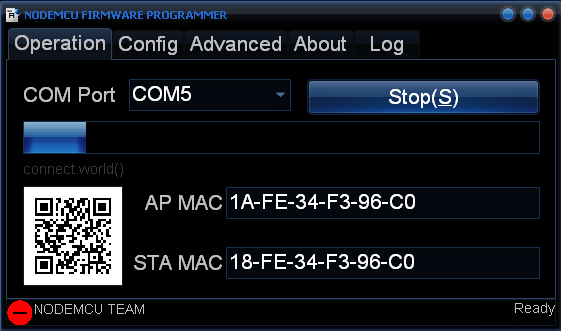
Which settings should I use with the NodeMCU flasher?
The NodeMCU flasher already comes with the right settings by default.
If you have changed some of the settings, I highly recommend that you re-download the NodeMCU flasher.
Here’s my current settings:
If you pressed the “Flash” button and nothing happens… It means one of these two things:
- Problem 1 – Your ESP isn’t in flash mode (double-check if GPIO 0 is connected to GND on power up)
- Problem 2 – Your FTDI Programmer can’t supply enough current to your ESP
Problem 1 – How to make your ESP go into flash mode:
- Close the NodeMCU flasher window
- Remove power from your ESP8266
- Having your ESP connected like this (double check that GPIO 0 is connected to GND)
- Apply power to your ESP8266 and open the NodeMCU flasher
- Press the “Flash” button
If it’s still saying “Waiting MAC”, then try the following:
- Having the NodeMCU flasher still open
- Connect a wire from your ESP8266 reset pin to GND
- Remove that wire from GND and connect to VCC
Repeat steps 2 and 3 a few times until your ESP reboots and hopefully the NodeMCU flasher can detect your ESP and start the flashing process.
Problem 2 – If your FTDI can’t supply enough current, you might need to buy a new FTDI programmer or power your ESP8266 with an external power supply.
For more detail: ESP8266 Troubleshooting Guide
- Where can I download the NodeMCU flasher?
You can download it from the NodeMCU flasher GitHub repository by clicking the Raw button. - What settings should I use with the NodeMCU flasher?
The tool comes with the correct settings by default; re-download if you changed them. - Why does nothing happen when I press the Flash button?
This usually means the ESP is not in flash mode or the FTDI cannot supply enough current. - How do I make my ESP go into flash mode?
Ensure GPIO 0 is connected to GND while powering up the ESP8266. - What should I do if the flasher says Waiting MAC?
Connect a wire from the reset pin to GND, then remove it and connect to VCC repeatedly. - Can I solve the insufficient current problem without buying new hardware?
No, you might need to buy a new FTDI programmer or power the ESP8266 with an external power supply. - Does the NodeMCU flasher support both Windows versions?
Yes, there are specific downloads available for both Windows 64 bits and 32 bits.