I wanted to try my hand at a true “DIY” project, designing and building my own micro quadcotper frame and writing my own firmware in C++. In this post I will describe the frame and build; in my next post I will talk about the firmware.
Excluding stuff I had lying around the shop, (heat-shrink tubing, EC-3 connectors, velcro, cable ties, etc.) the cost came to just under $170:
- 3D-printed frame “free”!
- Flight Controller: Flip32 (Naze32 clone), with Spektrum RX mount removed to expose 3V. $15
- Receiver: MicroFrX by Curtis Fissel. $16.
- ESC: BLHeli 4 in 1 ESC – 12A, with male EC-3 soldered on. $34
- Motors: RMRC Black Series 1306 3300kv ( 2 CW, 2 CCW) $56
- Props: 3030×3 glass composite $8
- HQPROP 3030X3 – BLACK CW
- HQPROP 3030X3 – ORANGE CW
- HQPROP 3030X3 – BLACK CCW
- HQPROP 3030X3 – ORANGE CCW
- Battery: Turnigy nano-tech 1000mah 2S 25~50C Lipo Pack $8
- Fasteners:
- M3 nylon machine screws (20mm, cut down to around 5mm) (4) $8
- Nylon 6/6 Male-Female Threaded Hex Standoff, 4.5 mm Hex Size, 5 mm … (8) $13
- Dese nuts (4) $11
Here’s the frame, fresh out of my LulzBot Mini printer:
Before adding any components, I inserted a velcro tie to keep the battery in place:
Here’s the amazing RMRC BLHeli 4-in-1 ESC with motors and EC-3 battery connector soldered on:
Here’s the BLHeli mounted on the frame. I should’ve used the thinner (4.5mm) standoffs on top and bottom to avoid damaging the circuit!
Next it was time to make a custom jumper for the tiny 3V FrSky-compatible CPPM receiver, which is not 5V tolerant. I un-soldered the 3V Spektrum header from the Flip32 and jury-rigged a little three-pin jumper connection:
Here’s the super-tiny FrSky-compatible receiver from Curtis “Beef” Fissel (of Beef’s Brushed Board fame). This photo shows the receiver after I soldered on a three-pin header, solder-bridged the bind pads, connected it to the Flip32, powered the Flip32 through the USB port bound the receiver to my Taranis, and un-soldered the bridge:
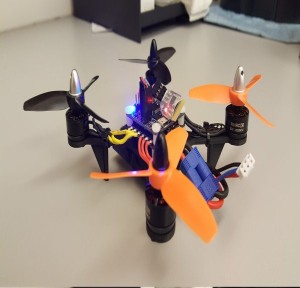
You can see the completed project at the top of this post. Although I could have used Baseflight or Cleanflight to configure the board, I used my own C++ firmware, adapted mostly from Baseflight. Having never configured such a tiny vehicle before, I struggled for a while with the PID settings. Eventually I just divided all the default values by two, and that worked fine, giving me the smooth flight shown in the video.
In a follow-up post I’ll discuss the C++ firmware that’s flying the ‘copter.
For more detail: DIY Mini Quadcopter with 3D-Printed Frame and Custom Firmware