Summary of DIY Microcontroller – Hand Dynamometer
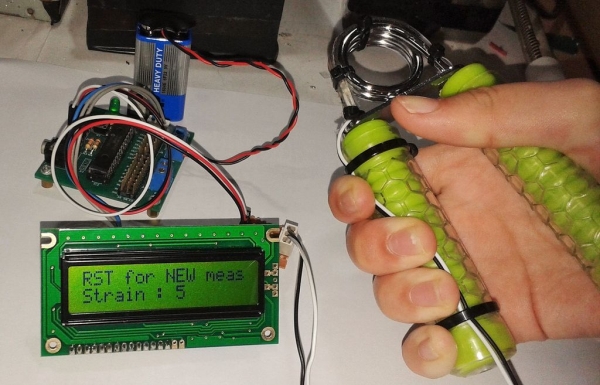
This DIY project converts a standard hand exerciser into a force sensor compatible with microcontrollers like PICAXE or Arduino. The build involves attaching a flex sensor to the exerciser's spring, reinforcing its fragile terminals with plastic from an IC chip holder, and securing everything with hot glue and double-sided tape. The resulting device allows users to measure grip strength by monitoring resistance changes in the flex sensor.
Parts used in the Hand Dynamometer:
- Hand Exerciser
- Flex Sensor 2.2"
- Cable ties
- Wires
- Plastic holder for IC chip
- Super glue
- Double sided tape
Did this DIY Hand Dynamometer as a sensor for PICAXE micro-controller. It also can be use for Arduino or any micro-controller too.
List of the materials I used to make Hand Dynamometer :
1) Hand Exerciser from Amazon – 1 pc
2) Flex Sensor 2.2″ from Amazon – 1pc
3) Some cable ties
4) Wires
5) Plastic holder for IC chip.
6) Super glue
7) Double sided tape
 Tools require :
1) Hot glue gun
2) Scissor
3) Soldering iron
4) Metal files
5) Plier
6) Pen knife
Step 1: Get the right size Flex sensor.
Bought the Flex Sensor 2.2″ from Amazon, which can fit nicely around the circumference of the metal spring on the Hand Exerciser.
Step 2: Solder the terminals
Solder the wire to the Flex Sensor 2.2″ using the plier to hold the sensor down.
While soldering please be careful not to soldered directly on the mica sheet
Step 3: Making the backing material for the flex sensor terminals
The Flex Sensor 2.2″ is fragile at the terminal part. So to strengthen it, I cut out some plastic piece from a plastic IC shipping tube.
– You will then glue the flex sensor on to the plastic piece just little over the label on the flex sensor. The flex sensor label should face down as shown on the picture.
 Step 4: Hot glued the terminals and trim the excess plastic.
Hot glued the terminals to insulate it as well as to provide extra protection.
– Use a pen knife to level the hot glue before it solidified.
– Trim off the excess plastic with a scissor.
For more detail: DIY Microcontroller – Hand Dynamometer
- Which microcontrollers can this project use?
The device works with PICAXE micro-controllers and is also usable for Arduino or any other micro-controller. - What size flex sensor fits the hand exerciser?
A Flex Sensor 2.2" was selected because it fits nicely around the circumference of the metal spring on the hand exerciser. - How do you attach wires to the flex sensor?
You must solder the wire to the Flex Sensor 2.2" while using pliers to hold the sensor down. - Why is a plastic piece added to the flex sensor terminals?
The plastic piece strengthens the fragile terminal part of the flex sensor to prevent damage. - How should the flex sensor label be oriented during assembly?
The flex sensor label should face down when glued onto the plastic backing piece. - What tool is used to insulate the terminals after gluing?
A hot glue gun is used to hot glue the terminals for insulation and extra protection. - How do you finish the excess plastic material?
A pen knife levels the hot glue before it solidifies, and scissors are used to trim off the excess plastic. - What tools are required to make this project?
The required tools include a hot glue gun, scissor, soldering iron, metal files, plier, and pen knife.