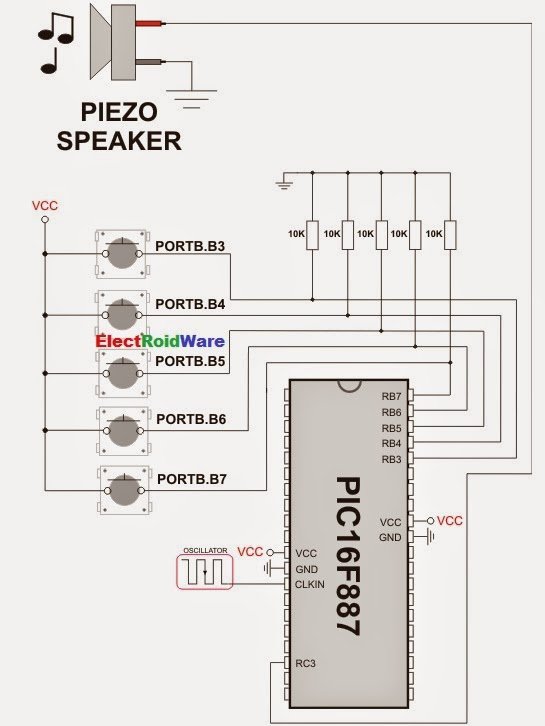
The mikroC PRO for PIC provides a Sound Library to supply users with routines necessary for sound signalization in their applications. Sound generation needs additional hardware, such as piezo-speaker (example of piezo-speaker interface is given on the schematic at the bottom of this page).
Library Routines
Sound_Init
| Prototype | void Sound_Init(char *snd_port, char snd_pin); |
|---|---|
| Returns | Nothing. |
| Description | Configures the appropriate MCU pin for sound generation. Parameters : |
| Requires | Nothing. |
| Example | // Initialize the pin RC3 for playing sound Sound_Init(&PORTC, 3); |
Sound_Play
| Prototype | void Sound_Play(unsigned freq_in_hz, unsigned duration_ms); |
|---|---|
| Returns | Nothing. |
| Description | Generates the square wave signal on the appropriate pin. Parameters :
Note : Frequency range is limited by Delay_Cyc parameter. Maximum frequency that can be produced by this function is Freq_max = Fosc/(80*3). Minimum frequency is Freq_min = Fosc/(80*255). Generated frequency may differ from the freq_in_hz parameter due to integer arithmetics. |
| Requires | In order to hear the sound, you need a piezo speaker (or other hardware) on designated port. Also, you must call Sound_Init to prepare hardware for output before using this function. |
| Example | // Play sound of 1KHz in duration of 100ms Sound_Play(1000, 100); |
Code Example
The example is a simple demonstration of how to use the Sound Library for playing tones on a piezo speaker.
void Tone1() {
  Sound_Play(659, 250);   // Frequency = 659Hz, duration = 250ms
}

void Tone2() {
  Sound_Play(698, 250);   // Frequency = 698Hz, duration = 250ms
}

void Tone3() {
  Sound_Play(784, 250);   // Frequency = 784Hz, duration = 250ms
}

void Melody() {           // Plays the melody "Yellow house"
  Tone1(); Tone2(); Tone3(); Tone3();
  Tone1(); Tone2(); Tone3(); Tone3();
  Tone1(); Tone2(); Tone3();
  Tone1(); Tone2(); Tone3(); Tone3();
  Tone1(); Tone2(); Tone3();
  Tone3(); Tone3(); Tone2(); Tone2(); Tone1();
}

void ToneA() {
  Sound_Play( 880, 50);
}
void ToneC() {
  Sound_Play(1046, 50);
}
void ToneE() {
  Sound_Play(1318, 50);
}

void Melody2() {
  unsigned short i;
  for (i = 9; i > 0; i--) {
    ToneA(); ToneC(); ToneE();
}
For more detail: Create Musical Tone using PIC Code


