
A Simple Development Board
Ok, so you have now got your programmer, and you have a PIC or two. It is all very well knowing how to program the PIC in theory, but the real learning comes when you try your code on a PIC and see the results yourself in a circuit.
You could build a circuit each time and program the PIC to see if the program works, or you can make yourself a development board. A development board allows you to simulate the environment around the PIC. We have included a circuit diagram to show a very basic and cheap development board. You can, of course add LEDs and switches to this, but We have included the bare bones. You can monitor the Input/Output pins by connecting LEDs directly to the pins, and they will light up when the pins go high. Also, you can add switches to the pins, so that you can select which inputs are high, and which are low. Basically, what We are saying is if you start with this circuit, you can add whatever you feel necessary.
We will run through the circuit diagram, which We admit isn’t much, but it will give you a feel of things to come.
The supply rail is set to +6V, which is the maximum voltage of the PIC. You can use any voltage below this right down to +2V. C3 is known as a ‘Bypass’ Capacitor. All C3 does is reduce any noise on the supply rail. X1 is a 4MHz crystal. You could use a parallel resistor and capacitor circuit, but the cost of the crystal is negligible, and it is more stable.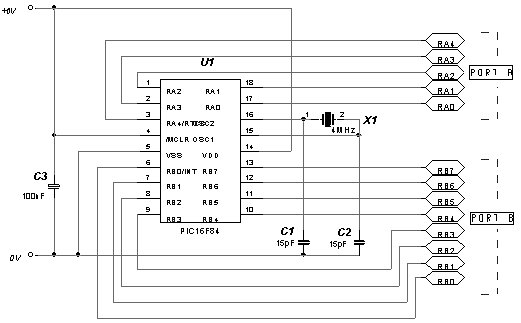 C1 and C2 help reduce any stray oscillations across the crystal, and get rid of any unwanted noise etc before the signal goes into the PIC.
Note: To report broken links or to submit your projects please send email toWebmaster
For more detail: Connect to the PIC Microcontroller
