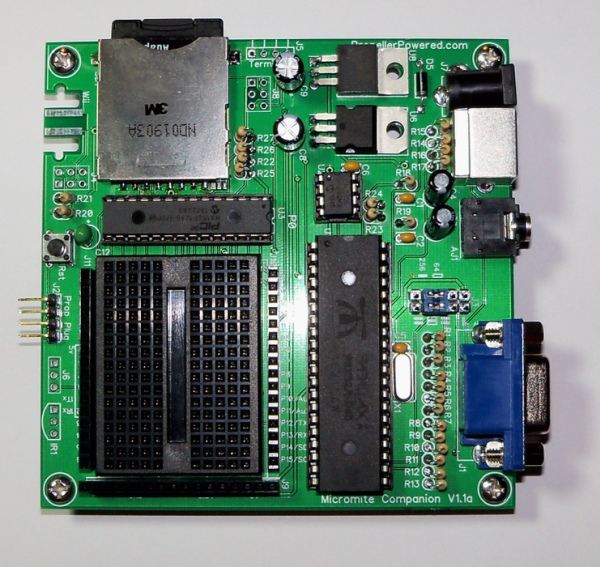
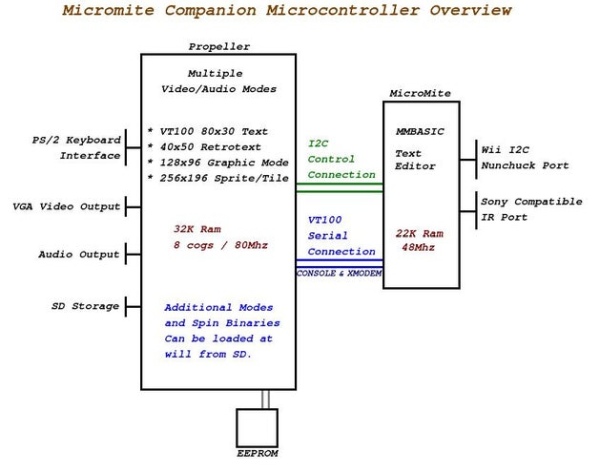
The Micromite Companion Minicomputer is the next generation in the Pocket Mini Computer series.
It is the combination of two Open Source systems, the Micromite software, a PIC32 creation by Geoff Graham, and the Parallax Propeller, a recently “Open Sourced” chip by Chip Gracey. By combining this two very unique chips we can create a powerful microcomputer which contains an up-to-date BASIC interpreter capable of running “old school” programs as well as new commands to control sensors, servos, LCD modules, and more. You’ll be able to create games using sprites and tiles to control objects on screen, or move the action into the real world with servo controlled robots and gizmos.
Propellerpowered stocks the preloaded Micromite Companion Kit which everything you need to create your own, but if you’ve already got a Propeller board,this Instructable will take you step-by-step on each circuit to create your own “home brew” version of the Micromite Companion (MMC) from scratch!
Update: You can use your “home brew” version of the Micromite Companion to win a fully loaded Micromite Companion Kit as a gift for someone (or yourself!) Details here.
Here’s a couple videos that will give you an idea of what is in store for this project.
In the 1970’s if you purchased a computer, it very likely arrived as a “kit”. The MMC is presented in the same spirit! If you’ve missed your chance to be part of the discovery era of the personal computer, or have fond memories from that era, this is the project for you.
Micromite Companion Minicomputer Specifications:
- 32K, Eight Core Parallax Propeller
- PIC32 MX170 installed with MMBASIC with 54k free memory for programming.
- SD card slot for program storage
- PS/2 Keyboard Connection
- VGA Screen Connection
- Video Modes (Expandable to 254 modes)
- 80×30 Micromite Companion Mode
- 40×50 Commodore/Atari Style Retrotext Mode
- 128×96 Fat Pixel Mode
- 256×192 64 color sprite/tile mode.
Let’s take a look at what you’ll need to build your own Micromite Companion Minicomputer.
Step 1: The Required Parts & Hardware
The required parts and hardware:
For the purposes of this Instructable, I’ll assume that you’ll be building your own “home-brew” Micromite Companion Minicomputer from scratch using a Propeller board you probably already have and provide you the instructions to build all of the circuits to create a minimal unit. Even if you decide to purchase a kit from Propellerpowered, I would like to encourage you to read through the entire Instructable as it will help you have a better understanding of how things are designed and operate.
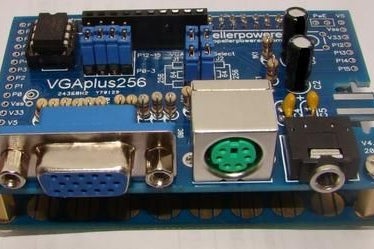
I’ll separate the hardware list by required circuits, as some Propeller boards have keyboard circuits, VGA circuits, and audio circuits built into them. I’ll assume that most Propeller boards provide you with the required 5v and 3v power circuits required. If you happen to have one of our old Pocket Mini Computer designs (pictured above), then this project be a snap, because you already have the Propeller, Keyboard, Vga, and SD circuits already created. All you’ll need to do is wire up the BASIC Micromite circuit and connect it to the open I/O. (2nd image is a Micromite Circuit added to a Propeller Experimenter’s Board.)
The parts below will give you enough to get a minimal computer running so you can join in on the fun.
Required Parts:
- 1 – Parallax Propeller Chip
- 1 – 32K EEPROM
- 1 – Micromite 28pin PIC32MX170 (54k of ram) or 28pin PIC32MX150 (22k of ram)
- 1 – 47uf tantalum (or ceramic) capacitor
VGA Circuit
- 1 – Female VGA connector (like those found on a PC video card.)
- 5 – 240 ohm resistors
- 3 – 120 ohm resistors
- 3 – 470 ohm resistors
Keyboard Circuit
- 1 – Female PS/2 keyboard connector (like those found on a PC motherboard.)
- 2 – 10k resistors
- 2 – 100ohm resistors
I2C Interconnection Circuit
- 2 – 10k resistors
SD Card Circuit
- 1 – SD card socket, or 2GB microSD card with adapter.
- 4 – 10k resistors
Naturally, you’ll need a soldering iron, solder, and a well-lit area to work.
Let’s talk about those two amazing microcontroller chips that this project uses next:
Step 2: The Parallax Propeller
The Parallax Propeller:
The Parallax P8X32A Propeller chip is a remarkable design by Chip Gracey of Parallax, inc.
Propeller Specifications:
- 32K RAM
- 8 CORES “COGS”
- 32 I/O PINS
“The Propeller microcontroller is designed to perform multiple tasks simultaneously, and without the need for interrupts or the dictates of an onboard operating system.
Each of the Propeller P8X32A’s eight symmetrical cores can access all 32 I/O pins and other shared system resources. Each core also has its own memory and a set of configurable hardware for creating, releasing, and re-creating software-defined peripherals as needed.”
Due to it’s multi-core design, the Propeller is ideal for use in our project as an I/O, Video, Audio controller. If you were a Commodore 64 user back in the day, you could think of the Propeller as both the SID, VIC, 1541, and keyboard controller all rolled into one! (Isn’t technology advancement amazing!)
The Propeller’s design was recently released under an Open Source, GPL V3 license. This is the first time a commercial micro-controller has been released as open source!
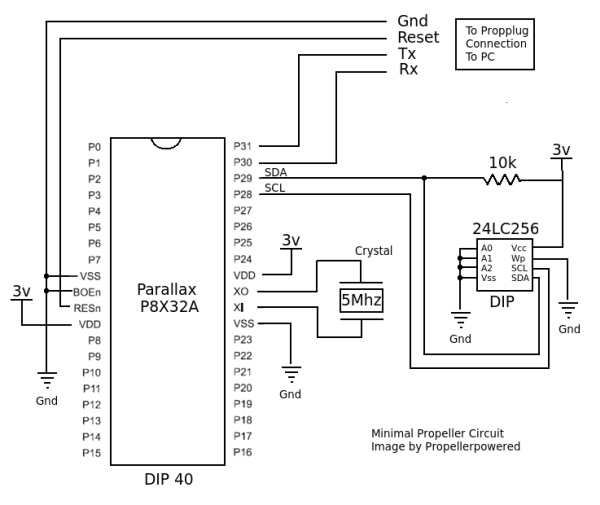
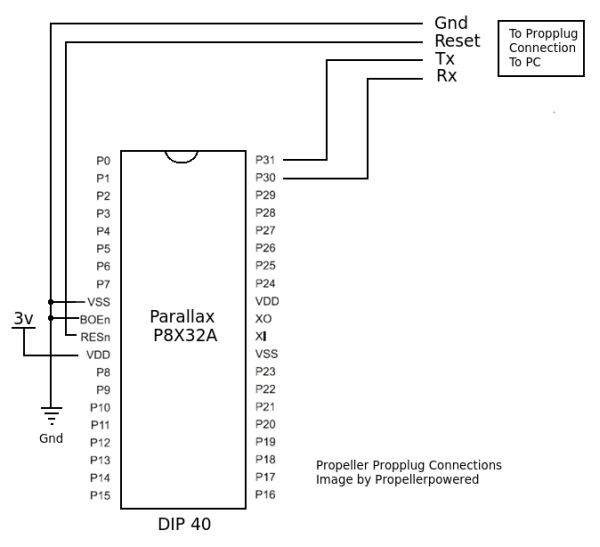
When the Propeller chip is powered up, it contains no code in memory. It receives it’s program from a connected 32K EEPROM. (Most Propeller boards contain the minimal Propeller circuit shown in the image.)
If you are building your Micromite Companion Minicomputer from scratch, you’ll want to make sure that the board you are using contains a USB programming circuit (most do), or obtain Propeller “propplug” from Parallax.com.
Step 3: The Micromite
Edit: WELCOME HACKADAY!
There are videos on this project in action on page 1
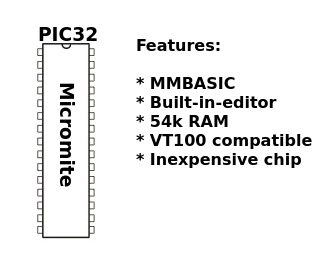
The Micromite:
The Micromite chip is actually either a PIC32MX150 or a PIC32MX170 (available from Microchip, Inc.) loaded with a special Open Source “Micromite” software created by Geoff Graham. The chips can be obtained pre-programmed with the Micromite software from Micromite.org. Even members of the Propellerpowered forums have been stepping up and offering programmed chips for a dollar or two over the cost. If you have a Pickit 3 programmer, you can create your own using the .hex files provided on Geoff’s page.
Here is a little overview of the kind of power provided by the Micromite chip.
- The Microsoft compatible BASIC interpreter
Fully featured with floating point and string variables, long variable names, arrays of floats or strings with multiple dimensions, extensive string handling and user defined subroutines and functions. Typically it will execute a program at 23,000 lines per second.
- Nineteen input/output pins are available.
These can be independently configured as digital input or output, analog input, frequency or period measurement and counting. Ten of the pins can be used to measure voltages and another seven can be used to interface with 5V systems.
- A “built-in” full screen editor.
This only requires a VT100 terminal emulator and can edit a full 54KB program in one session. It includes advanced features such as search and copy, cut and paste to and from a clipboard.
- Modern Communications protocols.
I2C, asynchronous serial, RS232, IEEE 485, SPI and 1-Wire. These can be used to communicate with many sensors (temperature, humidity, acceleration, etc) as well as for sending data to test equipment. Built in commands to directly interface special devices such as infrared remote controls, the DS18B20 temperature sensor, LCD display modules, battery backed clock, distance sensors, numeric keypads and more. Up to five PWM or SERVO outputs can be used to create various sounds, control servos or generate computer controlled voltages for driving equipment that uses an analogue input (eg, motor controllers).
Step 4: Building the Required Circuits: VGA
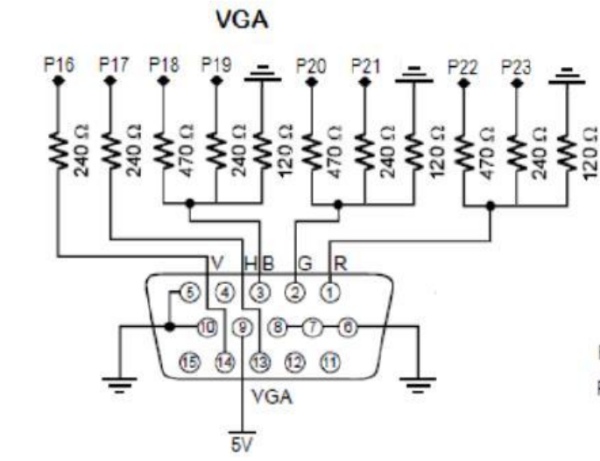
Many Propeller boards already contain a compatible VGA circuit. If so, take advantage of it.
The schematic provided in the image will create a slightly improved version which is capable of 64 colors.
You’ll Need:
- 1 – Female VGA connector (like those found on a PC video card.)
- 5 – 240 ohm resistors
- 3 – 120 ohm resistors
- 3 – 470 ohm resistors
I’ve built this circuit simply by soldering resistors directly to the back of a female VGA connector and carefully plugging them carefully into a solderless breadboard. The “P” numbers indicate which Propeller pin each resistor should be connected to.
If you are breadboarding your Micromite Companion Mini Computer, you can also cheat a little and obtain a breadboard friendly VGA Breakout Board from “Bot Thoughts” on Tindie.com.
It should be noted there are many different “video objects” used by programs contained in the Micromite Companion projects. Some older monitors have reportedly had issues with a few binary programs, so if something isn’t displaying as expected, cross-check your monitor, and post your results in the Propellerpowered forums.
Step 5: Building the Required Circuits: Keyboard
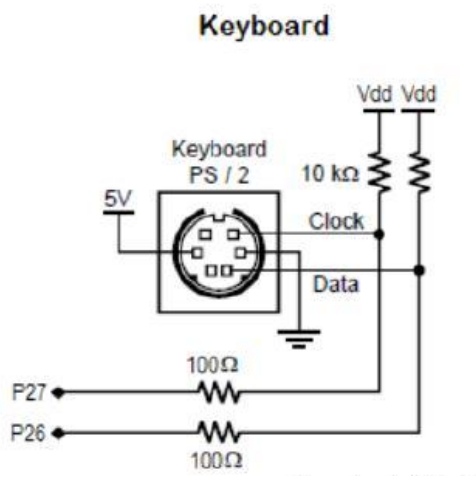
Several Propeller Boards I’ve come across have a Keyboard Circuit built in.
If you are building this circuit from scratch, don’t worry, it’s easy compared to the VGA circuit!
You’ll need:
- 1 – Female PS/2 connector
- 2 – 10k resistors
- 2 – 100ohm resistors
If you are breadboarding, I’ve provided a second image which contains a breadboard layout using the PS2 Keyboard adapter from Parallax.com. Just as before make the connections to the Propeller using the indicated “P” numbers provided in the schematic (image 1).
This would be a good time to locate an PC PS/2 keyboard. You probably have on on your computer, or one stashed in a closet from an old machine. It has a small, round connector, sometimes colored purple.
Step 6: Building the Required Circuits: SD Card
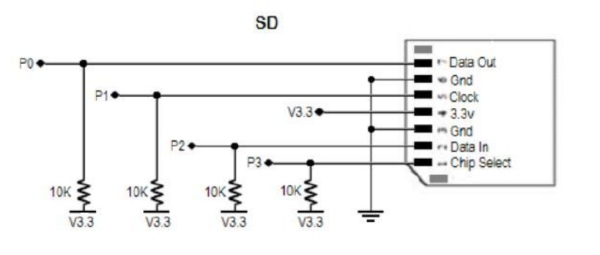
Only a handful of Propeller board outside of Propellerpowered have a built-in SD adapter.
Don’t worry! There are a several ways to obtain or create this circuit easily!
You’ll Need:
- 1 – SD Adapter Socket
- 4 – 10K resistors
The image above provides a schematic of the SD circuit in a way that would allow you to use a spare “Micro to SD adapter” itself as the adapter. Check out this other Instructable, “Cheap DIY SD card breakout” for a way to create the SD circuit from parts you probably already have.
Naturally, you can also purchase a breadboard friendly version of the SD adapter from Parallax.com. There are also very inexpensive adapters which can be source out of China (via Ebay) which are also compatible.
In our Micromite Companion Minicomputer, you can skip this circuit for now, but as soon as you want to SAVE, LOAD, or BRUN a new program come back to this page. The Micromite itself is capable of holding a single BASIC program in memory while the power is off, so if you are waiting on the post office to bring you one of the other options, read on!
BTW, this would be a good time to locate a 2GB (or less) SD card and prepare it by making sure it is formatted (fat32) and contains the BASIC program examples, the required MDE files, and the extra .BIN files.
Step 7: Building the Required Circuits: Micromite
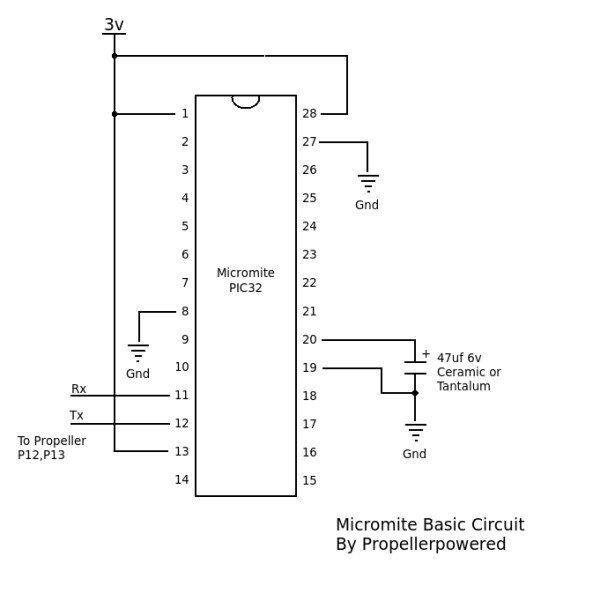
The Micromite acts as the brain of of Micromite Companion Mini Computer.
To create the Micromite Circuit, you’ll only need the chip itself (as mentioned earlier in the Instructable) and a 47uf capacitor (Tantalum recommended) to get it up and running. Our Micromite Companion Minicomputer will use the Propeller with the circuits you’ve assembled to make it a self-contained system.
This would be an excellent time to review the Micromite Manual which contains both connection diagrams, hardware and software examples, and a complete reference to the MMBASIC programming language.
Step 8: Building the Required Circuits: Bringing It All Together
At this point you should have the following circuits built:
- VGA Display Circuit – check!
- Keyboard Interface Circuit – check!
- SD Interface Circuit – check!
- Required software copied to the SD card – check!
- Programmed Micromite Circuit – check!
- Parallax Propeller Circuit (Your Propeller Board) – check!
Now it’s time to connect the Propeller and Micromite together!
You’ll Need:
- 4 – wires
- 2 – 10k resistors
Make the following connections:
- Connect the Micromite’s I2C pins (17 & 18) to two 10k “pull-up” resistors which are connected to 3v.
- Also connect the Micromite’s I2C pins (17 & 18) to the Propeller’s P14, and P15 as shown.
- Connect the Micromite’s Console pins (11 & 12) to the Propeller’s P12 and P13 as shown:
Who’s the Boss?
The relationship between the Propeller and the Micromite in this project is an interesting one (see image 2). It would seem that the Micromite is in charge of the Propeller by controlling the Propeller using I2C commands from it’s MMBASIC to control video, audio, and SD. This is true, but in fact, the Propeller’s keyboard, and VGA circuits are also acting as a powerful terminal program for the Micromite. Who’s in charge? Well that depends on the given moment.
Step 9: Programming the Micromite Companion Firmware
You are almost ready to power up your Micromite Companion Minicomputer!
The final step is programming the Propeller’s 32K EEPROM with the Micromite Companion firmware.
You’ll need to obtain the umitecompanion.eeprom file, and a copy of the Propeller Tool, or Brad’s Spin Tool.
Connect your Propeller Board by USB to your PC, (or use a Propplug as shown in the image) and open either of the programming tools. Open the umitecompanion.eeprom file and select load “EEPROM” to write it to the EEPROM of your board. Once this is complete, you can update your firmware this way, or from the SD card using our SDloader binary program.
Step 10: Powering Up the Micromite Companion Minicomputer
The moment has arrived!
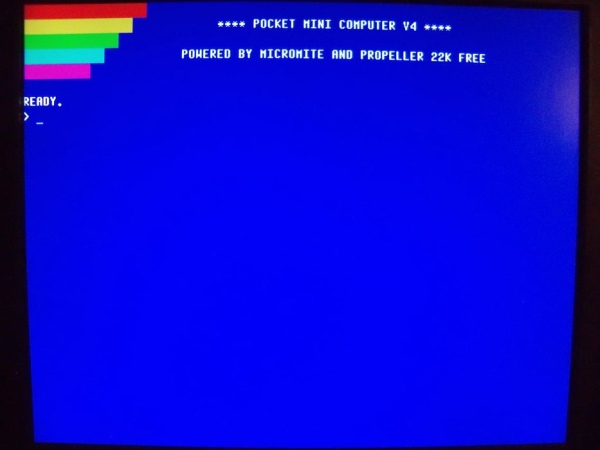
Power up your Micromite Companion Minicomputer and you should see a bright blue screen with:
READY
>
Everything comes up Congratulations! If not, see the troubleshooting section on the next page.
The first thing you’ll want to do is adjust the Micromite’s screen settings with the following command:
OPTION LINES 30
This will set the correct number of displayed lines so that the on-board EDITOR looks correct.
Let’s start by typing a small BASIC program…
Type EDIT to launch the Micromite’s on-board editor and type the following…
FOR X = 1 TO 20
PRINT “HELLO WORLD”
NEXT X
Now, press F2 to RUN your program from the editor.
I’ve provided a number of BASIC programming examples to test your Micromite Companion Minicomputer.
{ You can see them by typing DIR and press }
Let’s load one of them from the SD card..
Type LOAD and press (or CTRL-L)
Type I2CLINES.BAS into the filename prompt and press
This will load the I2CLINES.BAS program from the SD card and put it into the memory of the Micromite.
Type RUN and press
If this program changes video modes and starts printing random lines on the screen, your I2C connections between the Micromite and the Propeller are working properly!
Step 11: Troubleshooting
Uh oh.. Something didn’t go right… Time to go on a Computer Bug Hunt!
BTW, did you know that the term “computer bug” was actually coined by the US Navy?
“Moth found trapped between points at Relay # 70, Panel F, of the Mark II Aiken Relay Calculator while it was being tested at Harvard University, 9 September 1945. The operators affixed the moth to the computer log, with the entry: “First actual case of bug being found”. They put out the word that they had “debugged” the machine, thus introducing the term “debugging a computer program”.
Hopefully, it isn’t an actual BUG that is causing your problem..
Here are some typical symptoms and what to do about them..
SCREEN IS BLACK and KEYBOARD IS FLASHING
Either your SD card is incompatible (Requirement is: 2GB or smaller) or you need to check the SD card circuit itself.
YOU HAVE A READY PROMPT WITHOUT A > BELOW IT.
Either the Micromite is still running a program (Press CTRL-C) or the RX/TX lines between the Micromite and the Propeller need to be checked.
THE BOTTOM LINE IN EDIT IS SEVERAL LINES FROM THE BOTTOM.
The Micromite’s screen settings need to be adjusted. Type OPTION LINES 30 at a prompt to fix this.
THE I2CLINES OR I2C CONTROL PROGRAMS DON’T RUN OR SHOW A BLUE SCREEN.
Check to make sure that your connection lines between the Propeller and the Micromite are connected properly and that there are two 10k pull up resistors in place.
Step 12: Cool Stuff to Do Right Away!
Welcome to the world of “Modern Retrocomputing!”
There are several interesting things you can do right away to try out your Micromite Companion Minicomputer.
You might have noticed that there are several programs that have a “BIN” extension when you used DIR.
This programs are Propeller binaries which can be launched with the BRUN (CTRL-B) command.
There’s a couple games, a SID player, copy of ZORK, even a Sprite editor for MODE 4.
Naturally, you should dig into the Micromite Manual and have a look at all the powerful commands provided by MMBASIC. MMBASIC supports both the “old-school” lined numbered BASIC commands (allowing you to run programs like those from CREATIVE COMPUTING) or QBASIC style programs with SUB routines, and labels.
With the additional MMBASIC commands, you’ll be reading sensors, controlling servos, and connecting your Micromite Companion Minicomputer to the outside world.
At the time of the writing of this Instructable, the Propeller has three additional video modes which can be controlled using I2C commands from your MMBASIC programs. Make sure you also read the Micromite Companion Manual which documents these commands.
Most importantly! Join the forums at Propellerpowered! You’ll find a friendly community of like-minded individuals who are enjoying the Micromite Companion project. Post up pictures of your home-brew computer design and share programs and ideas with a great bunch of folks.