Summary of Build Your Own Simple and Easy PICAXE Microcontroller Based Photovore Robot
This tutorial guides beginners in building BRAM-AXE, a simple photovore robot that navigates toward light sources using a PICAXE 28X1 microcontroller. The project minimizes programming complexity by utilizing the PICAXE BASIC language and IDE. The robot employs two LDR sensors to detect light intensity, driving two continuous servos attached to toy tires for locomotion. It automatically searches for light in dark environments and stops when the source is bright enough.
Parts used in the BRAM-AXE Robot:
- PICAXE 28X1 microcontroller board with serial downloader cable
- Two LDRs (Light Dependent Resistors)
- Two 1K Ohm 0.25 watt resistors
- Two Continuous Servo motors
- Two toy tires
- Cables and Tubing (1mm and 3mm)
- 3 x AA battery holder with 3 x AA alkaline batteries
- One CD or DVD
- Double tape or epoxy glue
- One paper clip and neckless beads
- Bolts and nuts
Building a simple and easy microcontroller based robot is always a fascinating topic to be discussed, especially for the robotics newbie enthusiast. On this tutorial I will show you how to build your own microcontroller based robot which known as a photovore or you could call it as the light chaser robot using the simplest possible circuit for the microcontroller based robot brain, locomotion motor and the sensor.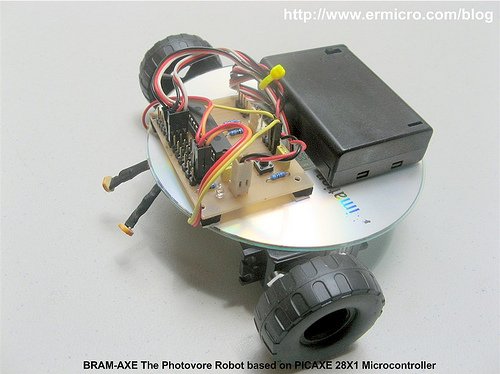
One of the most frustrating parts when building your first microcontroller based robot is to program it and to download it into the microcontroller flash ram. On this tutorial this kind of “trouble maker” is being reduced as we will use the PICAXE programming editor from the Revolution Education Ltd (http://www.rev-ed.co.uk/picaxe) as our Integrated Development Environment (IDE) to program our robot brain using the BASIC (Beginners All Purpose Symbolic Instruction Code) language and to download the program into the PICAXE 28X1 microcontroller.
The PICAXE 28X1 microcontrollers actually is based on the popular Microchip 8-bit 28 pins PIC16F886 microcontroller that have a preload PICAXE BASIC interpreter firmware inside, in fact when you buy it its looks the same as the usual Microchip PIC16F886 microcontroller. Together with the free PICAXE Programming Editor and simple serial cable connector for the program downloader makes this PICAXE framework suitable for beginners and even for the professional.
You could read more information about the PICAXE microcontroller on my previous posted blog “Introduction to the Embedded system with PICAXE Microcontroller“.
On this tutorial I will refer this photovore robot as the BRAM-AXE as this is a simplify version of the more advanced version of its big brother BRAM (Beginners Robot Autonomous Mobile) which you could read more information about it on my previous posted blog “Building BRAM your first Autonomous Mobile Robot using Microchip PIC Microcontroller – Part 1” and “Behavior Based Artificial Intelligent Mobile Robot with Sharp GP2D120 Distance Measuring Sensor – BRAM Part 2“.
The BRAM-AXE robot simply use its light sensitive sensor to navigate to the light source, when it being placed in the dark environment it will automatically switch to the light search mode and try to find the light source, when it encounter the light source it will navigate to the light source and when the light source intensity is bright enough it will stop and enjoying the light. You could see all this behavior on the video at the end of this tutorial. Ok now let’s list down all the electronics parts, robot chassis materials and software needed to build this interesting robot.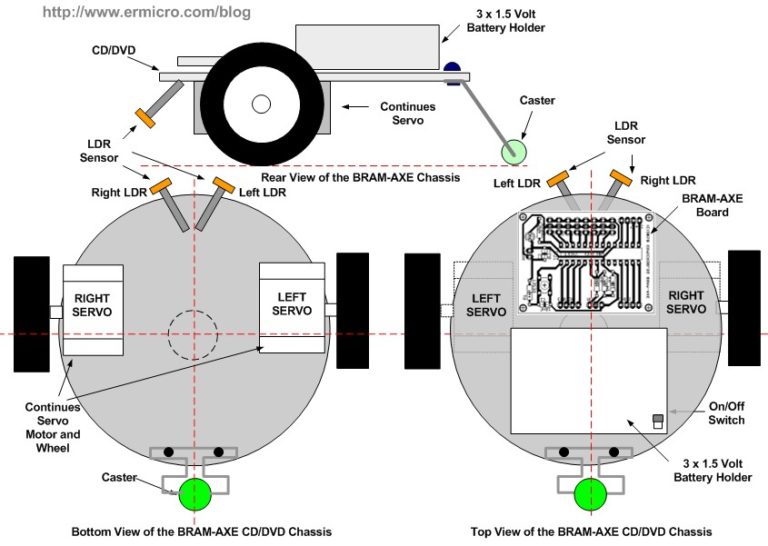
- BRAM-AXE board: based on the PICAXE 28X1 microcontrollers together with the PICAXE serial downloader cable which you could easily build from my previous posted blog “Make your own Microcontroller Printed Circuit Board (PCB) using the Toner Transfer Method“.
- Two LDR and Two 1K Ohm 0.25 watt resistor
- Two Continues Servo (on this tutorial I use the Parallax Continues Servo)
- Two toys tire to be attached to the servo’s arms
- Enough cables and Tubing (1mm and 3mm)
- 3 x AA battery holder with 3 x AA alkaline battery
- 1 CD or DVD
- A good double tape or epoxy glue for the permanent robot
- One paper clips and neck less beads for the robot caster (the robot’s third wheel)
- Enough bolts and nuts for the caster
- PICAXE Programming Editor from Revolution Education Ltd which you could download from their website
For more detail: Build Your Own Simple and Easy PICAXE Microcontroller Based Photovore Robot
- What is the main function of the BRAM-AXE robot?
The robot uses light sensitive sensors to navigate to a light source, switching to light search mode in darkness and stopping when the light is bright enough. - How can I program the microcontroller for this robot?
You can use the PICAXE Programming Editor from Revolution Education Ltd to program the robot brain using the BASIC language. - Does the PICAXE 28X1 require external firmware installation?
No, it comes with a preload PICAXE BASIC interpreter firmware inside the chip. - What components are used for the robot's locomotion?
The robot uses two continuous servos attached to two toy tires for movement. - How does the robot detect its environment?
It utilizes two LDRs and two 1K Ohm resistors as light sensitive sensors to determine light intensity. - What power source does the BRAM-AXE use?
The robot is powered by a 3 x AA battery holder containing three AA alkaline batteries. - Can I build the programmer cable myself?
Yes, you can easily build your own PICAXE serial downloader cable using methods described in previous tutorials. - What material serves as the third wheel for the robot?
A paper clip and neckless beads are used along with bolts and nuts to create the robot caster.