Introduction
Controlled by a PIC 32, the automated ice cream topper stores individual ice cream topping preferences, outputting the user’s ideal solid, liquid, and whip cream topping amount with the push of a button. Our project demo can be viewed here: Project Demo.
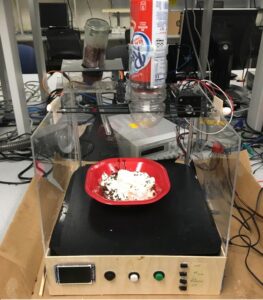
The automatic ice cream topper as demoed had three basic topping capabilities that covered the cream, liquid, and solid topping realms. Through the lever actuation of whip cream, spinning of a turntable releasing solid topping, and pressure controlled liquid topping dispenser, we succeeded in releasing commercially available whip cream, sprinkles, and chocolate syrup. The rotation of a turntable holding the ice cream bowl ensured even distribution of toppings on the ice cream.
This project was pursued initially because of common interest – a common love of ice cream for both partners.
Contents
- High Level Design: Explanation of our project origins and structure.
- Hardware: Physical parts of our project.
- Software: Software implementation of our project.
- Results: Quantitative and qualitative performance analysis.
- Conclusion: Discussion of project implications.
- Appendices: Additional files.
High Level Design
Rationale
The idea of a Personal Ice Cream Topper emerged from a series of design thinking brainstorming exercises. The goal of our brainstorming wasn’t to have a patentable product in the end, but to develop a creative idea that both team members could enjoy and be invested in.
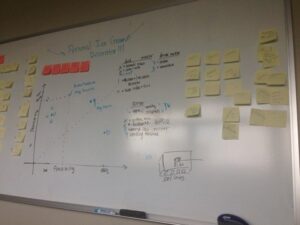
Through our brainstorming, we looked for mutual interests and passions to create an environment where both teammates would equally “love” the idea. A sample of our brainstorming is shown below.
The plot Feasibility vs. Desirability served as a visual tool for narrowing ideas. From the plot, we were able to narrow over 60+ ideas to those which were both most desirable for us and also the most implementable. This process helped us select the ice cream topper as our project.
Background Math
Initial calculations were conducted for required motor torques, however, these calculations were ultimately forfeited, noting that attempting implementation and observing working/non-working results would likely generate more accurate and instant results. Since we had multiple motors available for prototyping, trial-and-error ensured quicker prototyping than an analytical approach.
Logical Structure
The Automatic Ice Cream Topper adds whip cream and up to two toppings based on pre-programmed user parameters. The program will have three pre-programmed users, Kristen, May, and Ezra (for a Cornell themed ice cream display). Variation of parameters between users will be topping choice, topping density, and the use of whipped cream.
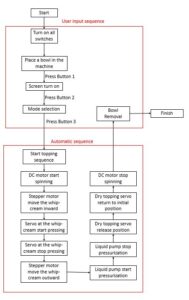
Topping ice cream consists of the following actions, as detailed in Figure 4 below. The sequence contains both manual setup and an automatic sequence.
If the user selected program indicates a whipped cream topping, the program will initiate a whipped cream sequence consisting of linear motion from bowl outer diameter to bowl center via a stepper motor. The linear motion of the whipped cream dispenser combined with the rotational motion of the bowl will combine to create uniform whipped cream distribution on the ice cream. In parallel, a servo will be used to add pressure to the nozzle of the whipped cream for distribution. The system will be designed to interface directly with a 6.5oz bottle of Reddi Wip whip topping. The whip cream will return to the outer diameter (rest position) following distribution.
Following whip cream distribution, topping distribution will begin. If a liquid topping is selected, the liquid topping sequence will begin first (otherwise liquid is bypassed directly to solid topping or end of sequence). The liquid topping distribution is unique in that the liquid topping is expelled from the tubbing without making contact with a valve. By using an electronic air pump, the pump can be controlled via the PIC32, in turn, the pressurization of the liquid topping container can be controlled. Moving from a high pressure (topping container) to a low pressure environment (expelling from tube), liquid topping distribution is accomplished. The air pump is opto-isolated from the PIC32 to prevent excess noise from entering the microcontroller system.
A servo with a rotating turntable releases the solid to via PIC32 PWM commands. Based on user toping density preference, the servo will rotate to the release position for a specified time interval. Toppings will then pass through a stationary tubing, and will distribute evenly over ice cream via the bowl’s rotational motion.
Hardware & Software Tradeoffs
The PIC imposed a constraint on the number of PWM controlled motors that could be implemented (the PIC32 has 5 output compare units). Thus, this limitation poses a constraint on the complexity of our physical design. To allow for additional servos to be implemented, we made the decision to manually generate the PWM signal for the stepper motor via for loop, in turn freeing up an output compare unit to be used for additional topping servos. By implementing PWM via for loop, we greatly reduced the maximum speed of the stepper motor, since a minimum yield time between pulses rose to 1ms. This implementation did not pose restriction to the final design however, since the whip cream required slow linear movement.
Note, in our demoed design we did not end use all five output compare units, but this design decision was made early into integration to allow for scaling up if time permitted the opportunity.
Applicable Standards
Since the whip cream and toppings are being treated as external to our system, we are primarily concerned with the food safety of materials interfacing with the whip cream and toppings. These standards have been set by the FDA.
Existing Technology and Intellectual Property:
The goal of this project was not to produce a patentable product, but to instead provide us with a foundational learning opportunity through a novel concept that we both would enjoy. With that, although there are food 3D printers being developed, it is not believed that we invade on their intellectual space.
Important to note, however, is that our project was designed specifically for Reddi Wip whipped topping, which is a trademarked product. This would need to be addressed if the project was to move forward.
An exciting reality of the Automatic Ice Cream Topper is the price point and learning opportunities for the DIY community. Budding off of DIY 3D printer construction (see here), we view the Automatic Ice Cream Topper catering to a similar audience—teaching the basic use of rotary tools and mechanics, in addition to motor implementation via PWM on the PIC32 resulting in a fun and exciting final product. With many materials scavenged from everyday household items and from Walmart and Amazon, the project is highly implementable.
Hardware Design
Hardware was a significant component to this project. The demoed project contains one brushed DC motor, one stepper motor, two servos, and one air pump, in addition to load bearing support rods, significant wiring, a belt drive, and a user interface.
Base Turntable Design
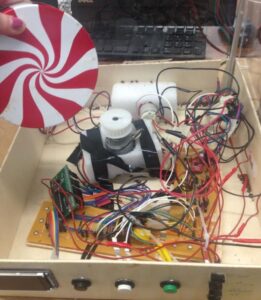
The base turntable design consisted of a low RPM brushed DC motor mounted to the structure’s base. The brushed DC motor was opto-isolated so as to prevent noise from entering the microcontroller circuit. The motor itself was mounted in Styrofoam to damp vibrations it introduced in the system and reduce noise. A set screw gear was used to increase the surface area for attachment between the turntable and the motor. A black plastic sheet, not shown below, (with hole for turntable) covered the mounting electronics for aesthetics and protection from whip cream.
The Styrofoam was securely taped to the base to limit the movement of the turntable structure—this was added during final implementation after noting the bowl seemed to drift off of the rotating turntable.
Whip Cream Mechanisms
The whipped cream mechanisms posed a great amount of difficulty for implementing our project. Although the working mechanism actuating and holding the whipped cream in our demonstration was developed early on in our design, a significant amount of time was invested into developing a freshly-whipped cream option using a nitrous oxide whip cream chamber (see link.)
With a center of mass out of plane, the whip cream dispenser posed difficult to mount when desiring a perfectly vertical orientation. Multiple iterations of introducing stability are shown below.
We determined that by introducing a fixed support at the dispenser’s nozzle we could implement a stable system, which appeared in future iterations. Additionally, a second structural support beam was added to limit tipping of the dispenser.
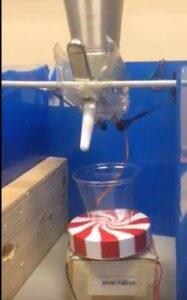
Ultimately, after difficultly in applying enough force to actuate the fresh whip cream dispenser, we determined to move forward with the initial design, as shown below. The servo actuates a lever, which pushes on the whip cream nozzel, actuating the dispenser.
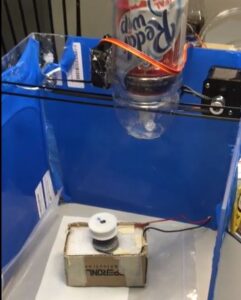
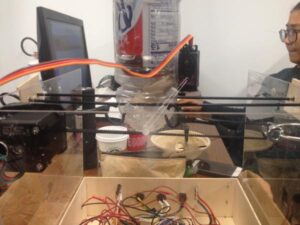
The stepper servo was actuated via an output compare unit and the stepper was controlled via stepper driver 4A988, as shown in the schematic in the appendix. Belt attachment was done via coat hanger pieces and skewers, as can be seen from the back assembly image below.
Solid Topping Dispenser
The solid topping dispenser was constructed out of a spice jar. A servo was mounted inside the cap, which would spin an internal turntable, so as to align with exit tubing when in the actuated position. This is shown below.
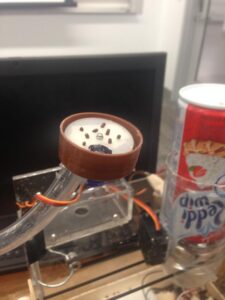
An older implementation had the mounting on top of the container, with the rotating mechanism traveling through the toppings. Direct connection of the release mechanism was preferred due to its cleaner packaging.
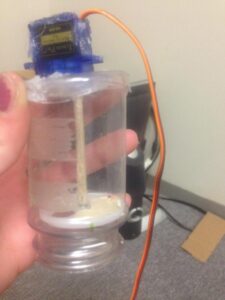
The toping dispenser was then placed in a small acrylic box, and exit tube was oriented towards the bowl location, as shown in Figure 2.
Liquid Topping Dispenser
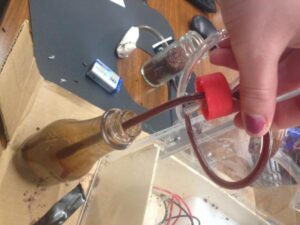
Liquid topping pressurization was accomplished using a fish tank air pump and tubing. The pump was isolated from the microcontroller, after noticing that it’s on state caused the servos to fluctuate. Setting the air pump pin high would result in the chamber of liquid moving into a high pressure state. The air input tube was placed in the area above the liquid in the chamber. Another tube was placed in the fudge. In a high pressure state, the fudge would move though the tube and out, in a pursuit of a lower pressure state. This setup is shown in the image below.
User Interface
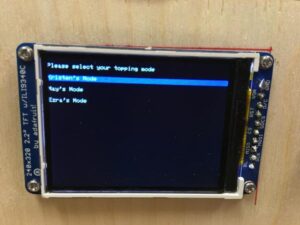
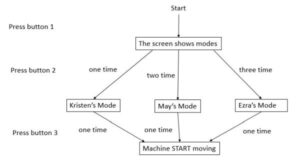
The user interface consisted of a TFT, three buttons, and on-off switches that could be utilized for turning off motors and the air pump, which was highly valuable for testing. The first button has the modes appear on the screen. The second button allows the user to move between modes, and the third button selects the mode. The screen will display “start” and “finish” functionality as well.
Software Design
Overview of Software & State Machine
As said earlier, we have pre-programmed three users in the machine. Those users have different taste of ice-cream toppings. Before the machine run automatically, a user has to choose mode of operation from three buttons, one to three respectively.

Setting the buttons in the code, we enable internal pulldown resistor from the code and set pin RA2, RA3, and RA4 as input to our microcontroller. The program will receive the signal from those buttons at the begging before the machine run automatically.
After any user press the button one (black button) turning on the selection screen, the screen will show the three user options how to decorate a person ice-cream as Figure 11.
The white button use for mode selection. Every time when a user press the white button, the blue stripe in the screen will move downward one by one and return to the top again. After a user select a mode, press the green button. The short sentence will be shown on the display. The screen will show that screen until the topping filling finish.
For the buttons, we implement the state machine on our code as shown below.
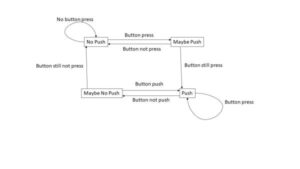
To set up all the components in our project, we have to set the PWM of two servos for press the whip-cream and to spin the lid of dry topping. We open one timer and two output compare (OC2 and OC3) for both of them individually and set them as output. We set the initial PWM of two motors as in the code to set the first position of the servos. The challenge thing is to set the PWM of the servo to result in the enough force to pull the rod for whip-cream and fully open the lid of the dry topping. All other components such as the DC motor, the pump, and the stepper motor controller (4A988) are set as output with high and low signal from the PIC32.
Every time we order the ice-cream with toppings. After the staff scoop the ice-cream, they will begin with whip-cream, liquid syrup, and dry topping. In our mechanism, we set each process run follow each other by limiting the time.
We start with the DC motor which will continue spinning from pin RB3 until we got the completed topping items on the ice-cream. The stepper motor will move linearly to the left side which the direction is set as LOW at pin RB15. The step of the stepper motor is from for loop in the code toggle high and low. While the stepper motor is working, the servo of the whip cream also press the tip of the whip-cream container. We use the function ‘SetPulseOCX(pwm_start, pwm_stop)’ to set the blade’s angle of the servo. The stepper motor is moving back to the initial position after a servo of whip-cream stop. The direction of the stepper motor controller is set to HIGH.
The pump start running after the stepper motor stop right away. Set bit RB8 to start and clear bit RB8 to stop the pump. At last, the servo of the dry topping will spin at the right angle which we measure to flow the sprinkle decorate the ice-cream on top of the syrup and whip cream.
At each step of each motor, servo, and pump, we write delay time to set the proportion of each topping we like.
Anyone can build one’s own code from reading this. Moreover, they can add more toppings or change the components depend on which topping mechanism will be operated in this machine.
Results
Overall, we the implementation of our design was successful. Whip cream, liquid toppings, solid toppings, and the DC motor turntable worked for our final demo.
In this section we will primarily speak to usability by our team and others. It’s important to note, that we had difficulty on the first run through of our project demonstration. When moving our device, our solid topping dispenser and whip cream dispenser deviated from their initial positions. This resulted in an undesired performance (no sprinkles expelling and excessive whip cream). Moving forward, we would include additional visual cues to indicate calibration and starting positions. This would prove useful not just for our team, but for other’s using our device in the future.
Aesthetically, we are very excited about our design, and through the addition of additional visual cues for user calibration, we think this could be a great project for the maker and DIY community.
In regards to quantitative analysis, when calibrated we received near ideal results – timing our procedure aligned with 1 second accuracy to the programmed design.
The one aspect of our design that broke this idealized timing was the dripping chocolate pump following pressurized release. We believe this is due to the chamber’s slow depressurization. As the pressurization remains, there is still a fluid flow, introducing inaccuracy in our results. Dripping would last between 3 and 45 seconds following the pump being set low (a slow lingering drip). This value was highly dependent on the angle of the tubing. With the tubing angled upward, the lingering drip time would move to 0.
Safety of electronic components was ensured in our design with the protective acrylic side panels of the structure and plastic covering the electronic components in the base.
Conclusions
According from our demonstration, we appreciate with the result that every devices work well together. Our project have mechanical, electrical, and software parts combining together. We didn’t meet our beginning plan because we plan to have two dry toppings. However, we have a liquid syrup instead of another dry topping. The whip-cream pressing is the most challenge part because we have to set the force of pressing by setting the PWM of the servo blade’s position which that servo has to have high torque to pull the rod. For further implement, we can implement more variety toppings for the hardware and can write the manual mode to select each topping or set the new user mode after programmed the microcontroller. We can combine the power supply to decrease the budget.
The deisgn conformed to the applicable standards – all components interacting with food were deemed food safe.
Code implemented was primarily result of our team’s lab 4, which stemed from the code on the 4760 site”.
We were not reverse engineering a design – this was primarily from scratch.
We did not sign any NDAs.
In our design, we reuse the lab 4 circuit for running DC motor and liquid pump with the opto-isolators. Stepper motor and servos are new components for us to deal with in this final project. The Mechanical part, we design the movement of whip-cream linearly as the 3D printing machine. However, we have only x-axis.
In our project, we didn’t deal with any patent or trademarks issues and didn’t see any legal restriction.
From the IEEE Code of Ethics, there is no part in this project harm the member of a team or anyone else. We implement our hardware and write our code by our own. We design the hardware and buy every components by our own. We used sharp tools and devices such as drill, saw, and screw driver with cautious. We are careful of electricity by not touching with wet hand. We clean the working area every time we finish it. We didn’t copy the code from anywhere. Because our project is used many different voltage range, we check the required voltage of the component every time before plug in the power supply preventing that part become broken or can’t be used any longer. Every mechanical part we did by ourselves. We won’t sell our implementation to elsewhere. There are no other students work for us. Sometimes we ask for help from Bruce Land and TAs of this course for more information or clarification. This machine won’t affect negative effect to anyone. We didn’t discriminate any gender, race, or religion. We treat everyone fairly with respect.
In our conclusion part, we discussed that this project can be extended in more advanced and can be improved better. We believe that we gain lots of experience and knowledge from this project. The result from this project can represent our work force.
Source: Automated Ice Cream Topper
