A small PCB allows for the out-of-circuit programming of 18 & 28 pin SOIC PIC Microcontrollers from either an ICSP programmer or ZIF socket.
A recent article in a popular electronics magazine presented a small printed circuit board for programming 18-pin SOIC PICs from a ZIF socket. Looking at the design I knew instinctively that it would be unusable with the set-ups I use, which is a shame, as I’d just taken delivery of two 16F88 SOIC PIC samples from Microchip and was scratching my head regarding whether I should put ICSP headers on the target boards or not.
I sat down and thought about what would really be useful and came up with the design presented here. It provides a small board which can be cut in two and used in two different ways. One part provides an ICSP header and locations for both 18 & 28 pin SOIC PICs, and together with the re-combined cut-off, provides programming from a ZIF socket programmer such as the PICStart plus.
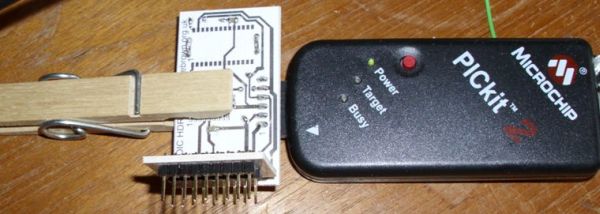
In the photographs I have shown the re-combined unit, which may be used for programming from either ICSP or ZIF. Normally, I would expect that you would choose whichever type suits your programmer. I wanted to show that both methods work.
After producing the PCB as in the above photo, you should drill all holes. I use 1mm for the 0.1 inch headers and DIL ‘plug’ and 0.8mm for the link and guide wire holes. The board can then be cut along the dotted line I’ve thoughtfully provided for you ![]()
Next I soldered the only 2 SMD components actually mounted – the 100nF capacitors, before soldering in the links and SOIC guide wires. I followed this by soldering the right-angle 2-row header pins joining the two pieces of PCB together as shown in the 1st photo. A small tip iron was used to solder these pins.
Once upon a time, there was an engineer called Joe. He was looking for a suitable method of clamping a small SOIC chip firmly but gently onto a small printed circuit.
On the table were 5 clips. Joe was very keen to try out his latest gizmo, but had to choose. Which one would it be?
He picked up the small black metal clip, but it was too strong and distorted the poor little PIC’s legs. “This clip is too strong!” he exclaimed.
Next he picked up the shiny round clip, but it was not the right shape at all. “This clip is useless!” he exclaimed.
Next he picked the oblong flat plastic clip, but it tipped the poor little PIC up. “This clip looked promising, but so does pie crust!” he exclaimed.
That left the two humble clothes pegs. One had been made in a great big dirty factory in China and was made of white plastic. The other was made of wood and Joe had bought it off a lovely lady at the door along with some lucky heather and some ‘virility’ spells. Both pegs were tried with his gizmo and were perfect, but Joe preferred the ‘organic’ option and decided on the wooden peg. “This clip is just right!” he exclaimed.
Joe was very tired by this time, so he went upstairs to his bedroom to try out the virility spells. Much later he connected up his gizmo and everything worked!
Using the unit
A word of warning. If you decide on using a metal clip, ensure this does not short-circuit the links on the rear of the board.
For more detail: Versatile SOIC PIC Programming Header using PIC18F88