This project has been adapted from an experiment by John Ridley Stroop, who published his work in 1935. Basically it is a “trick.” It is a trick in that you are required to answer a question at a “second level of thinking.”
In our test we have three tri-coloured LEDs and below each is a push-button.
When a LED illuminates, your immediate response is to push the button below the LED.
But this is not the requirement.
The LED will illuminate as one of three colours. Red, Orange or Green.
You are required to push the first button for red, the middle button for orange and the third button for green.
In other words you have to divorce yourself from the urge to push the closest push-button and work on the colour-requirement.
Obviously you will become more-adept at this over a period of time but the most important results will come from the first few attempts.
That’s why it will be interesting to have your friends take a test.
The “Stroop effect” has been used to investigate the psychological capacities of a person. In fact it introduces capabilities that have never been investigated before. Although I don’t believe in anything to do with psychology, this test is considered to measure selective attention, cognitive flexibility and processing speed. About the only word I understand is “processing speed” and that’s how our game works. It runs for 20 seconds and gives a score on the 7-segment display.
You are required to get as many matches as possible in 20 seconds.
The game comes on by displaying the letters “S-t-r-o-o-P” on the 7-segment display and then sits ready for your first try.
The single digit display can actually display up to 99 as it flashes the tens digit first and then the units. It repeats this three times and turns off, ready for the second game. Push any button to start.
The CIRCUIT
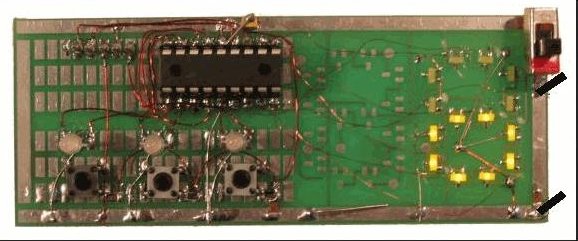
The circuit consists of three push-buttons, three tri-coloured LEDs and a 7-segment display made from individual LEDs. All the “timing,” outputting and switch-detection is done in the PIC16F628 microcontroller.
The board contains 5 pins for In-Circuit Programming so the program can be changed and modified at any time.
The resistor values for the LEDs have been chosen to get the maximum brightness, using the 25mA available from each output.
The 7-segment display is made up of 14 individual LEDs, with two LEDs in series for each segment. This gives a voltage drop of approx 3.4v and a 22R current-limit resistor is needed.
RB7 is used for the switch inputs and this is also used as the data line when programming. To allow the data to enter the chip while programming, a 2k2 resistor has been added as the 100n upsets the data line if it is connected directly to the programming pin.
The resistor values for the switches have been chosen to separate the timing for each switch and make it easy to recognise in the program.
CONSTRUCTION
You can build the circuit on any type of Proto board or design your own PC board.
Use 3 – AAA cells and not button cells as button cells do not have low enough impedance to keep the voltage high when all the LEDs are illuminated and the chip hic-cups and flashes the display.

The PROGRAM
The program has been kept simple to make it easy to understand. Very few Boolean expressions have been used as they take a lot of understanding and “working out” as to the the outcome of the instruction.
We note that a simpler program was written in “C” and it failed to compile into the 1024 memory locations, so I don’t know how the inefficiency of higher-level programming would relate to this project.
In any case, we have used the 35 instructions that come with the chip and this makes fault-finding very easy as you know the fault lies in the code you have generated.
As long as you only introduce a small amount of code at a time, you will be able to gradually get a program up-and-running.
The interesting feature of the program is the overall timing. The micro is counting in the background via timer1 and this consists of two files (registers) capable of counting to 65,536. A prescaler has been added to increase the count to 524,288. This is about half a second.
When the timer overflows, the program-execution is interrupted and the micro goes to location 4 (called the Interrupt location where it finds an instruction to go to a sub-routine called: “isr.” At isr, another file is decremented (_20Secs) thirty-nine times and this produces the 20 seconds duration for each game.
(Point to remember: Timer0 does not produce a long delay, so Timer1 has to be used).
The buttons are detected by charging the 100n and waiting 20mS to see if the capacitor has discharged. We know the cap will discharge in less than 8mS if a button is pushed.
The program now knows if a button is pushed or not.
It makes a second pass, if a button is pushed, to work out which button has been pressed.
The first button will discharge the cap in less than 2mS, the second button will discharge the cap in less than 4mS and the third button will discharge the cap in less than 8mS.
The program now performs a 1mS loop, looking for a LOW on the detecting pin.
It will exit with a value of 1-8.
The program now decrements the count file and and if it is zero after one or two decrements, button 1 has been pressed. It continues with decrements until it finds the button.
For more detail: Stroop Game using PIC16F628 Microcontroller