About a year ago I started on a project to make a temperature controlled nightlight. I was inspired by seeing these lovely LED lamps styled as mushrooms growing out of pieces of wood. Those mushrooms were made out of glass, which was somewhat beyond my skills. However I then saw some had used translucent sculpey to make mushroom nightlights on instructables. So with that discovery it seemed like it would be rather simple to do…
The first job was to solder up a three colour (RGB) LED (a super bright one from oomlout):
I then covered the LED in translucent Fimo:
As Fimo only needs to be heated to about 100C to set it’s ok to do this, as it won’t hurt the LED. Also LEDs don’t normally give out much heat, so covering them is ok. Of course this is a relatively low power (though quite bright) LED as well which helps.
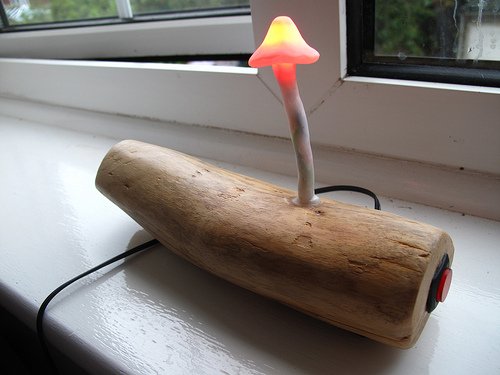
I found a branch on the way home from work, which I cut up and sanded down. This formed the base for the mushroom:
As you can see I also opted for a chunky on/off button, in the style of the original mushroom lamps.
Next I put a small electronics project box into the bottom of the piece of wood and made space for a slide switch and power socket
At the time I decided to try to use a Picaxe 08m chip to control the LED and read from a temperature sensor. The Picaxe 08m has a native function to read the temperature from a DS18B20 One Wire digital temperature sensor. It also had just about enough inputs and outputs to handle controller the three colors of the LED and reading from a slide switch (to make it switch between temperature display and plain nightlight). The individual chips were also pretty cheap, so it seemed like a good plan at the time.
However the size of the circuit and number of components I needed to solder was all a bit too much for me:
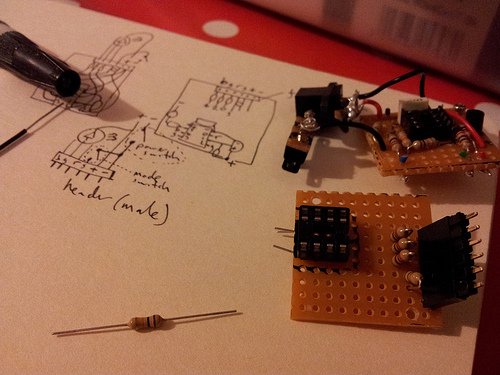
Eventually after much debugging I was able to get some things working – e.g. controlling the colour of the LED, but the temperature sensor just wouldn’t cooperate and always gave a high reading. I also managed to get through a few sensors due to mis-wiring them!
So I decided it was time to start again with the circuit. I bought a better soldering iron (a not too expensive digital temperature controlled one) and started on a new circuit:
For more detail: Arduino powered temperature sensing RGB LED nightlight using PICaxe