A few months ago I wrote a blog post about the chipKIT Basic I/O Shield and used Analog RBG Strips to demonstrate the the open drain FETs. 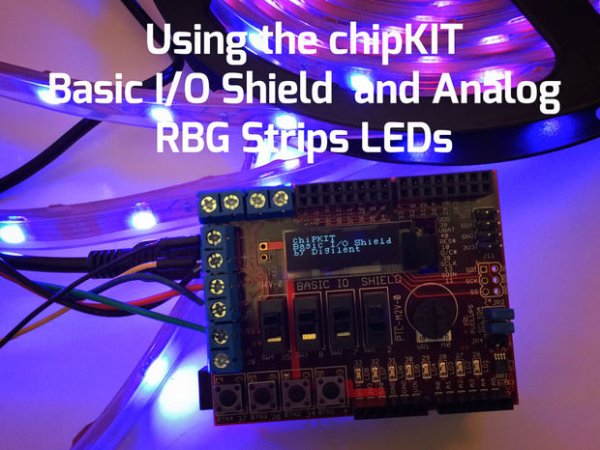
This post is to give details on how to wire up the strip LEDs to the I/O Shield.
You should already know how to program MPIDE before using this Instructable.
Step 1: Gather Materials
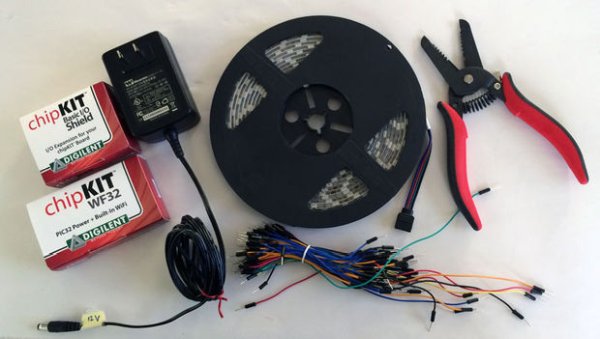
Gather your materials:
- Strip of RGB LEDs (12V) usually, you can get them fairly cheaply off of ebay
- chipKIT Microcontroller– in my case I chose the WF32, but the Basic I/O Shield will work with almost every chipKIT platform with compatible headers (such as the Max32, UC32 or the Uno32).
- USB Mini cable to program the chipKIT
- computer running MPIDE
- chipKIT Basic I/O Shield
- A 12V power supply with at least 2.5A – the one displayed is 3A and I borrowed it off of a battery charger for one of my coworkers.
- Female barrel jack adapter and a screw terminal (OPTIONAL)
- Wire Strippers
- screwdriver that can fit the screw terminals of the Basic I/O Shield
- Breadboard wire or hookup wire to connect your LEDs.
Step 2: How Many Inputs Does Your Strip of LEDs Have?
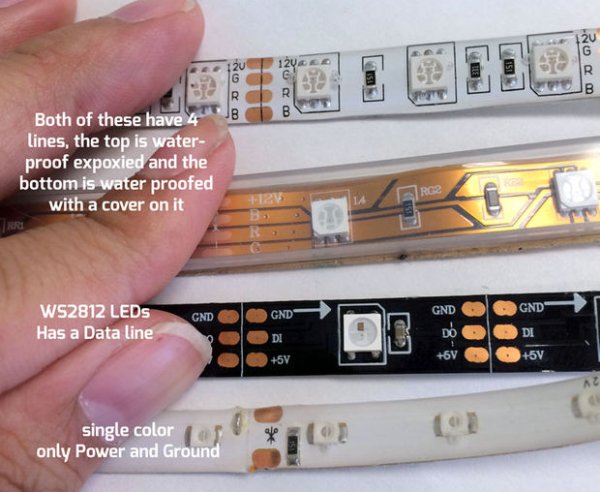
RGB LEDs are fairly easy to get a hold of, but there are many different options out there.
The first thing you should check for is that you have 4 inputs (a R, G, B and a power) into the LED strip.
If you have only 2 inputs then you have a single color strip.
If you have 3 inputs, most likely you have a WS2811/WS812 strip (addressable LEDs).
The top 2 in the photo are both RGB LEDs.
You can see that although in different order, they have 4 inputs and have R, G, and B and a power line.
Step 3: What Will It Take to Power Your Strip?
Once you establish that you have the correct LEDs, then it’s time to think about powering the strip.
There are a couple of different ways to power your strip. In the video here, I used a variable power supply. However, most people will choose to use either a wall-supply or batteries. Either way, you will need to choose a power supply that has enough voltage and current to run them.
What are we powering?
RGB LEDs are basically 3 LEDs in one package (the ones that I have are 5050 SMD).
Each group of 3 LEDs shares 3 resistors for each color group.
The LEDs I am using are common anode.
Translates to meaning that all of the LEDs share a common + power source, in this case is 12V.
So, a 12V power supply is needed, but we still need to address current.
LEDs depend mostly on current to light up.
The first is to understand how the different ways you wire up an LED will effect it’s current consumption.
If you are unfamiliar with LEDs in general, I would recommend this excellent tutorial on Instructables here.
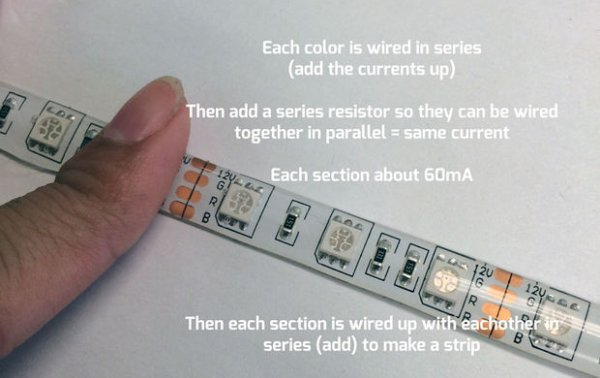
To understand how the strip is put together, I like to break it down to it’s individual parts.
R, G and B LED together = 1 LED package
Three of these LEDs together + 3 resistors = a section.
X # of sections wired together = a strip
LEDs in Series:
In these LEDs, each group of LEDs, the R, the G, and the B are all tied in series with each other.
For LEDs in series, you add up the current draw of each series element. Example if you have a LED that is drawing 15mA and wire it in series with another LED that is drawing 10mA, then you will have a total current draw of 25mA.
In the case of these LEDs, each LED color family is tied together in series.
This is the Red LEDs are wired together.
Each LED is roughly 18mA and since you add current draw together when LEDs are wired in series, then you will get 18mA *3= 54mA for R.
The same goes for green. This is also roughly 18mA and 3 of them are in series so 18mA*3= 54mA for G.
Blue is slightly higher current, so it is roughly 20mA per LED and 3 of them in series together = 20mA *3 = 60mA
LEDs in Parallel:
If you wire up LEDs in parallel, then they will use the same amount of current.
This means that LEDs in parallel = the same current (versus adding like in series).
Example, if you have a LED that is using 15mA and you wire it in parallel with another LED that uses 15mA, then your total current draw is 15mA. However, LEDs in parallel should always have a matched series resistor in order to make each branch of the circuit even with each other. Theoretically if you have two LEDs that have identical current draw then you should be able to wire them up with each other without a resistor. However, even inside of the same manufacturer there are slight variations and it really is best to always have a matched series resistor if you are putting LEDs in parallel.
Which is why in the case of these LEDs–
All three colors, R, G, and B are wired together in parallel.
There is a series resistor in order to make each color match current draw.
Sine Blue is the highest current draw to approximately 60mA, then Red and Green have resistors that make 60mA feasible for their branches.
For a single section of the LED strip we are looking at approximately 60mA of current.
Calculating the strip:
The strip is sections wired in series with each other.
Since LEDs in series we add the current together… then all you need to know is how many sections you have.
In my case, I have a 5 meter strip.
Each meter has 20 sections— 5 meter x 20 sections = 100 sections total
Each section draws 60mA or .6A
So, if all of the LEDs are on at the same exact time, full brightness, then I will need at most …
100 sections *.6A = 6A
So, a power supply that has up to 6A will cover the worse case scenario.
Do I really need that?
Now a real question to ask… do I really need all 6A for my LED strip?
Probably not, mostly because it will be very rare that all LEDs will be on at full brightness at the same time.
However, I did look for the highest current, 12V power supply I could find, and found this one, a 12V, 3A supply, which is what I ended up using.
Step 4: ChipKIT Basic I/O Shield, Connecting the LEDs
In the blog post mentioned, I talk about the main reason why I like the chipKIT Basic I/O Shield is for the open drain FET outputs.
These with a separate section that allows an external power supply is what makes the chipKIT Basic I/O Shield perfect for these LEDs (although you can achieve something similar using the Pmod OD1 (Peripheral Module Open Drain) instead of the entire I/O Shield).
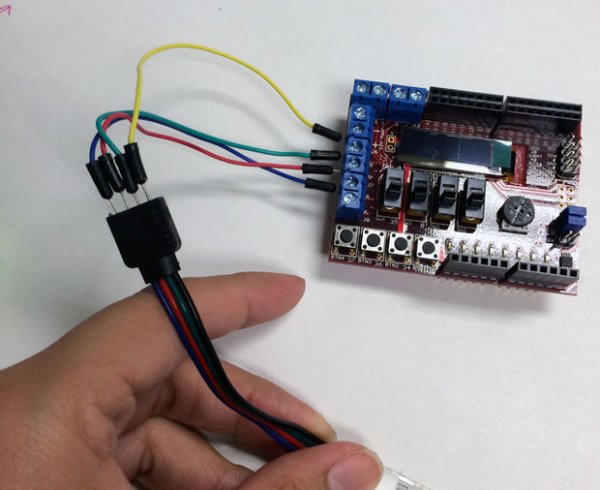
To get started, we will need to connect the LEDs the screw terminals of the I/O shield (5, 3, and 9 ) using a screwdriver and breadboard wires to connect the two.
In my photo I used Yellow for 12V– connected that to the screw terminal marked 12V
Green for the G on the LED Strip= Pin 5
Red for the R on the LED Strip = Pin 3
Blue for the B on the LED Strip = Pin 9
Depending on your LED strip depends on how easy this portion can be.
You may need to connect to a breadboard first, or you may be able to take the LED wire and put it directly to the screw terminal. In my case I had a female adapter on the end of my strip that I could plug the ends of the breadboard wire into the corresponding sockets.
Almost done wiring except for needing power!
Step 5: Adding Power!
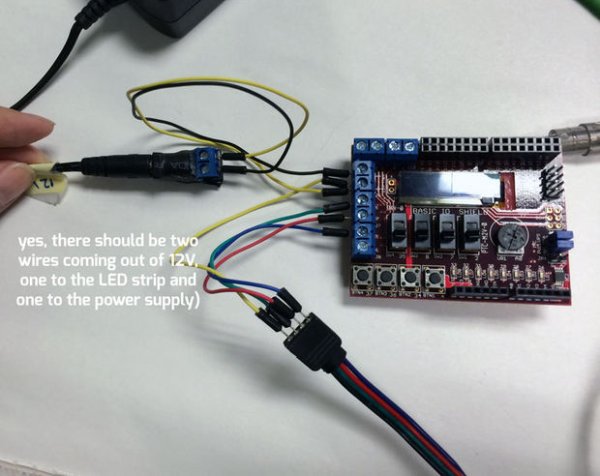
We need to add 12V + and GND to the I/O Shield in order to power the LEDs.
There are a few ways to do this, but in essence you need to have 2 wires that are tied to both power rails.
This can be achieved a few ways with a wall power supply.
The first is to cut off the barrel connector and to use the bare wire directly.
This is great if you have the option to use a wall supply in this manner (you have extra, don’t use it anymore etc).
I didn’t because I borrowed the connector from another person’s project at the Digilent MakerSpace and I need to return it in tact, so … I made an adapter (you can learn how I did it by looking at this instructable).
Using the screw terminals on my adapter for power and ground, connect the wires to the 12V on the I/O Shield and the GND on the I/O Shield (there will be 2 wires coming out of the 12V).
Step 6: Connect I/O Shield to Your ChipKIT Board
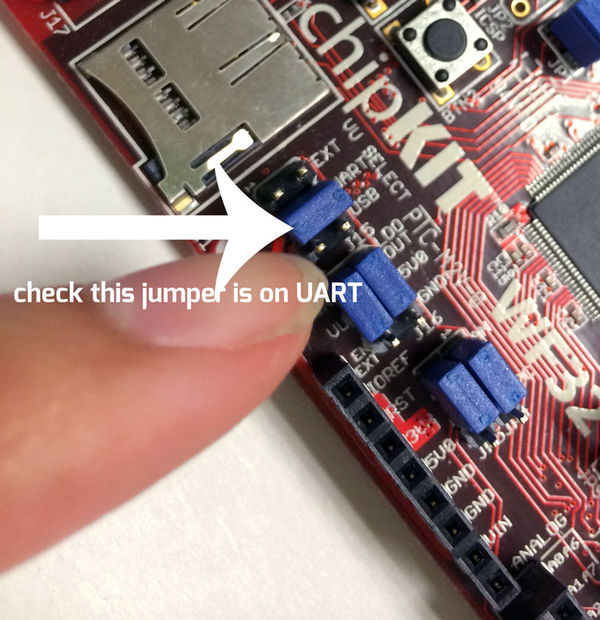
Now that you have the LEDs wired up completely, you can connect it to your chipKIT board.
I am using the WF32, but the steps should be the same for all of the other chipKIT compatible boards.
Ensure that your board is in UART mode (programmable mode).
Gently plug the I/O Shield into the pins of the chipKIT, matching the pins. It should fit very naturally. You should not have to force the chipKIT to accept the pins of the I/O Shield. If it doesn’t feel like it will easily slide in, then check to see if all of the pins are in alignment.
(there may be 2 extra pins on the top row of both sides, this was the change in R3 Arduino Shield standard that some of the chipKIT boards incorporated).
Step 7: Program Your ChipKIT for the LED Demo Code
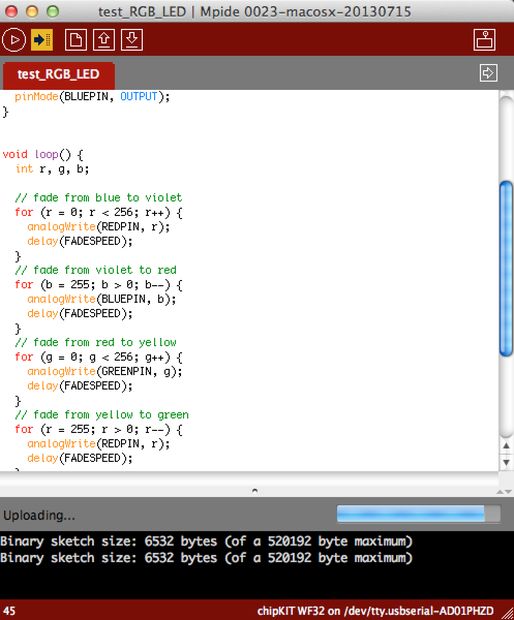
Connect your chipKIT via USB to your computer to program the demo code.
If you haven’t used MPIDE before, or are unfamiliar with the steps, please read this tutorial here first.
Copy and paste the following sketch and upload (alternatively you can use the one attached to this step):
/*test your analog RGB strip*/
#define REDPIN 5 //pin wired to red LEDs
#define GREENPIN 3 //pin wired to Green
#define BLUEPIN 9 //pin wired to Blue
#define FADESPEED 5 // make this higher to slow down
void setup() {
pinMode(REDPIN, OUTPUT);
pinMode(GREENPIN, OUTPUT);
pinMode(BLUEPIN, OUTPUT); }
void loop() {
int r, g, b;
// fade from blue to violet
for (r = 0; r < 256; r++) {
analogWrite(REDPIN, r);
delay(FADESPEED); }
// fade from violet to red
for (b = 255; b > 0; b–) {
analogWrite(BLUEPIN, b);
delay(FADESPEED); }
// fade from red to yellow
for (g = 0; g < 256; g++) {
analogWrite(GREENPIN, g);
delay(FADESPEED); }
// fade from yellow to green
for (r = 255; r > 0; r–) {
analogWrite(REDPIN, r);
delay(FADESPEED); }
// fade from green to teal
for (b = 0; b < 256; b++) {
analogWrite(BLUEPIN, b);
delay(FADESPEED); }
// fade from teal to blue
for (g = 255; g > 0; g–) {
analogWrite(GREENPIN, g);
delay(FADESPEED);
}
}

Step 8: Power the LEDs and Watch!
With the chipKIT still plugged into USB, you can now add the Power to the LEDs.
Plug in the power supply. In my case, I had to add plugging in the barrel jack.
Right away you should see the LEDs fading different colors.
You can try out the other example on the blog post, combining switches with the RGB strip.

Step 9: Removing USB Cable and Powering Off Wall Jack Only

If you are using the WF32… this particular chipKIT has the ability to go up to 4A of current on it’s Vin output. Since the power supply only goes up to 3A, then there isn’t anything to worry about.
This is handy because you may want to remove the USB cable all together.
To do this, you will need to take the I/O Shield off and then move the jumper you had on UART to EXT (external).
This means you can no longer change the program on your chipKIT (if you want to reprogram it, you will need to move it back to UART).
Then, plug in the barrel jack into the barrel jack on the chipKIT WF32.
Then wire up the 12V on the I/O shield over the VIN on the chipKIT and GND to GND (in my case this meant taking it out of the adapter and then moving it over to the pins on the WF32).
This should get you prepared to do other projects using the chipKIT WF32 + Analog RGB Strips!
About The Author
Ibrar Ayyub
I am an experienced technical writer holding a Master's degree in computer science from BZU Multan, Pakistan University. With a background spanning various industries, particularly in home automation and engineering, I have honed my skills in crafting clear and concise content. Proficient in leveraging infographics and diagrams, I strive to simplify complex concepts for readers. My strength lies in thorough research and presenting information in a structured and logical format.
Follow Us:LinkedinTwitter