A while ago I purchased a batch of 18F6620 TQFP PIC Microcontrollers at a ridiculously low price. The barrier to use of TQFP packages is, of course mounting these SMD packages effectively alongside the ‘normal’ components enthusiasts tend to use. At the time I set about and designed a header, and test motherboard for these chips, and although my header was successful, repeatability was variable using the rather primitive facilities I have for making printed circuit boards.
Just recently, a correspondent from The Netherlands drew my attention to the VOTI website, and I was intrigued to see 64-pin TQFP-to-64pin DIL headers advertised for E3.73. (just under 4 Euros) I ordered a couple of these and some other bits and pieces, and just after the Easter weekend the parcel arrived.
The quality of these, and the other headers I ordered is excellent, and the photos on the VOTI site do not do the PCBs justice. All pads are gold plated, and a thin but effective solder mask ensures no solder creep.
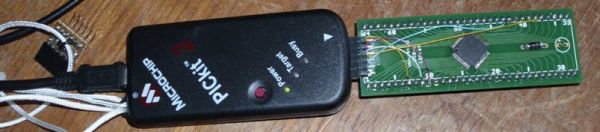
I set about fitting one of my 18F6620 PICs to the header, together with jury-rigged ICSP header and successfully programmed the unit using my PICKit 2 programmer.
I am so pleased with this unit, I will be ordering more, and in an effort to guide those who may be hesitant in dipping their toes into TQFP PICs, I have documented my experience here.
You will need, as well as the header, 5 X 100nF type 0805 SMD capacitors, a PIC, and a six-pin 0.1inch pin header. This will enable you to program the PIC. To plug it into a breadboard or PCB socket, you will need 2 X 32pin headers, I used vintage (NOS) Cambion pins, but VOTI can supply suitable pins also.
You should be aware that both SMD capacitor and resistor kits are available on eBay for a few pounds.(GBP)
Assembly
First of all, rid yourself of fears regarding soldering the PIC. I used a 25Watt Antex iron with a small chisel bit. You will also need a good-quality solder braid.
I give the steps I used below (I always note my sequence of actions. OCD? No, just useful information in the event of failure)
You may wish to refer to the pin diagram for the PIC18F6620 whilst following the sequence below.
For more detail: Ultra-easy use of 64-pin TQFP PIC18F6620 using TQFP-to-DIP PCB from VOTI