


Summary of PlayPIC Tutorial Board for the PIC16F84A Microcontroller
This tutorial board utilizes the PIC16F84A microcontroller to introduce beginners to microcontroller programming. It includes eight LEDs, a 7-segment display, an LCD, and five push buttons. The board supports in-circuit programming (ICP) for easy reprogramming without removing the chip. Control is managed via switches that toggle power, reset the system, or enable specific components like the LCD and LEDs. Dip switches configure input/output connections and interrupt debouncing features for enhanced functionality.Parts used in the PlayPIC Tutorial Board:
- PIC16F84A microcontroller
- Eight single LEDs
- LED9 indicator
- 7-segment display
- LCD display
- Five push buttons (S2 through S9)
- In-circuit-programming (ICP) header
- SW1 dip switch
- SW2 dip switch
- Buzzer
This is a new design of a tutorial board based on the popular PIC16F84A microcontroller. It features eight single leds, a 7-segment display, an LCD display and five push buttons. It is an ideal solution for the beginner to take his/her first programming steps in the world of microcontrollers. Having an in-circuit-programming (ICP) header, it can be easily reprogrammed without unplugging the microcontroller each time, provided that the programmer also supports this feature (like OziPic'er).
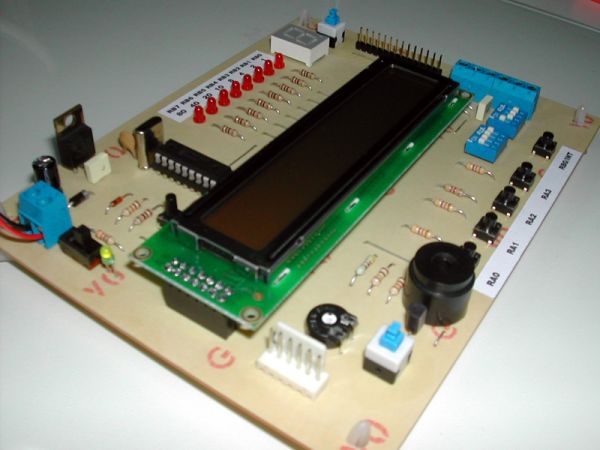
Feature Description
- S1 switches the board on and off. When on, the indicator led LED9 is lit.
- S2 resets the microcontroller.
- S8 switches the LCD display on and off
- S9 switches the eight individual leds AND the 7-segment display on and off.
- Push buttons S3 to S6 correspond to RA0-RA3 inputs. They are enabled or disabled by the SW2 dip switch.
- The SW1 dip switch enables or disables the following features :
1. Connects RB0 (used as output) to LED1.
2. Connects RB0 (used as interrupt input) to S7.
3. Enables the debouncing circuit for interrupt switch S7.
4. Connects RB0 (used as output) to the buzzer.
This dip switch must be either 1000 or 0100 or 0110 or 0001.
For more detail: PlayPIC Tutorial Board for the PIC16F84A Microcontroller
- What is the main purpose of this tutorial board?
It serves as an ideal solution for beginners to take their first programming steps in the world of microcontrollers. - Can the microcontroller be reprogrammed without unplugging it?
Yes, the board has an in-circuit-programming header that allows reprogramming without unplugging if the programmer supports this feature. - Which switch controls the power on and off function?
S1 switches the board on and off, lighting LED9 when powered. - How are the push buttons S3 to S6 enabled or disabled?
They are enabled or disabled by the SW2 dip switch. - What configurations are required for the SW1 dip switch?
The SW1 dip switch must be set to 1000, 0100, 0110, or 0001 to enable specific features. - What happens when S8 is pressed?
S8 switches the LCD display on and off. - Which component connects to RB0 when the buzzer feature is active?
RB0 connects to the buzzer when configured as an output via the SW1 dip switch. - Does the board include a 7-segment display?
Yes, the board features a 7-segment display along with eight individual LEDs.
Related projects
PIC Stepper Motor Controller using PIC16F84A with Proteus Simulation
Introduction Stepper motors are widely used in embedded systems and DIY electronics projects where precise position control is required. This PIC Stepper...
Programmers & ICSP · PIC16F84APIC Musical Doorbell using PIC16F84A with Proteus Simulation
IntroductionThis microcontroller project demonstrates a musical doorbell built around a PIC16F84A and a simple piezo sounder.Using two push buttons, the system allows...
Beginner Tutorials · PIC16C84Exploring the World of PIC Microcontrollers: An Architectural Overview
A Peripheral Interface Microcontroller (PIC), developed by General Instruments Microcontrollers in 1993, operates under software control and is programmed to execute various...
Development Boards & Kits · PIC18F4520Voltage Measurement with A PIC Microcontroller
Voltage Measurement with PIC Microcontroller articulates a methodical framework for facilitating analog voltage measurement using the PIC18F4520, an advanced member of Microchip’s...
Development Boards & KitsUltra-Low Power: Microcontroller Standby Current to 130uA with OPEnS Power Control Board
At the OPEnS Lab, a key focus for our projects is achieving exceptionally long battery life. This was particularly true for the...
Development Boards & KitsAn Integrated Approach to Developing Applications with Microchip PIC Microcontrollers
1. Introduction In our daily lives, a variety of devices such as telephones, household appliances, and cars incorporate "smart" electronics, typically manifested...

Ibrar Ayyub
I am an experienced technical writer holding a Master's degree in computer science from BZU Multan, Pakistan University. With a background spanning various industries, particularly in home automation and engineering, I have honed my skills in crafting clear and concise content. Proficient in leveraging infographics and diagrams, I strive to simplify complex concepts for readers. My strength lies in thorough...