
This post provides the PWM code for PIC12F675 microcontroller using timer0. There are many uses for PWM signal, e-g you can control dc motor speed using PWM. Timer0 is initialized in the start of the main function and using timer0 interrupts, PWM is generated.
This code is written in C language using MPLAB with HI-TECH C compiler. You can download this code from the ‘Downloads‘ section at the bottom of this page.
It is assumed that you know how to configure timer0 of PIC12F675 microcontroller. If you don’t then please read this page first, before proceeding with this article.
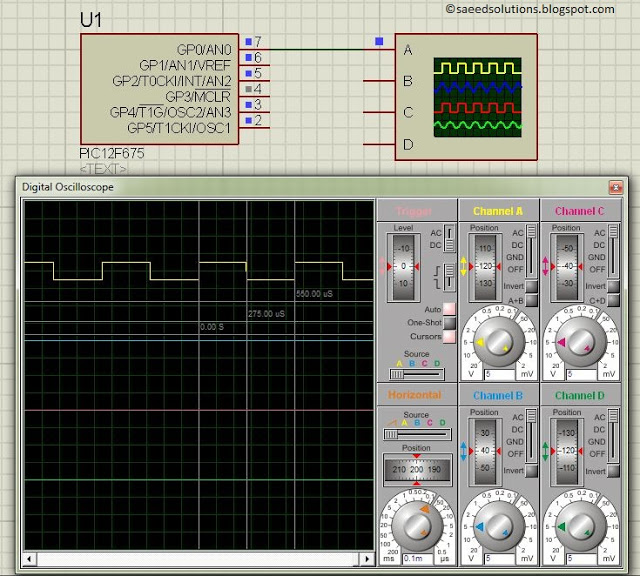
The result of simulating the code in Proteus is shown below.
Here PIC12F675 is running on 4MHz internal oscillator. A PWM wave of 1.8KHz frequency with 50% duty cycle is being generated as shown in the above figure. GP0 pin is being used as PWM_PIN, which you can easily change in the code. Also, you can change PWM duty cycle in the code at any time as well.
Code
The code used to initialize PWM is shown below.
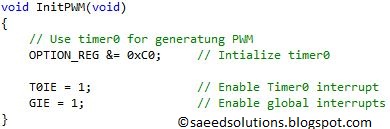
In this InitPWM() function, timer0 is initialized with it’s interrupts enabled. Rest of the PWM generation code is written inside timer0 interrupt service routine code, which is shown below.
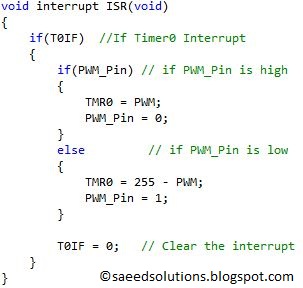
Whenever timer0 expires and an interrupt is generated, then interrupt ISR() function is executed. In this function, depending upon the state of the PWM_PIN (i-e if it is high or low), timer0 register is loaded with appropriate value. There is a global variable with the name of PWM defined in the code. This variable can have a value from 0 (0% duty cycle) to 255 (100% duty cycle). You can change PWM variable in the main function and it will automatically change the duty cycle of the PWM wave. So, in the ISR code shown above, depending upon the value of PWM variable, proper value is loaded in timer0 register to indicate when it is going to expire again and toggle GP0 pin value.
The main function code is shown below.
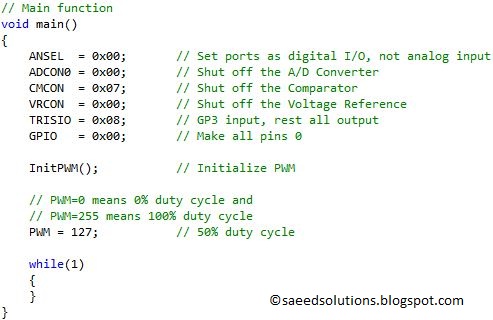
In the main function, firstly ADC and comparator both are turned off to make GP0 pin a digital IO pin. Then PWM is initialized using InitPWM() function. After that, PWM variable is assigned a value of 127, which corresponds to a duty cycle of 50% (as shown in figure 1). You can change duty cycle of PWM by just changing the value of PWM variable.
You can change PWM frequency by changing the CPU frequency of PIC12F675 microcontroller. In other words, currently I am using internal oscillator of 4MHz value which generates a PWM frequency of 1.8KHz. But you can use external crystal of upto 20MHz value to generate a maximum PWM frequency of 9KHz. Also, you can change PWM frequency by changing the frequency Pre-Scalar of timer0 in the code.
This code is intended to be a simple example of how you can generate PWM using PIC12F675 microcontroller. As an example, You can use this PWM code to control dc motor with PIC12F675 controller. You will need some sort of dc motor driver circuitry in between PIC12F675 controller and the dc motor. Other than that, using this simple PWM controlling code, you can control dc motor speed with PIC12F675 controller easily.
You can leave your comments in the comment section below.
Downloads
PWM code using PIC12F675 was compiled in MPLAB v8.85 with HI-TECH C v9.83 compiler and simulation was made in Proteus v7.10. To download code and Proteus simulation click here.
Further Reading Suggestions
Source: PIC12F675 PWM Code and Proteus Simulation
About The Author
Ibrar Ayyub
I am an experienced technical writer holding a Master's degree in computer science from BZU Multan, Pakistan University. With a background spanning various industries, particularly in home automation and engineering, I have honed my skills in crafting clear and concise content. Proficient in leveraging infographics and diagrams, I strive to simplify complex concepts for readers. My strength lies in thorough research and presenting information in a structured and logical format.
Follow Us:LinkedinTwitter