Summary of PIC Development Board – Hello World Project
This tutorial introduces PIC18F development using MPLAB IDE, HI-TECH C compiler, and eXtreme Burner PIC programmer. It guides installing tools, creating a new HI-TECH C project in MPLAB for a PIC18F4550, writing and compiling LED blink code, configuring oscillator settings, and burning the resulting HEX to a PIC development board to run a Hello World LED blink.
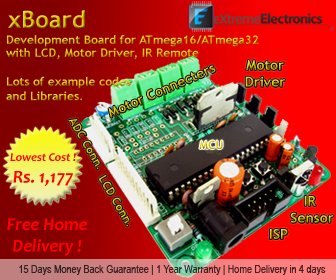
Parts used in the PIC Development Board – Hello World Project:
- MPLAB IDE (software)
- HI-TECH C Pro for PIC18 MCUs (compiler, software)
- eXtreme Burner PIC (USB programmer hardware + software)
- PIC18F4550 microcontroller
- PIC development board from eXtreme Electronics
- LED (on development board)
- Optional: Serial port-based PIC programmer hardware (homemade) and Christian Stadler's software
- Computer to run MPLAB and programmer software
Hello friends, welcome to this exciting tutorial where we will begin our journey with the latest PIC18F microcontrollers from Microchip Technologies. This tutorial will give you information on what software/hardware you will require and basic steps on how to get, install, configure, and use them. After going through this tutorial, you will have a complete setup and knowledge to experiment with these powerful chips!
What will you learn?
- MPLab is a powerful IDE.
- HI-TECH C for PIC18 MCUs is a powerful C Compiler.
- Creating a new HI-TECH C project in MPLab.
- Write a C Code to blink the LED and compile it to get a HEX code.
- Configure the MCU for proper oscillator selection.
- Basic Use for PIC development board from eXtreme Electronics
- Burn the HEX code to the MCU using eXtreme Burner PIC from eXtreme Electronics.
- Use the programmed MCU to actually blink the LED!
So let’s get started !!!
First, get this stuff
- Microchip’s MPLab IDE or Integrated Development Environment. This is the central tool from which you can access most of the other tools, like the C Compiler. This also lets you create and edit program files and projects. Download this from Microchip’s site and install it on your computer.
- HI-TECH C Pro for PIC18 MCUs – This will compile the high-level human-readable programs (in C Language) to Machine Language Instructions (contained in a HEX file). You will not interact directly with this software; instead, the MPLAB will use it internally. Actually, this is a commercial software, but a fully functional demo is available. The demo has only restriction that the code is not highly optimized. Not a problem for a startup hobbyist!
Download HI-TECH C Pro for PIC18 Free
- eXtreme Burner PIC – This hardware + software tool is used for burning(uploading) the HEX file to the microcontroller chip. This is a USB-based programmer with a GUI interface, so it is very easy to install and use.
- If you have made a Simple Serial port-based PIC Programmer as discussed here, then you need this nice program from Mr Christian Stadler. This is similar to eXtreme Burner PIC, but serial port-based, and the hardware can be made easily.
-
Creating your first project with MPLAB + HI-TECH C.
After installing the above tools, open MPLAB IDE from the desktop Icon or the Start Menu. You will get a main screen similar to this.
From the Project Menu, Select Project Wizard.
The Project Wizard will come up which will help you easily create a C Project. Click Next.
On the next screen, select the Microcontroller you want to use. in our case select “PIC18F4550” and Click Next.
After that, select what tool suits you want to use this project. There are many C Compilers for PIC18 (from different vendors) and also many people use assembly language, so this step is required.
As we will be working will HI-TECH C, select that from the list. Do not touch any other fields in this dialog. Just select Active Tool Suit = HI-TECH Universal ToolSuit. as shown in image below.
Now Select select a suitable folder for your new project. I recommend create a Folder Named MPLAB (To save all MPLAB project in one place) and then create subdirectories in this folder for each new project. Like use C:\Your Name\MPLAB\LED\ for this led blinky demo. Now show the project wizard the path to this folder so it can create a project file here. See the next image.
For more detail: PIC Development Board – Hello World Project
- What software is required to develop for PIC18F microcontrollers?
MPLAB IDE and HI-TECH C Pro for PIC18 MCUs are required according to the article. - How do I create a new project for PIC18F4550?
Use MPLAB Project Wizard, select PIC18F4550 as the device, choose HI-TECH Universal ToolSuit as the active tool, and set a project folder. - Can I compile C code for PIC18F in MPLAB?
Yes, MPLAB uses HI-TECH C Pro for PIC18 MCUs as the compiler to build HEX files. - How do I program the HEX file into the PIC?
Use eXtreme Burner PIC (USB programmer and software) to burn the HEX file to the microcontroller. - Do I need to configure oscillator settings for the MCU?
Yes, the tutorial states you must configure the MCU for proper oscillator selection. - Is there an alternative to eXtreme Burner PIC for programming?
Yes, a serial port-based PIC programmer built as discussed in the referenced post can be used with Christian Stadler's software. - What will the Hello World project demonstrate?
The Hello World project demonstrates blinking an LED using the programmed PIC on the development board. - Where should I save MPLAB projects?
The article recommends creating a folder named MPLAB and subdirectories per project, e.g., C:Your NameMPLABLED.