The “Mädchen Machen Technik” workshop is designed to give high school students an introduction to microcontrollers. The students will build a flashing light pattern and/or a counter-timer. In the process of building this project, the students will learn about microcontrollers and digital electronics. Here is the parts list for the projects.
Introduction to some circuit elements
- The students will learn how to measure DC voltage and resistance using a multi-meter. They will measure the voltage of batteries connected in series and in parallel.
- The students are given the task to determine, using a voltmeter and wires, how the holes on a breadboard are connected. The students sketch the hole connections on a picture of the breadboard.
- Next, the students will be given several Light Emitting Diodes (LEDs), with an explanation on how they work. They are to connect the LED(s) to the breadboard so that one LED lights up, then two light up, etc. Do not put more than 3 Volts across an LED.
Blinking Lights ProjectAs a first project on the breadboard, we will program the microcontroller to produce a blinking pattern of up to five LED’s. We will start with one of the simplest microcontrollers: PIC12F629. First, we build the circuit on the breadboard, then we will program the PIC12F629 chip.
Building the Circuit
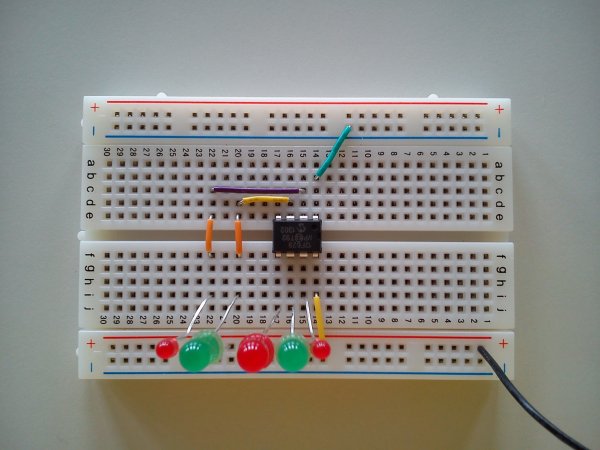
- A schematic of the circuit is shown below:
- The PIC12F629 has only 8 pins. Pin 8 is the ground pin, and Pin 1 is the positive voltage pin. In our applications, we will use two AA batteries in series which will give around 3 volts for Pin 1.
- The other six pins (2-7) will be used as digital input/output. Pins 2, 3, 5, 6, and 7 will be output pins connected to LEDs. Pin 4 can only be set as an input pin. We will not connect an LED to pin 4. In the picture below, one can see the 5 LEDs connected to the appropriate pins.

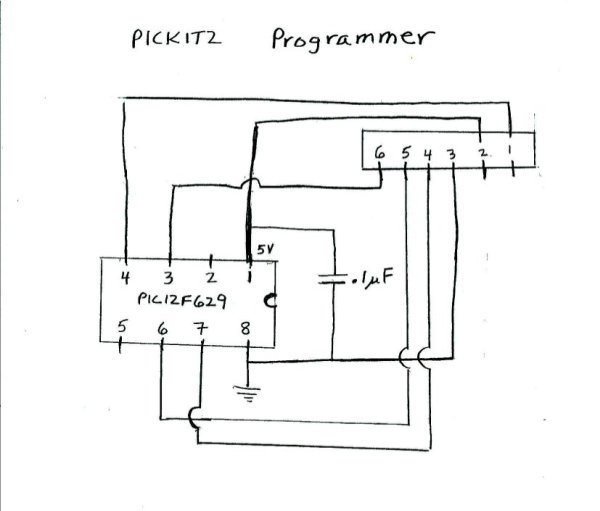
Building the ProgrammerAfter setting up the “blinking lights project” on the breadboard, we program the chip. To program the microcontroller, we will need to constuct a programmer circuit on a bread board. Each group of three students will use the same programmer, a pickit2. The programmer circuit is shown below

The programmer has 6 pins in a row. The ground on the programmer, pin 3, is connected to the ground of the chip (pin 8). The voltage (5V) of the programmer, pin 2, is connected to pin 1 of the chip. The other programmer pins are connected to the chip.
The pickit2 is connected to a personal computer through a usb port. In the picture below, one can see where the microcontroller chip is connected in the programmer:
Finally, we program the microcontroller using the MPlab software from microchip.
Programming the Microcontroller
- The assembly code we will start with is the code: test12.asm. The only lines of the code the students need to modify for their desired blinking pattern are:loop
movlw b’00100101′
movwf GPIO
call delay1
movlw b’00010010′
movwf GPIO
call delay1
goto loopFirst, the binary number ‘00100101’ is placed in the working register. Then this number in the working register is transfered into the register GPIO. The GPIO register is directly connected to the pins of the chip. A “1” will put 3 volts on a pin, and a “0” will put zero volts on the pin. The last 6 bits are connected to pins 2, 3, 4, 5, 6, and 7 respecively. The number ‘00100101’ in register GPIO will result in 3 volts for pins 2, 5, and 7, and zero volts for pins 3 and 6. Pin 4 is not affected, it is only an input pin. The subroutine delay1 causes a delay of around 1/4 second.Then, the binary number ‘00010010’ is placed in the working register and then transfered to the GPIO register. The number ‘00010010’ will produce 3 volts on pins 3 and 6, and zero volts for pins 2, 5, and 7. After a delay of 1/4 second, the chip goes back to “loop” and repeats the pattern. - The students can program any pattern of the five LED lights by modifying the lines in the loop.
Read More: Mädchen Machen Technik

