Summary of LASER HARP
This project details the creation of a laser harp, replacing physical strings with lasers and phototransistors to trigger digitally synthesized sounds using the Karplus-Strong algorithm. The team prioritized high-quality physical construction and user safety while managing hardware limitations by synthesizing four simultaneous notes from eight input channels via an LRU cache system.
Parts used in the Laser Harp:
- Hand-crafted wooden harp frame
- 8 red laser pointers (650nm wavelength)
- 1.5V power supply for lasers
- 8 BPW40 phototransistors
- Resistors (1kΩ)
- Analog multiplexer (CD74HC4051E)
- PIC32 Big Board microcontroller
- 9V battery for PIC32
- DAC A output module
- Powered speakers
- Passive low pass filter (2000 Hz cutoff)
- Fusion 360 CAD software
- Laser cutter and jigsaw
- Wood filler and spray paint
THE INTERSECTION OF MUSIC WITH TECHNOLOGY CAN CREATE ENTIRELY NEW WAYS TO PRODUCE OR EXPERIMENT WITH MUSIC. THE RECENT HISTORY OF MUSIC HAS TAKEN ADVANTAGE OF THIS TO AUGMENT EXISTING INSTRUMENTS AND MODIFY THEIR SOUND, OR IN THE CASE OF SYNTHESIZERS, TO PRODUCE ENTIRELY NEW AUDIO EFFECTS. OUR PROJECT WAS INSPIRED BY THE NOTION THAT TECHNOLOGY HAS DONE MUCH TO INFLUENCE HOW MUSIC SOUNDS, BUT VERY LITTLE TO CHANGE HOW IT IS ACTUALLY PLAYED. BEING ABLE TO DIGITALLY PRODUCE SOUNDS OPENS UP A THEORETICALLY LIMITLESS NUMBER OF POSSIBILITIES FOR ENTIRELY NEW INSTRUMENT TYPES, SINCE WE ARE NO LONGER LIMITED BY THE PHYSICAL CHARACTERISTICS OR GEOMETRIES NORMALLY NEEDED TO PRODUCE SOUNDS. OUR PROJECT TAKES ADVANTAGE OF THIS NEW FREEDOM WITH A MODERN TAKE ON A HARP, REPLACING THE STRINGS WITH LASERS THAT CAN BE “PLUCKED” IN ORDER TO PRODUCE A HARP-LIKE SOUND.
AS LOVERS OF MUSIC, WE THOUGHT THIS PROJECT WOULD BE PERFECT TO SHOWCASE WHAT WE’VE LEARNED THIS SEMESTER, AND WOULD ALSO BE A BEAUTIFUL PIECE TO BE PROUD OF. 🙂
HERE IS A VIDEO OF OUR FINAL PROJECT DEMO! HOPE YOU ENJOY:
HIGH LEVEL OVERVIEW
Inspiration for our laser harp comes from a volunteer trip to a local museum, Sciencenter (1). At this museum, we saw a cool display of a large harp with invisible strings, and we found it super fun to play with. When thinking about project ideas, this harp popped into our heads, so we decided to create our own implementation with the same overall idea.
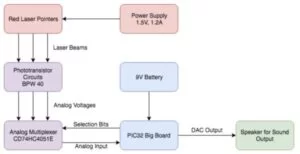
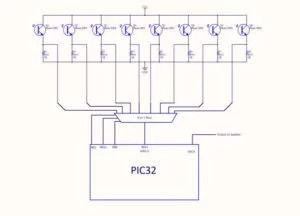
Our system has several components: a hand-crafted wooden harp with 8 red laser pointers attached along the inside of the top of the harp (connected to a 1.5V power supply), 8 phototransistors carefully placed under each laser along the soundboard of the harp, a circuit consisting of those phototransistors, resistors, an analog mux (2), and the PIC32 big board placed inside the soundbox of the harp, a 9V battery powering the PIC32, and speakers connected to the DAC output of the PIC32. An overview of our system can be seen below:
An overview of the theory involved in synthesizing the harp-like sound:
We use a technique called the Karplus-Strong Algorithm (3), which is a simpler way to simulate a physical model of a plucked string. When a real string is plucked, the burst of energy creates vibrations of many frequencies in the string. This results in “a fairly complex (meaning rich in harmonics) sound wave whose fundamental frequency is determined by the mass and tension of the string.” The energy depletes over time due to friction between the string and air with the fundamental decaying the slowest, resulting in a less complex waveform and therefore a more pure tone. After all the energy is gone, the string stops vibrating and no more sound is produced.
To model a string with a computer, we first start with a circular array buffer representing a string, and it is full of random values, or noise. These values represent the initial pluck of a string which has energy in the form of noise. To generate a waveform we iterate through this array, using the values as sample waveform values. Because these values are repeated as we loop through the array over and over again, a pitched, periodic sound is produced. This frequency is related to the size of the buffer, which is analogous to string length. But, we change the values of the buffer as we iterate- we average the current value with the previous value, and place this new value back into the buffer. We also use this averaged value as our sample. This averaging effect is like a low-pass filter, slowly getting rid of high-frequency harmonics. The feedback allows the waveform to be filtered again and again, slowly reaching equilibrium. Over time, the values in the buffer become equal, i.e. the string has reached equilibrium, and no more sound is produced. We go further into our implementation of the algorithm in the software section.
We made only a couple of hardware/software trade-offs, but with big impact. One tradeoff was that we were persistent in having at least 8 laser-strings (for a full octave), but in doing so we made the software much more complex as we could only synthesize 4 string sounds at once, as we describe later on in the software section of the report. The second trade-off we made was focusing a lot of our time on the build quality and appeal of the entire system- we wanted not just the basic functionality working, but we also wanted the system to look and feel like a harp, like a quality product that people will want to use. This also had implications for the reliability of the system, which is described more later. Therefore, we spent a couple weeks on the construction of the harp, including designing the frame, cutting wood, spray-painting, soldering lasers together for a common voltage and ground, condensing our circuit, aligning the lasers and phototransistors on the harp exactly, and hiding the circuit inside the soundbox. This cut into our programming time so that we did not have enough time to implement other features, such as adjustable string notes. We believe that this tradeoff was worth it, because our harp was fully functional in the end and looked beautiful :).
We believe that our project is fully compliant with IEEE (and other) standards, which are mainly in place to protect the public’s health and safety. Our laser harp is designed to be user-friendly and safe, with most of its electrical components hidden within the harp and its lasers pointed down at the phototransistors. It is easy to use, simple, and harmless to anyone using the harp as intended. One possible source of harm is if a user looks directly at a laser for a prolonged period of time. This is not the intended purpose of the harp, but this may happen, and it may cause some eye damage.
All links and unoriginal images in this report are cited in the Appendix section. We have found a patent related to our laser harp, which can be found at the bottom of this Wikipedia article (4), but there are also many variants created by other people, one of which is our laser harp, as ours is built differently from the patented one. Because we do not have intention to sell or publish our harp, we will not have any issues with patents/copyright.
PROGRAM DESIGN
Our program is structured into the following sections:
- All of the global variables, #include statements for libraries we use, and #define statements to make the program easier to write and understand.
- A Timer 2 ISR handler, which produces the synthesized harp-sound for our 8 strings using Karplus-Strong and drives the DAC.
- A thread to read the analog input of each string through an analog mux (2) by driving digital mux select pins, and “plucking” the strings who have been touched by the user.
- (optional- we won’t go in depth for this) A thread that uses the TFT for debugging purposes, such as displaying the value read by the ADC pin, or displaying which notes are currently being played. Updates once per second.
- Our main() method, which is where hardware setup and thread initiation & scheduling occurs.
In main(), we first set up Protothreads (5) and initialize the two threads we have- the one that determines which string is being plucked, and our debugging TFT thread. Next, we set up system-wide interrupts, turn on timer 2, and configure the timer 2 interrupt. Our timer 2 interrupt is running at 20kHz. We then set up SPI for the DAC (we are using DAC A), and then the ADC. We have auto-sampling turned on, scan mode off (because we are only using one ADC pin as we have a mux), and we do one sample each time. We use AN11 (pin 24), so we enable that pin as analog input, and only sample that pin. Then we enable the ADC. For debugging purposes, we initialize the TFT display. Next, we initialize a global drive table that stores values to use when we pluck the strings. The table is filled with values for different waveforms, but we only use the row of the table representing low-pass filtered noise. Lastly, we set up the analog mux select pins by setting RB3, RB10, and RB8 as digital output pins, and we schedule the threads round-robin style.
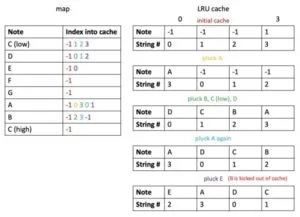
In our thread that cycles through the strings and detects if one is plucked, we created a system of data structures to resemble an LRU (least recently used) cache of size 4 so that we can hear at most 4 strings playing at the same time. The reason we need this system is because synthesizing one string takes about 20% of the CPU, and so we found that the maximum number of strings we could synthesize at a time is 4 strings, keeping in mind that some CPU time is needed for the rest of the program. Therefore, we decided to keep track of the 4 least recently plucked strings to produce a realistic sound of overlapping notes. To create this LRU cache in an efficient way, we first have a 2-D array representing the strings in the cache. It is 2-D because we have 4 strings, and for each string we store 2 pieces of information: the musical note that the string represents (in numeric form), and the synthesized string number that we have it playing on (0 through 3 because there are 4 synthesized strings). To give an example of how the cache works, let’s say we play notes A, B, C and D, and now they are all in the cache in the order of D, C, B, A, with D being the least recently played. Next, let’s say we play A again. What this cache does is that it sees that A was already played recently (it’s in the cache), and so it moves A to the front, resulting in A, D, C, B. Next, let’s say we play E. This is not in the cache, so we have to kick out the oldest note, which is now B. We remove B and put E at the front, shifting the other notes right one and resulting in E, A, D, C. This is basically how the LRU cache works. The only notes you can hear (until they die out) are the ones in the cache, and whenever a note is played, it moves to the front of the cache and gets plucked. To efficiently see if a note is in the cache, and if so, where it is located in the cache, we have a map array that maps each of the 8 notes to its index in the cache if it is there, otherwise it is mapped to the value -1. Below is a visual of how these data structures look after the aforementioned series of events:
So in this thread, we first initialize the values of these data structures. Since there is no note being played initially, all the notes in the cache are -1, but each is still given one of 4 “strings” to be played on, as later on we will be shifting the ownership of these 4 strings around. The map is initialized to -1 for all notes as well. We have a debouncing system in this thread too, so that if a user leaves their finger blocking a laser, that note only plays once. To implement debouncing, we save the previous adc value of that note in memory, and only when the previous value is high (laser is not being blocked) and the current value is low (laser is being blocked), we know to pluck the string. So, we also initialize the previous ADC values of all 8 strings to 0.
After initialization comes the while(1) loop. First, we read the ADC value of the laser/phototransistor pair we are currently looking at, called lasernumber. If it’s less than our threshold ADC value of 200, it is being blocked, and if the previous value was greater than 200, then we know for sure to pluck that string. In the case it is plucked, we then have to ask if this note has been plucked recently or not, as we handle the cases in different ways. If it is in the cache, which we can tell easily from our map, then we go to that index in the cache, save the information stored there in a temporary variable, shift all the entries in the cache that are to the left of this index right one while updating their map values, and place the saved information at the beginning of the cache. If the index is 0, meaning that it was just plucked, we don’t need to reorder anything in the cache. If the note was not recently plucked (it is mapped to -1 in our map), then we have to kick out the oldest note in the cache. So, we shift all the notes in the cache right one while updating their map values, and for the last note, we map that note to -1 as it is no longer in the cache. We then set the first entry of the cache to be the new note and update its map value. This new note gets to be played on the “string” of the kicked out note, so we update that string to play the new note.
After all of these cases, we pluck the string of the first entry in the cache, because that is the new note we just played. We then update the previous ADC value for that note and increment our lasernumber so that we look at the next string in the next iteration. If lasernumber is currently 7, then we it to 0 to complete the cycle (as there are 8 lasers). Lastly, we toggle the analog mux select bits/digital output pins so that the mux outputs the signal of the next laser/string we are trying to read.
Our Timer 2 ISR synthesizes sound by calculating the values to send to the DAC. As mentioned before, we are using the Karplus-Strong algorithm to synthesize our sounds. The algorithm produces a much nicer and more convincing string sound than could be produced with simpler methods like DDS. Karplus-Strong is a sort of “shortcut” for simulating a string using the wave equation, which takes advantage of the fact that one possible solution to the wave equation is a travelling wave on a string. By representing the string as a circular buffer, where the size of the circular buffer correlates with the frequency of the string, we can replicate the periodic nature of the travelling wave. We start with two buffers travelling in opposite directions, with a factor of -1 applied at both ends to represent the waves being inverted at a fixed end of a string.

These multiplications can actually commute to form a single buffer cycling in one direction. At a high enough sampling frequency, this circular buffer could always have an integer number of cells, but for most typical synthesis frequencies – in our case 20 kHz – we will require a fractional number. For example, to play a C4 note (261.6 Hz) at a synthesis rate of 20 kHz, we would need 76.45 cells. This means that in addition to the 76 integer locations in our circular buffer, we need a fractional time delay of some kind in order to effectively achieve the required 76.45 cells if we want any kind of tonal accuracy. Finally, low frequencies die out slower than higher ones on a string, so a low pass filter will replicate this characteristic. Ideally, this would happen to every cell at every time step, but only applying it to one transition in the circular buffer will not be audibly different to a human listener since it still happens so fast.

In the actual ISR, we do not constantly resize the buffer or shift all the entries into the buffer; rather, we simply move two pointers every time the ISR is called, and have a separate variable to track when those pointers should roll back to zero that we change as necessary. We first low pass the signal by taking the difference between the previous and current index, multiplying it by a low pass coefficient, and then adding that value to the current index. This effectively shifts it downwards if the previous index is lower, or upwards if the previous index is higher.
The next step implements the fractional time offset. It takes the difference between the previous index and the current one, multiplies it by a corrector value specific to the note, and adds it to the previous index to achieve the corrected current index. This corrector value does not depend on the length of the string, but instead each time it loops through the entire buffer once it should correctly delay the waveform. The math involved is slightly confusing, but we opted for a method where we calculating it by dividing one minus the fractional component by one plus the fractional component. This resulted in accurate frequency readings with a tuning app, and the notes sounded accurate to the ear as well.
Once these steps are completed, the pointers are updated, the new value is stored, and the ISR repeats for the other strings. If a string has been plucked, then another variable is set to add drive to the plucked string, decrementing the set variable each time. When the variable reaches zero, the pluck has completed, and vibrations continue to pass through the string until the damping coefficient causes them to die out.
All of the ISR computations were done using fixed point arithmetic. As mentioned, we were able to synthesize four strings simultaneously with this method. Switching to integer arithmetic and shifts could make this slightly faster, but much uglier. Four strings proved to be more than enough to be unnoticeable by the human player.
HARDWARE DESIGN
Fundamentally, our electrical hardware setup is relatively straightforward, consisting of the following components:
- Eight laser pointers powered by a power supply
- Eight corresponding phototransistor circuits, all connected to an analog multiplexer
- PIC32 Big Board, which handles all of the computation, reading from the multiplexer and synthesizing the string sounds
- Powered speakers to play the waveform generated by the DAC output
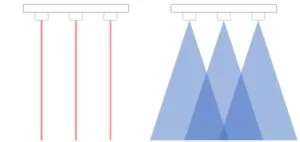
The design of the harp begins with the laser pointers themselves. The purpose of the lasers is to detect when someone plays the harp by running their hands through the frame. We initially considered other options for detecting the presence of a hand in the harp, such as ultrasonic distance sensors, but we found that essentially all other sensor types have a cone shaped region where they are sensitive. This would have caused the invisible strings to be much wider far away from the sensors than they were up close, and likely made the harp impossible to play accurately. To achieve a real “invisible” string, lasers were the best option.
The lasers used are simple low-power red laser pointers, similar to the type that would be used to play with pets. They are cheap and lack any serious documentation, but we estimate that the beam produced has a wavelength close to 650nm. By aiming the lasers at the phototransistor circuits, we would be able to tell whether they were being intercepted by the player’s hand. The BPW40 phototransistors have the highest response to 780nm light, but the intensity of the lasers is high enough to still get an extremely pronounced response if they are still well aligned.
The phototransistor circuits are quite simple. The collector is connected to the voltage line from the PIC32 Big Board, and the emitter is connected through a 1kΩ resistor to ground. The node between the phototransistor and resistor for each circuit goes to an input on the analog multiplexer. When the lasers shine on the phototransistors, the current through them increases and the voltage at the previously mentioned node increases. When the laser is not shining on the phototransistor, much less current flows, so the voltage at the node is much lower. We use this to tell whether someone’s hand is blocking the laser to play the harp.
This is a good time to bring up the physical construction of the harp. Aiming laser pointers at phototransistors results in a very sensitive system, as even a very tiny shift in the position of either the laser itself or the phototransistor will render it inert by misaligning the beam. Our first prototype, made from a cardboard box, was extremely difficult to test with for this reason. The cardboard was reasonably solid, but even the small movements would ruin the alignment.
This was a large part of the motivation for the switch to a wooden frame with much higher build quality. Doing so, in addition to making the harp look like a much more finished project, also made it function more reliably. The physical construction will be detailed at the end of this section.
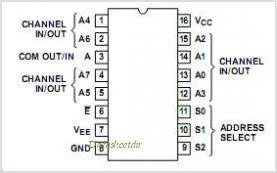
The eight phototransistor circuits are connected to the CD74HC4051E, an eight-to-one two-way analog multiplexer. Each of the phototransistor circuits is considered to one of the channel in/out pins. We used RB3, RB8, and RB10 as digital pins on the PIC32 Big Board for the three address bits. The common in/out pin on the multiplexer is connected to RB13, which we connected to AN11 to read the analog voltages using the analog to digital converter.
With this in place, the PIC32 is able to tell when strings are plucked, and the software takes over for a while.
The last step in hardware occurs when the DAC outputs the sound waveform. We connected this output through a passive low pass filter with a cutoff frequency of around 2000 Hz (which was reasonable for the notes we would be playing) to any powered speakers to play the sound.
Physical Construction
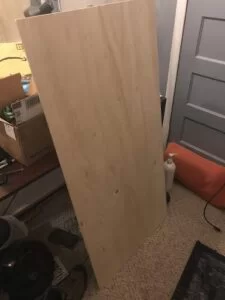
We started by making a rough 3D CAD of how we thought the harp frame should look in Fusion 360. We then generated a .dxf file to be used with a laser cutter by projecting the profiles of the 3D model into sketches.


However, this method did not work. The plywood we used was not a type that was easily cut through by the laser cutter, despite being quite thin.
The laser did singe the rough shapes that we wanted to cut out, even if it didn’t get all the way through the wood. We borrowed a jigsaw from another very generous student in 4760 and managed to cut out all of the pieces needed to assemble the harp, albeit somewhat roughly.
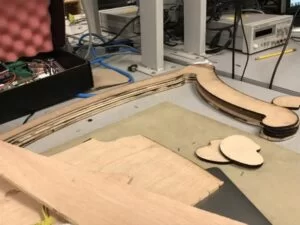

After gluing the pieces together, we then added wood filler around the edges, sanded the whole thing, and spray painted it a golden color.
The next step was to prepare the “strings” of our harp, the laser pointers. We used a pipe cutter to sever the section dedicated to holding the AA battery typically used to power them. This made each pointer less than half as long, and allowed them to fit much more cleanly into the harp frame. The other benefit is that we could more easily access the battery terminals so we could power them with a power supply. We soldered red wires to the positive terminals of each laser pointer, and connected black wires to the casings, which were grounded, using conductive tape.

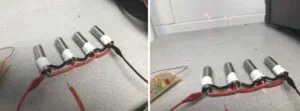
We actually ran into a problem with this scheme when connecting all eight laser pointers together. As you can see in the images above, the ground wire was not continuous; instead, each ground wire segment was connected to the previous one through the casing of the intermediate laser pointer. This introduced a semi-large series resistance in our ground line (nearly 10 Ohms) which was causing the pointers to light up with non-uniform brightness. We fixed this by switching to a single ground wire spliced out at eight points, which provided much less resistance than connecting through all the casings. This change fixed the brightness uniformity issue. The lasers, as you can observe in the previous images, are connected in parallel with 1.5 V across them. Each one draws approximately 150mA, so the whole line is pulling 1.2A continuously, hence the need for the larger gauge wires. Once the line was completed, it could be installed into the harp frame. We hot glued the pointers into place after measuring the approximate position and angle each one should be at.
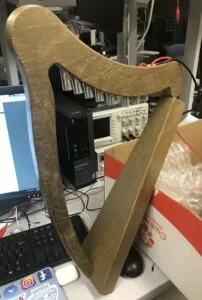
Once the laser pointers were set, we powered them on and marked where each of the beams landed on the trapezoidal section, and then drilling holes for the phototransistors in each of those spots. This ensured that they would be aligned properly. The phototransistors were also hot glued in place once they were checked to be working, and the rest of the electronics were moved into the trapezoidal box.
RESULTS
We already linked the final demo video in the introduction, but here is the link again in case you would like to watch!
Our harp shows no apparent delay in response time, so it feels like the harp is playing notes just as you pluck the strings. As stated in the software section, we can concurrently play 4 strings at a 20 kHz sampling frequency.
Unfortunately we did not obtain quantitative measurements on the frequencies produced by our harp, but it sounds very accurate upon listening to the video.
We enforced safety in our design of the harp by putting the majority of the circuit inside the soundbox of the harp and having the lasers point down at the phototransistors. We also added wood filler to smooth out the rough edges of the wood harp and sanded it down to prevent getting splinters.
Our laser harp is usable by anyone of any age as long as it is held in place by someone else or the user. It is unfortunately not a project meant for those who are hard of hearing.
CONCLUSIONS
Our design definitely met our basic expectations, and even exceeded it in terms of physical design, as originally we were not planning on making an actual harp frame. We are extremely satisfied with the quality of the sound produced and the concurrency of multiple strings at once. If we had extra time, we would have implemented more features such as the ability to adjust each string’s note, or possibly a “performance” mode where you give the harp a simple song and it performs it. Our design conforms to the IEEE (and other) standards, as mentioned in the high level overview, and is safe to use as long as the user does not look directly at the lasers for an extended period of time.
Considering intellectual property, for our Karplus-Strong algorithm, we based our code off of our professor Bruce Land’s code (7), which we modified in order to make ours sound more harp-like. The rest of the code and the laser harp design is original material. We do not believe there are patent opportunities nor publishing opportunities for our project as mentioned before due to the existing patent (link) on a similar laser harp, and because this overall idea has been done before in different variations.
Considering the IEEE Code of Ethics (8), we specifically made our harp safe by tucking away most of the electrical parts into the soundbox, only letting the audio cord stick out so we could connect the harp to speakers. As mentioned in the results section, our harp has a smooth surface due to wood filling and sanding, and is safe to touch. Everything mentioned in this report is honest to our knowledge, and we have no accepted bribes.
A user might want to consider laser-light shielding for the eyes if they are young and/or don’t have a full understanding that it is dangerous to look at the lasers directly.
Schematic
Source: LASER HARP
- How does the laser harp detect when a string is plucked?
The system detects a pluck when a hand blocks the laser beam, causing the voltage at the phototransistor node to drop below a threshold of 200. - What algorithm is used to synthesize the harp sound?
The project uses the Karplus-Strong Algorithm to simulate the physical model of a plucked string. - Why was a wooden frame chosen over cardboard?
A wooden frame was selected because it provides higher build quality and stability, ensuring the precise alignment required for the lasers and phototransistors. - Can multiple strings be played simultaneously on this harp?
Yes, the system can synthesize up to 4 strings playing at the same time using an LRU cache system. - What are the safety concerns regarding the laser harp?
The primary safety concern is eye damage if a user looks directly at the laser beams for a prolonged period of time. - How does the software handle notes that have been played recently?
The software uses an LRU cache to track the 4 least recently used strings, moving recently played notes to the front of the queue. - Why were ultrasonic distance sensors not used instead of lasers?
Ultrasonic sensors have a cone-shaped sensitive region that would make the invisible strings too wide and inaccurate compared to the focused laser beams. - What sampling frequency is used for the Timer 2 interrupt?
The Timer 2 interrupt runs at a frequency of 20kHz to drive the DAC and synthesize the sound.