
If you follow my Instructables projects you know that I am a big fan of the JAL programming language in combination with the PIC Microcontroller. JAL is a Pascal like programming language developed for the 8-bit PIC microcontrollers of Microchip. Most people know the Arduino using the ATMEL microcontroller. One of the nice things of an Arduino board is that you can program the microcontroller without the need of a separate programmer.
This absence of the need for a programmer brought me to this project. I wanted to make an Arduino Uno like board for the PIC microcontroller developing the software for that board with in the JAL programming language. The board did not need to have the exact size of the Arduino Uno board but the connectors on the board should have – where possible – the same connections as the connections of an Arduino Uno. And so the JALPIC One development board was born.
Step 1: Designing the Board
Before I started the design, I had a good look at the Arduino design and decided the following:
- I wanted the board to be built with standard components so no Surface Mount Design (SMD). Reason for this is that it would be easier for hobbyists to assemble the board.
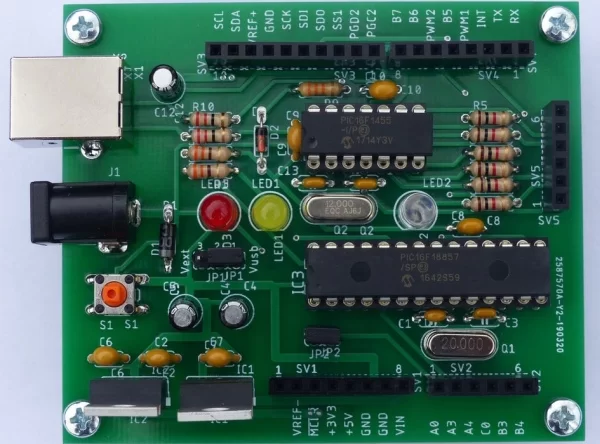
- The connectors should carry as much as possible the same functionality as the Arduino Uno. In the front-picture I did not yet assemble the connectors.
- The control of the board had to be done by a PIC and this PIC should be programmed using the JAL programming language.
- For testing purposes the board should have a LED that you can control from the PIC that runs the application. This feature is also present on the Arduino Uno.
- The PIC that runs the application should have sufficient memory and RAM for easy application development.
In the attached schematic diagram you find the design of the JALPIC One development board. I also included a screenshot of the PCB. Just like the Arduino the board can be powered by the USB port of by an external DC power supply when used stand alone.
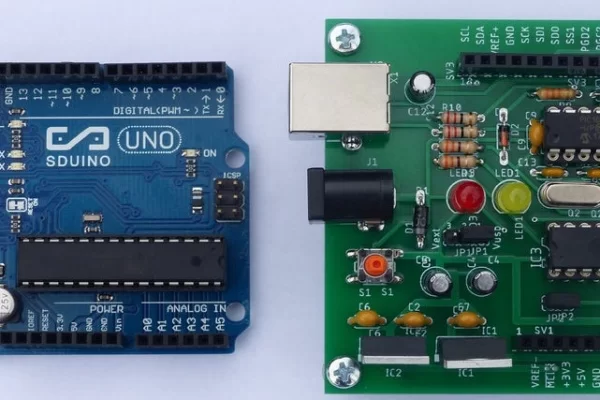
I added a picture that shows the Arduino and the JALPIC One development board.
The application PIC on the board is programmed using the hex file that is created by the JAL compiler.
Attachments
Step 2: Required Components
You need to have the following components for this project next the board itself:
IC
- 1 * LM2940CT-5.0: IC1
- 1 * LM3940IT-3.3: IC2
- 1 * PIC16F18557P: IC3 (application PIC)
- 1 * PIC16F1455P: IC4 (control PIC)
Crystal
- 1 * 20 MHz: Q1
- 1 * 12 MHz: Q2
Diode
- 1 * 1N4004: D1
- 1 * 1N4148: D2
LED
- 1 * Yellow LED: LED1
- 1 * Amber LED: LED2
- 1 * Red LED: LED3
Connector
- 1 * Power Jack: J1
- 1 * USB Connector: X1
- 2 * 6-pin header: SV2, SV5
- 2 * 8-pin header: SV1, SV4
- 1 * 10-pin header: SV3
- 1 * 3-pin jumper: JP1
- 1 * 2-pin jumper: JP2
Capacitor
- 4 * 22 pF: C1, C3, C11, C13
- 5 * 100 nF: C2, C6, C7, C8, C 9
- 1 * 470 nF/Ceramic: C10
Electrolytic Capacitor
- 3 * 10 uF/25V: C4, C5, C12
Resistor
- 2 * 22 Ohm: R10, R11
- 2 * 330 Ohm: R1, R8
- 6 * 1 kOhm: R2, R3, R4, R5, R6, R7
- 1 * 33 kOhm: R9
Switch
- 1 * Omron Pushbutton: S1
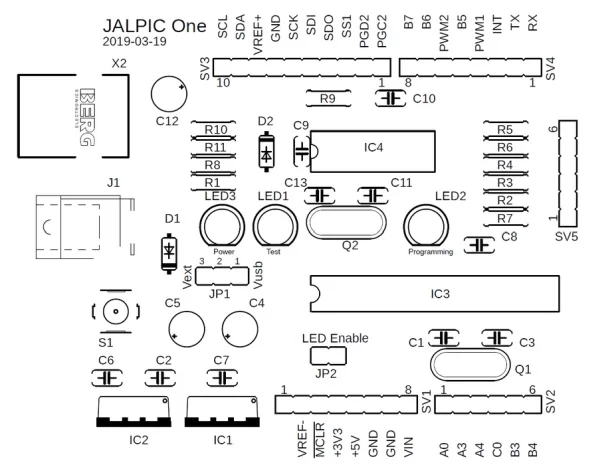
In the attached layout of the board you can see where each component should go.
Step 3: The Board Software
Most of the work was the development of the control software for the control PIC on the board. The board has a simple command set to erase the application PIC, program the application PIC and some more commands. As mentioned it was written in JAL. There are 3 main components in the software:
- The main program that provides the interface with the USB, interprets the commands and sends the responses.
- The hex file parser which checks the contents of the hex file, extracts the address and data to be programmed.
- The programmer that erases the memory of the application PIC and programs the application PIC with the data coming from the parser.
Since the control PIC does not have a large internal memory, parsing of the hex file is done real-time and on a line by line basis after which the data is passed on to the programming software who then also programs the application PIC on a line by line basis.
The attached hex file can be used to program the controller PIC.
Attachments
Step 4: What an Application Program Looks Like
Since the hardware of the application PIC is known, a simple include file can be used to define all kind of settings needed for the application PIC to operate. The person writing the program can then focus on the program itself. A simple blink-a-led program in JAL then looks as follows:
include jalpic_one — include the board definition file
enable_digital_io() — make all pins digital I/O
alias led is pin_a0 — alias for pin with LED
pin_a0_direction = OUTPUT
forever loop
led = ON
_usec_delay(100_000)
led = OFF
_usec_delay(400_000)
end loop
This program uses the LED which is present on the JALPIC One development board. When the program is done, only 1 click on a button in an editor called JalEdit is sufficient to compile the program and download it to the board. The short video shows how this works.
Step 5: Building the Board Yourself
I could not describe everything in this Instructable but the whole board design, software and documentation can be downloaded from one of the Jallib releases under the folder ‘project\jalpic_one’.
Since this new development is not yet officially released in a new version Jallib, it has to be downloaded using the latest ‘bee-package’ from the JAL download site.
The download site can be found at: Just Another JAL Website
Have fun building your own project and looking forward to your reactions.
Source: JALPIC One Development Board
About The Author
Muhammad Bilal
I am a highly skilled and motivated individual with a Master's degree in Computer Science. I have extensive experience in technical writing and a deep understanding of SEO practices.