Summary of IR Remote Controlled Home Automation Using PIC Microcontroller
This project utilizes a PIC microcontroller to remotely control AC loads like lights and fans via an IR remote. The system decodes 38KHz signals using a TSOP1738 sensor, processes them with the PIC18f2520, and activates relays or a TRIAC for switching and speed control. The design includes custom PCB fabrication via EasyEDA and JLCPCB, powered by a regulated transformer circuit.
Parts used in the IR Remote Controlled Home Automation Project:
- PIC18f2520 Microcontroller
- TSOP1738 IR Receiver
- IR TV/DVD Remote
- Transistor BC547
- Relays 12 volt
- Bulb with holder
- Connecting wires
- EasyEda PCB
- 16x2 LCD
- Power supply 12v
- Terminal connector 2 pin
- Terminal Connector 3 pin
- Transformer 12-0-12
- Voltage Regulator 7805
- Voltage Regulator 7812
- Capacitor 1000uf
- Capacitor 10uf
- Capacitor 0.1uf
- Capacitor 0.01uf 400V
- Resistors (10k, 1k, 100ohm)
- Common cathode segment display
- 1n4007 diode
- BT136 triac
- Male/female header
- LEDs
- Opto-coupler moc3021
- Opto-coupler mtc2e or 4n35
- 20Mhz crystal
- 33pf capacitor
- 5.1v zener diode
- 47 ohm 2 watt resistor
In this project, we are going to use a PIC microcontroller to remotely control few AC loads by just using an IR remote. Here we designed it on PCB using EasyEDA’s online PCB designer and used their PCB designing services to order the PCB boards as shown in the subsequent section of the article.
At the end of this project you will be able to toggle (ON/OFF) any AC load using an ordinary Remote from the comfort of your Chair/Bed. To make this project more interesting we have also enabled a feature to control the speed of the fan with the help of Triac. All these can be done with simple clicks on your IR remote. You can use any of your TV/DVD/MP3 remote for this project. The different IR signals from the remote are received by the microcontroller which then controls the respective relays via a relay driver circuit. These relays are used to connect and disconnect the AC Loads (Lights/Fan).
Step 1: Working Explanation:
The block diagram of the project is shown above.
The working of this project is fairly simple to understand. When a button is pressed on the IR Remote it sends a sequence of code in form of encoded pulses using 38Khz modulating frequency. These pulses are received by the TSOP1738 sensor and then read by the Controller. The Controller then decodes the received train of the pulses into a hex value and compares it with the predefined hex values in our program.
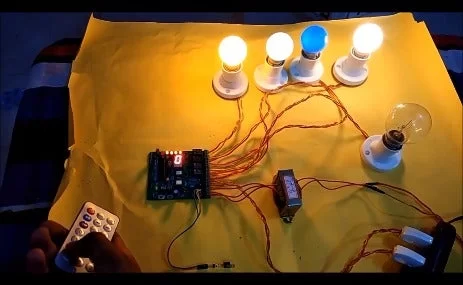
If any match occurs then the controller performs a relative operation by triggering the respective Relay/Triac and the corresponding result is also indicated by on-board LEDs. Here in this project, we have used 4 bulbs (small bulbs) of different colors as lighting loads and another bulb (bigger bulb) is considered to be a fan for demonstration purpose. We have selected key 1 to toggle the relay1, 2 to toggle the relay2, 3 to toggle the relay3, 4 to toggle the relay4, and Vol+ to increase fan speed and Vol- to decrease speed of the fan.
Note: Here we have used 100watt bulb instead of a fan.
There are many types of IR Remotes available for different devices, but most of them work around 38KHz Frequency. Here in this project, we control home appliances using IR TV remote and for detecting the IR signals, we use a TSOP1738 IR Receiver. This TSOP1738 sensor can sense 38Khz Frequency signal. The working of IR remote and the TSOP1738 is covered in detail in this article: IR Transmitter and Receiver
Our PIC microcontroller operates at +5V and the Relays operate at +12V, Hence we use a transformer to step down the 220V AC and rectify it using a full bridge rectifier. This rectified DC voltage is then regulated to +12V and +5V by using the regulator ICs 7812 and 7805 respectively.
To trigger the relay we make use of transistors like BC547 which can act as an electronic switch to turn ON/OFF the relays based on the signal from the PIC microcontroller.Further to control the speed of the fan we are using a TRIAC. TRIAC is a power semiconductor which is capable of controlling the output voltage; this capability is used to control the speed of the fan.
We have also used a Triac Driver to control the Triac using our PIC microcontroller. This driver is used to give a firing angle pulse to Triac, so that the output power can be controlled. Here we have used 6 level of speed control. When the level is 0 then the fan will be off. When level will be 1 then speed will be 1/5th of full speed. When level will be 2 then speed will be 2/5th of full speed and respectively for others. The current level of the speed can be monitored using the on-board 7-segment display.
Step 2: Components:
The components required to build this project is given below:
· PIC18f2520 Microcontroller -1
· TSOP1738 -1
· IR TV/DVD Remote -1
· Transistor BC547 -4
· Relays 12 volt -4
· Bulb with holder -5
· Connecting wires –
· EasyEda PCB -1
· 16×2 LCD
· Power supply 12v
· Terminal connector 2 pin ` -8
· Terminal Connector 3 pin -1
· Transformer 12-0-12 -1 –
· Voltage Regulator 7805 -1
· Voltage Regulator 7812 -1
· Capacitor 1000uf -1
· Capacitor 10uf -1
· Capacitor 0.1uf -1
· Capacitor 0.01uf 400V ` -1
· 10k -5
· 1k -5
· 100ohm -7
· Common cathode segment -1
· 1n4007 diode -10
· BT136 triac -1
· Male/female header –
· LEDs -6
· Opto-coupler moc3021 -1
· Opto-coupler mtc2e or 4n35 -1
· 20Mhz crystal -1
· 33pf capacitor -2
· 5.1v zener diode -1
· 47 ohm 2 watt resistor -1
All these components are commonly used and can be easily purchased at LCSC.com. it’s an online electronic components online store launched by EasyEDA, They feature about 25,000 kinds of components and the best thing is that they sell even small quantity items for small projects, also can be shipped together with your PCBs ordered at EasyEDA, so saving lots of time and money.
Step 3: Decoding the IR Remote:
As said earlier you can use any kind remote for your project. But we have to know what kind of signal is generated for from that particular remote. For every individual key on the remote there will be an equivalent HEX value for that key. Using this HEX value we can distinguish between each key on our microcontroller side. So before we decide to use a remote we should know the HEX value for the keys preset in that particular remote. In this project, we have used a NEC remote. The HEX values for the keys on a NEC remote is given above.
As you can notice the HEX value has 7 characters out of which only the last two differs, hence we can consider only the last two digits to distinguish between each keys.
Step 4: Circuit and PCB Design Using EasyEDA:

Here you can find the schematic and PCB of the circuit, feel free to use it as a reference.
You can also find the schematic on EasyEDA:
Step 5: Calculating and Ordering PCB Samples Online:
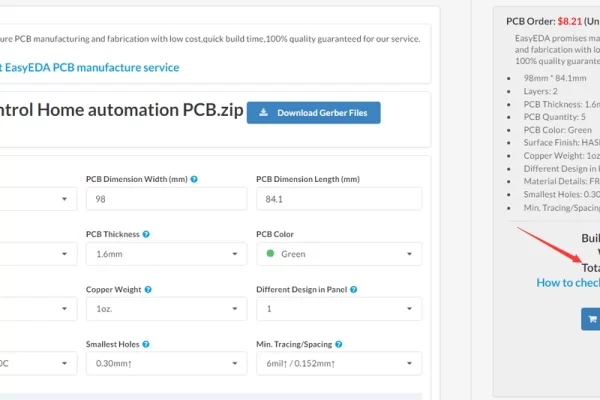
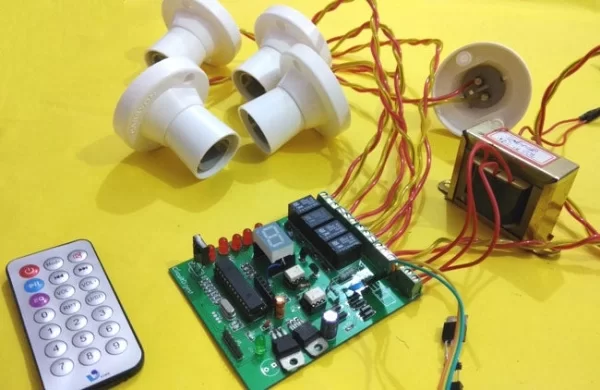
After completing the design of PCB, you can click the icon of Fabrication output, which will take you on the PCB order page. You can directly order this PCB or download the Gerber file using this link. The boards that we received and finished boards are shown above.
EasyEDA recently released a new website specially for PCB and PCB assembly service called JLCPCB.com, they are fabricating the PCB at a very low rate which is $2 for 10pcs 10x10cm PCBs, you can also order PCB here.
Step 6: Programming:
The program for this project is done using MPLABX, the code is also pretty simple and easy to understand. The complete code will be given at this page.
Step 7: Demonstration Video:
Demonstration video for PIC microcontroller based home automation project which is controlled by an ordinary remote control.
Source: IR Remote Controlled Home Automation Using PIC Microcontroller
- How does the system receive commands from the remote?
The TSOP1738 sensor receives encoded pulses at 38Khz frequency sent by the IR remote. - What happens if the received code matches a predefined value?
The controller triggers the respective Relay or Triac and indicates the result with on-board LEDs. - Can I use any type of remote for this project?
Yes, you can use any TV, DVD, or MP3 remote that works around 38Khz Frequency. - How is the fan speed controlled in this circuit?
A TRIAC is used with a driver to provide firing angle pulses, allowing six levels of speed control. - What voltage do the Relays operate at compared to the microcontroller?
The Relays operate at +12V while the PIC microcontroller operates at +5V. - Which components are used to regulate the power supply voltages?
The 7812 regulator IC is used for +12V and the 7805 regulator IC is used for +5V. - How many levels of fan speed control are available?
There are 6 levels of speed control ranging from level 0 (off) to level 5 (full speed). - Where can the schematic and PCB design be found?
The schematic is available on EasyEDA under the link provided in Step 4.