
Summary of IOT Based Temperature data logger using esp8266 and pic microcontroller
This article describes an IoT-based temperature data logger utilizing a PIC16F887 microcontroller and an ESP8266 WiFi module. The system monitors ambient temperature, displays readings on an LCD, and uploads data to the ThingSpeak cloud platform for remote access via web browsers. It integrates power regulation, signal level shifting, and sensor interfacing to enable real-time data logging and analysis over the internet.
Parts used in the ESP8266 Temperature Logger using PIC16F887:
- PIC16F887 microcontroller (MCU)
- ESP8266 WiFi module
- ThingSpeak API
- Logic-level shifter
- LM35 temperature sensor
- 3.3V regulator LM1117-3.3
- 5V regulator 7805
- 16×2 LCD module
In this post we will learn IOT based temperature data logger using esp8266 and pic microcontroller: The project ESP8266 Temperature Logger using PIC16F887 is build up using PIC16F887 microcontroller (MCU), ESP8266 WiFi module and a ThingSpeak API. Previously, we posted Arduino and ESP8266 based webserver and this project is somehow similar.
IOT Based Temperature data logger using esp8266 and pic microcontroller:
Here is a PIC16F887 microcontroller and ESP8266 based temperature logging system. The project; ‘ESP8266 Temperature Logger using PIC16F887’ monitors temperature of the vicinity simultaneously and provides details of information collected. Well, the project also incorporates a modern concept; ThingSpeak which ensures safe storage and retrieval of data from things over the wide internet zone.
It is an IOT(Internet of things) application and API, it is an open source platform and is gaining more popularity for the reason. This platform ensures possibility to make use of data from different electronic devices, sensors etc., by storing it on the internet and then make required observations to reach a conclusion after proper analysis of those information.
Other Data Logger projects posted in bestengineeringprojects.com
So as to obtain the temperature details from the project ESP8266 Temperature Logger using PIC16F887, you can login into browser on your device and use ThingSpeak API through Wifi.
Circuit Description of ESP8266 Temperature Logger using PIC16F887
Fig. 1 below gives details of the circuit layout of this project. The project includes microcontroller PIC16F887 MCU (IC4), ESP8266 Wi-Fi module, logic-level shifter, LM35 temperature sensor (IC3), 3.3V regulator LM1117-3.3 (IC2), 5V regulator 7805 (IC1) and 16×2 LCD module (LCD1) as the building blocks.
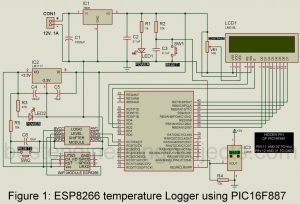
The entire circuit is powered using two power sources; 5V is required for PIC16F887, LCD and Logic-Level Shifter IC where ESP8266 module requires 3.3V. Since this ESP WiFi module intakes a regulated 3.3V altogether, you can replace IC2 with an adjustable voltage regulator, but be sure the voltage is precisely 3.3V.
The temperature sensor IC3 collects data and then forwards as input to IC4 through pin 2. The IC4 is responsible to transmit data to the Wifi module(ESP8266) via a logic level shifter. Finally, we can read the recorded temperature details on the screen of our gadgets; smartphone and laptops browsing through ThingSpeak website once the WiFi module executes data transmission process.
We establish the connection between the Wi-Fi modem of the user to ESP8266 Wi-Fi module and the temperature details are loaded onto the website of ThingSpeak, and it allows us to view the statics of temperature data on our devices through browser.
For visual interpretation of the project, LCD(pins D0-D7) is interfaced to IC4 (port B) which displays information about the circuit status and recorded data.
Read more: IOT based temperature data logger using esp8266 and pic microcontroller
- What components make up the circuit?
The project includes a PIC16F887 MCU, ESP8266 Wi-Fi module, logic-level shifter, LM35 sensor, two regulators, and a 16×2 LCD. - How is the system powered?
The circuit uses two power sources: 5V for the MCU, LCD, and shifter, and 3.3V for the ESP8266 module. - Does the LM1117-3.3 have to be fixed or adjustable?
You can replace the IC2 with an adjustable voltage regulator as long as the output is precisely 3.3V. - Where does the temperature data get stored?
Data is stored on the ThingSpeak open-source platform via the internet for safe retrieval. - Can I view the recorded data on my phone?
Yes, you can read details on smartphones and laptops by browsing the ThingSpeak website. - Which pin connects the sensor to the microcontroller?
The LM35 temperature sensor forwards data to the PIC16F887 through pin 2. - How does the microcontroller send data to the WiFi module?
The IC4 transmits data to the ESP8266 via a logic level shifter. - What role does the LCD play in this project?
The LCD interfaces with port B of the MCU to display circuit status and recorded data.
