Summary of Interfacing the AT keyboard.
The article explains the PC keyboard scan code system, detailing how keys send specific scan codes on press and release, including extended keys with multi-byte codes. It covers the bi-directional communication protocol between the keyboard and host via KBD Clock and Data lines and common keyboard commands like LED control. An example project uses a 68HC705J1A microcontroller to decode scan codes to ASCII and handle status LEDs, providing features like reset via key combo, toggling port pins, direct decimal and hex entry, and RS-232 output at 9600 bps.
Parts used in the Interfacing the AT keyboard Project:
- 68HC705J1A microcontroller
- PC AT Keyboard (101-key)
- RS-232 line transceiver
- External reset circuitry (for ALT-CTRL-DEL reset)
- LEDs for Num Lock, Caps Lock, Scroll Lock
- Power supply (considering 300mA max keyboard drain)
- Optional 4-line x 40-character LCD panel (for display)
PC Keyboard Theory
The IBM keyboard you most probably have sitting in front of you, sends scan codes to your computer. The scan codes tell your Keyboard Bios, what keys you have pressed or released. Take for example the ‘A’ Key. The ‘A’ key has a scan code of 1C (hex). When you press the ‘A’ key, your keyboard will send 1C down it’s serial line. If you are still holding it down, for longer than it’s typematic delay, another 1C will be sent. This keeps occurring until another key has been pressed, or if the ‘A’ key has been released.
However your keyboard will also send another code when the key has been released. Take the example of the ‘A’ key again, when released, the keyboard will send F0 (hex) to tell you that the key with the proceeding scan code has been released. It will then send 1C, so you know which key has been released.
Your keyboard only has one code for each key. It doesn’t care it the shift key has been pressed. It will still send you the same code. It’s up to your keyboard BIOS to determine this and take the appropriate action. Your keyboard doesn’t even process the Num Lock, Caps Lock and Scroll Lock. When you press the Caps Lock for example, the keyboard will send the scan code for the cap locks. It is then up to your keyboard BIOS to send a code to the keyboard to turn on the Caps lock LED.
 Now there’s 101 keys and 8 bits make 256 different combinations, thus you only need to send one byte per key, right?
Nop. Unfortunately a handful of the keys found on your keyboard are extended keys, and thus require two scan code. These keys are preceded by a E0 (hex). But it doesn’t stop at two scan codes either. How about E1,14,77,E1,F0,14,F0,77! Now that can’t be a valid scan code? Wrong again. It’s happens to be sent when you press the Pause/break key. Don’t ask me why they have to make it so long! Maybe they were having a bad day or something?
When an extended key has been released, it would be expect that F0 would be sent to tell you that a key has been released. Then you would expect E0, telling you it was an extended key followed by the scan code for the key pressed. However this is not the case. E0 is sent first, followed by F0, when an extended key has been released.
Keyboard Commands
Besides Scan codes, commands can also be sent to and from the keyboard. The following section details the function of these commands. By no means is this a complete list. These are only some of the more common commands.
Host Commands
These commands are sent by the Host to the Keyboard. The most common command would be the setting/resetting of the Status Indicators (i.e. the Num lock, Caps Lock & Scroll Lock LEDs). The more common and useful commands are shown below.
| ED | Set Status LED’s – This command can be used to turn on and off the Num Lock, Caps Lock & Scroll Lock LED’s. After Sending ED, keyboard will reply with ACK (FA) and wait for another byte which determines their Status. Bit 0 controls the Scroll Lock, Bit 1 the Num Lock and Bit 2 the Caps lock. Bits 3 to 7 are ignored. |
| EE | Echo – Upon sending a Echo command to the Keyboard, the keyboard should reply with a Echo (EE) |
| F0 | Set Scan Code Set. Upon Sending F0, keyboard will reply with ACK (FA) and wait for another byte, 01-03 which determines the Scan Code Used. Sending 00 as the second byte will return the Scan Code Set currently in Use |
| F3 | Set Typematic Repeat Rate. Keyboard will Acknowledge command with FA and wait for second byte, which determines the Typematic Repeat Rate. |
| F4 | Keyboard Enable – Clears the keyboards output buffer, enables Keyboard Scanning and returns an Acknowledgment. |
| F5 | Keyboard Disable – Resets the keyboard, disables Keyboard Scanning and returns an Acknowledgment. |
| FE | Resend – Upon receipt of the resend command the keyboard will re- transmit the last byte sent. |
| FF | Reset – Resets the Keyboard. |
Commands
Now if the Host Commands are send from the host to the keyboard, then the keyboard commands must be sent from the keyboard to host. If you think this way, you must be correct. Below details some of the commands which the keyboard can send.
| FA | Acknowledge |
| AA | Power On Self Test Passed (BAT Completed) |
| EE | See Echo Command (Host Commands) |
| FE | Resend – Upon receipt of the resend command the Host should re-transmit the last byte sent. |
| 00 | Error or Buffer Overflow |
| FF | Error or Buffer Overflow |
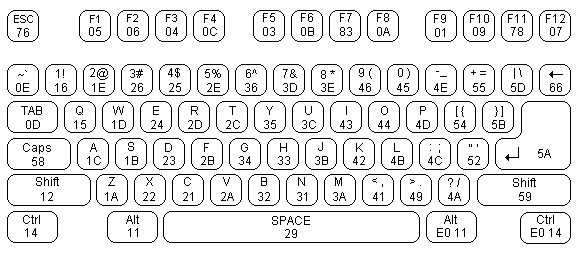
Scan Codes
The diagram below shows the Scan Code assigned to the individual keys. The Scan code is shown on the bottom of the key. E.g. The Scan Code for ESC is 76. All the scan codes are shown in Hex.
As you can see, the scan code assignments are quite random. In many cases the easiest way to convert the scan code to ASCII would be to use a look up table. Below is the scan codes for the extended keyboard & Numeric keypad.
The Keyboard’s Connector
The PC’s AT Keyboard is connected to external equipment using four wires. These wires are shown below for the 5 Pin DIN Male Plug & PS/2 Plug.
A fifth wire can sometimes be found. This was once upon a time implemented as a Keyboard Reset, but today is left disconnected on AT Keyboards. Both the KBD Clock and KBD Data are Open Collector bi-directional I/O Lines. If desired, the Host can talk to the keyboard using these lines.
Note: Most keyboards are specified to drain a maximum 300mA. This will need to be considered when powering your devices
The Keyboard’s Protocol
Keyboard to Host
As mentioned before, the PC’s keyboard implements a bi-directional protocol. The keyboard can send data to the Host and the Host can send data to the Keyboard. The Host has the ultimate priority over direction. It can at anytime (although the not recommended) send a command to the keyboard.
The keyboard is free to send data to the host when both the KBD Data and KBD Clock lines are high (Idle). The KBD Clock line can be used as a Clear to Send line. If the host takes the KBD Clock line low, the keyboard will buffer any data until the KBD Clock is released, ie goes high. Should the Host take the KBD Data line low, then the keyboard will prepare to accept a command from the host.
The transmission of data in the forward direction, ie Keyboard to Host is done with a frame of 11 bits. The first bit is a Start Bit (Logic 0) followed by 8 data bits (LSB First), one Parity Bit (Odd Parity) and a Stop Bit (Logic 1). Each bit should be read on the falling edge of the clock.
The above waveform represents a one byte transmission from the Keyboard. The keyboard may not generally change it’s data line on the rising edge of the clock as shown in the diagram. The data line only has to be valid on the falling edge of the clock. The Keyboard will generate the clock. The frequency of the clock signal typically ranges from 20 to 30 Khz. The Least Significant Bit is always sent first.
Host to Keyboard
The Host to Keyboard Protocol is initiated by taking the KBD data line low. However to prevent the keyboard from sending data at the same time that you attempt to send the keyboard data, it is common to take the KBD Clock line low for more than 60us. This is more than one bit length. Then the KBD data line is taken low, while the KBD clock line is released.
The keyboard will start generating a clock signal on it’s KBD clock line. This process can take up to 10mS. After the first falling edge has been detected, you can load the first data bit on the KBD Data line. This bit will be read into the keyboard on the next falling edge, after which you can place the next bit of data. This process is repeated for the 8 data bits. After the data bits come an Odd Parity Bit.
Once the Parity Bit has been sent and the KBD Data Line is in a idle (High) state for the next clock cycle, the keyboard will acknowledge the reception of the new data. The keyboard does this by taking the KBD Data line low for the next clock transition. If the KBD Data line is not idle after the 10th bit (Start, 8 Data bits + Parity), the keyboard will continue to send a KBD Clock signal until the KBD Data line becomes idle.
Interfacing Example – Keyboard to ASCII Decoder
Normally in this series of web pages, we connect something to the PC, to demonstrate the protocols at work. However this poses a problem with the keyboard. What could be possibly want to send to the computer via the keyboard interface?
Straight away any devious minds would be going, why not a little box, which generates passwords!. It could keep sending characters to the computer until it finds the right sequence. Well I’m not going to encourage what could possibly be illegal practices.
In fact a reasonably useful example will be given using a 68HC705J1A single chip microcontroller. We will get it to read the data from the keyboard, convert the scan codes into ASCII and send it out in RS-232 format at 9600 BPS. However we won’t stop here, you will want to see the bi-directional use of the KBD Clock & Data lines, thus we will use the keyboards status LEDS, Num Lock, Caps Lock and Scroll Lock.
This can be used for quite a wide range of things. Teamed up with a reasonably sized 4 line x 40 character LCD panel, you could have yourself a little portable terminal. Or you could use it with a microcontroller development system. The 68HC705J1A in a One Time Programmable (OTP) is only a fraction of the cost of a 74C922 keyboard decoder chip, which only decodes a 4 x 4 matrix keypad to binary.
The keyboard doesn’t need to be expensive either. Most people have many old keyboards floating around the place. If it’s an AT Keyboard, then use it (XT keyboards will not work with this program.) If we ever see the introduction of USB keyboards, then there could be many redundant AT keyboards just waiting for you to hook them up.
 Features
Before we start with the technical aspects of the project, the salesman in me wants to tell you about the features packed into the 998 bytes of code.
- Use of the keyboard’s bi-directional protocol allowing the status of the Num Lock, Caps Lock and Scroll Lock to be displayed on the Keyboards LEDs.
- External Reset Line activated by ALT-CTRL-DEL. If you are using it with a Microcontroler development system, you can reset the MCU with the keyboard. I’ve always wanted to be able to use the three fingered solute on the HC11!
- Scroll Lock and Num Lock toggles two Parallel Port Pins on the HC705. This can be used to turn things on or off, Select Memory Pages, Operating Systems etc
- “ALTDEC” or what I call the Direct Decimal Enter Routine. Just like using a PC, when you enter a decimal number when holding down one of the ALT keys the number is sent as binary to the target system. E.g. If you press and hold down ALT, then type in 255 and release ALT, the value FF (Hex) will be sent to the system. Note. Unlike the PC, you can use both the numeric keypad or the numbers along the top of the keyboard.
- “CTRLHEX” or you guessed it, Direct Hexadecimal Enter Routine. This function is not found with the PC. If you hold CTRL down, you can enter a Hexadecimal number. Just the thing for Development Systems or even debugging RS-232 Comms?
- Output is in ASCII using a RS-232 format at 9600 BPS. If using it with a development System, you can tap it in after the RS-232 Line Transceivers to save you a few dollars on RS-232 Level Converters.
For more detail: Interfacing the AT keyboard.