In one of the rooms upstairs in my house I have an Infra Red panel. When I am in that room and I switch on this panel I sometimes forget to switch it off, which is a waste of valuable energy. In order to prevent this, I built this Infra Red Panel Timer. Of course you can use this circuit for switching off other devices after a certain timeout.
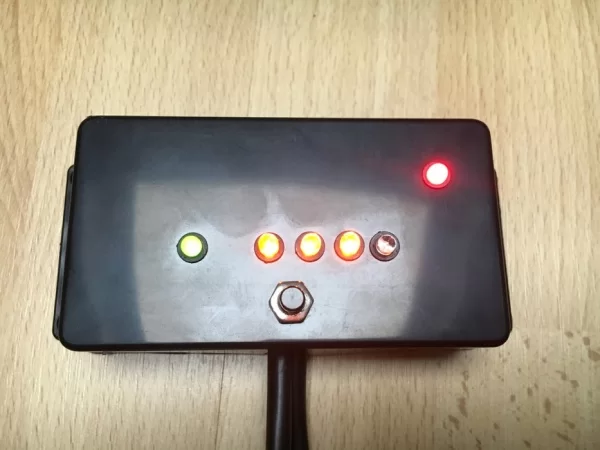
The operation of this timer is simple. When you press a push button once, one LED is turned on, the Infra-Red panel is switched on and a timer of 30 minutes is started. Pressing the push button again will increase the timer value with an additional 30 minutes and a second LED will turn on. Since 4 LEDs are present, the maximum timer value is 2 hours. When counting down, the LEDs will indicate how much time is left so when only 1 hour is remaining, 2 LEDs will light up. If the time is passed, all LEDs are off and the Infra-Red panel is switched off.
During operation, the timer value can be increased with 30 minutes– if not yet at the maximum value of 2 hours – by pressing the push button once. If you want to switch off the timer before the timeout has passed, you have to keep the push button pressed for one second.
As always I built this project around my favorite micro controller the PIC but you can also use an Arduino.
Note that the project is switching the mains power of 230 Volts so be careful!
Step 1: Required Components
You need to have the following components for this project with some references where you can get them:
- A piece of breadboard
- PIC microcontroller 12F615,https://www.win-source.net/microchip-technology-pi…
- Fuse holder + fuse 4A/250V
- Ceramic capacitor of 100nF
- 5 Volt Relays, capable of switching 230 V, 4 Ampere
- Resistors: 1 * 1k, 1 * 10k, 5 * 330 Ohm, 1 * 220 Ohm
- Diode 1N4148, https://www.win-source.net/microsemi-corporation-j…
- Transistor BC548, https://www.win-source.net/transistorsbjt-single-b…
- Pushbutton
- LEDs: 1 Green, 4 Amber, 1 Red
- 5 Volt power supply
- A plastic housing
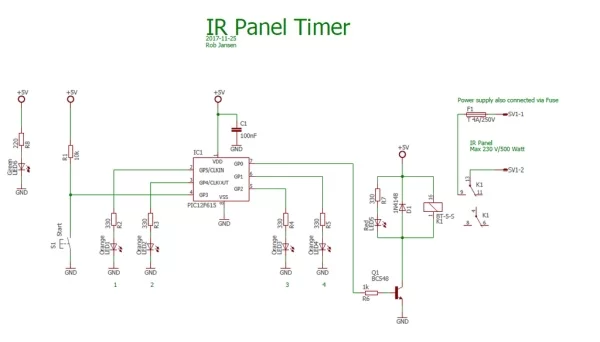
See the schematic diagram on how to connect the components.
Step 2: The Power Supply
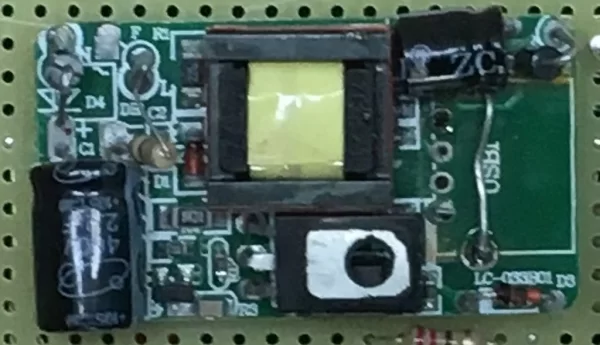
Something need to be said about the power supply is used. You can use any 5 Volt power supply that can provide a current of around 200 mA. In this project I used an old iPhone charger from which I removed the housing and the USB connector and placed it on the breadboard with some wires with a solid core.
The USB connector on this power supply is also used to connect two parts of the PCB of the power supply so make sure to make this connection with a wire. On the picture – sorry for the poor picture quality – you can see this wire which is on the location where the USB connector used to be. The iPhone charger can provide the required power easily.
Step 3: Building the Electronics
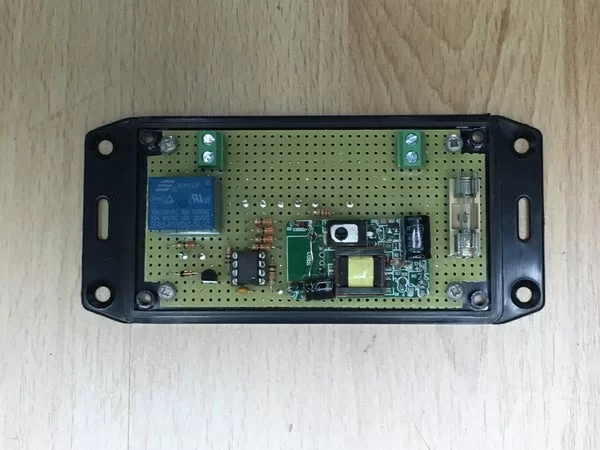
You can build the circuit on a breadboard but be very careful with the Fuse and the Relays that switch the mains power for the Infra-Red Panel. Do not touch the mains power in any way!
In the picture you can see the circuit as I built it on the breadboard including the temporary set-up for testing if it all works. As mentioned earlier, I connected the iPhone charger with some wires with a solid core a bit above the breadboard. It all fits in a standard plastic housing.
When all LEDs and the Relays are on the circuit draws about 130 mA from the 5 Volt power supply.
Step 4:
As already mentioned, the software is written for a PIC12F615. It was written in JAL. Since I did not use any specific libraries the total code size is only 252 bytes which fits easily in the 1k program flash memory this specific controller has.
In this project the PIC runs on an internal clock frequency of 4 MHz, where Timer 1 is used to decrease the timeout value, control the Relays and the LEDs. Timer 1 ticks every 262 ms. The main loop scans the push button and increases the timeout when the push button is pressed or it resets the timeout when the push button is pressed for 1 second or longer.
The JAL source file and the Intel Hex file are attached.
The video shows the operation of the Infra-Red Panel Timer. In this video the timeout is set to 5 seconds per LED instead of 30 minutes as to be able to show how the timer works. The green LED shows that the power is on and the red LED indicates that the Infra-Red panel is switched on. In the video I used a lamp to demonstrate the operation.
Apparently I filmed it upside down so when increasing the timeout value more LEDs on the left will turn on instead of to the right what you normally would expect.
The video shows the following:
- When the push button is pressed, the first LED turns on and the lamp is switched on
- Pressing the push button again, will increase the time and more LEDs will be turned on until all LEDs are on
- During count down, more and more LEDs will turn off until the timeout is passed which switches off the lamp
- Pressing the push button during operation will increase the timeout in this video with 5 seconds
- Pressing the push button for 1 second resets the timeout and switches the lamp off.
Have fun building your own project and looking forward to your reactions.
Attachments
Source: Infra-Red Panel Timer