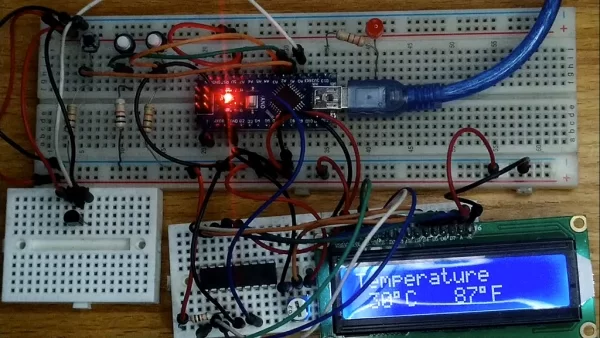
The Incubator Temperature Regulator is made on a breadboard to demonstrate how to program and set the temperature of the regulator. It uses an LM35 temperature sensor, a serial LCD made with a PIC16F628A microcontroller and an Arduino Nano. The low & high setpoint is configurable to maintain the temperature range. An LED is used to represent the function of the heater. When the temperature is below the low setpoint, the LED comes “ON”. It goes “OFF’ when the temperature rises above the high setpoint.
Supplies
1. One Arduino Nano with USB Cable
2. One PIC16F628A
3. LM35 Temperature Sensor
4. One Liquid Crystal Display (LCD)
5. Four 10 Kilo-Ohms Resistors
6. One 330 Ohms Resistor
7. One 10 Kilo-Ohms Reisitor
8. Three Push-button Switches
9. One Big Breadboard
10. Three Mini-Breadboard
Step 1: Build a Serial LCD With PIC16F628A Microcontroller and Connect to the Arduino Nano
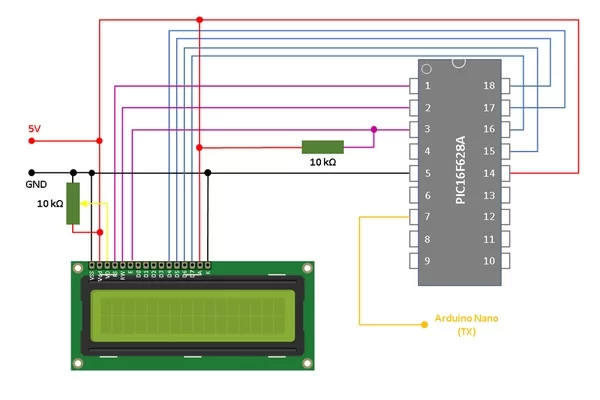
A serial LCD by Jason Jacob on LDmicro Github page (https://github.com/LDmicro/LDmicro/wiki/Stopwatch3-over-serial-LCD-based-on-HD44780-controller) was built on a breadboard. The MAX232 circuit, the transistor, and the push-button switches were removed from Jason’s serial LCD to give the stripped-down version above. Download and unzip the files. Upload the .hex file into the PIC16F628A microcontroller with the PICkit-3 programmer as demonstrated in tutorial 5. Pin 7 of the PIC16F628A should be connected to pin TX of the Arduino Nano circuit. The three push-button switches are used to adjust the low and high setpoints of the controller.
Step 2: Program the Arduino Nano With a LDmicro
See link to the LDmicro program. The code is compiled for Arduino Sketch in LDmicro. Then the Arduino IDE is used to upload the sketch to the nano.
https://drive.google.com/file/d/1obV54rjRBb2wflAQU…
LDmicro application can be downloaded from the link below.
Step 3: Conclusion
Observe that the displayed home page shows the temperature reading in both Celsius and Fahrenheit. Pressing the menu button once displays the low setpoint menu for the adjustment of the low setpoint. A second press of the Menu button displays the high setpoint menu for its adjustment. When the temperature goes below the low setpoint, the LED which represents the heater comes ON. It goes OFF when the temperature is higher than the high setpoint.
See video for full demonstration.
Source: INCUBATOR TEMPERATURE REGULATOR