Summary of ESP32 With RFID: Access Control
This article explains how to build an RFID access control system using a WiFi NodeMCU-32S and an RFID-RC522 module. The project enables reading data from or writing data to RFID cards and keychains via a serial menu interface, utilizing green and red LEDs for authentication feedback. It covers the system's operation, memory structure (16 sectors of 4 blocks), circuit assembly, and provides complete source code for managing SPI communication and data storage.
Parts used in the RFID Access Control System:
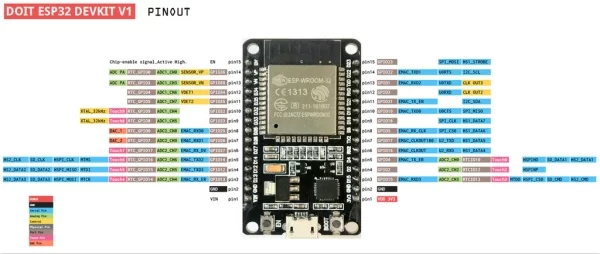
- WiFi NodeMCU-32S ESP-WROOM-32
- RFID-RC522 Module
- Green LED
- Red LED
- RFID Card
- Keychain with RFID Chip
- USB Cable
How about a method of automatic identification through radio signals that can bring you security and control the access of people to a certain location? This is possible through radio frequency identification or RFID from the English Radio Frequency Identification. And it is the assembly of this system that I am going to teach you today.
This system works with a card or it can also be a key chain that has a chip inside it. Through the identification of the data of this card or chip is that it is possible to do access control, a method widely used in records of employee points, public transportation, libraries, among others.
Our goal, therefore, is to create a program in which we can either read an RFID card (or tag) or write the data to it. We use a WiFi NodeMCU-32S and an RFID-RC522 module.
It is important to note that we can store and retrieve data on these chips or cards remotely through devices, as these have up to 1k of memory.
Step 1: Operation
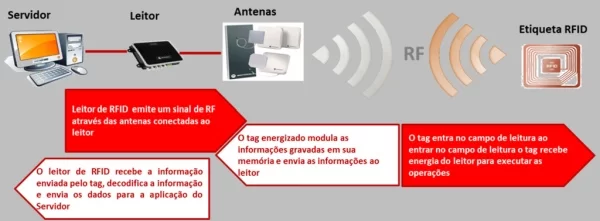
An RFID system basically consists of a transceiver with a decoder and an antenna and a transponder. And how it works? These cards have a reel inside them. When you approach them from the reader, they emit a radio signal through the antennas connected to the reader. The energized tag, which is the card, modulates the information stored in its memory and sends that data to the reader. This card then enters the reading field and receives power from the reader to perform the operations. The RFID reader receives the information sent by the tag, decodes and sends the data to the server application.
Step 2: Memory
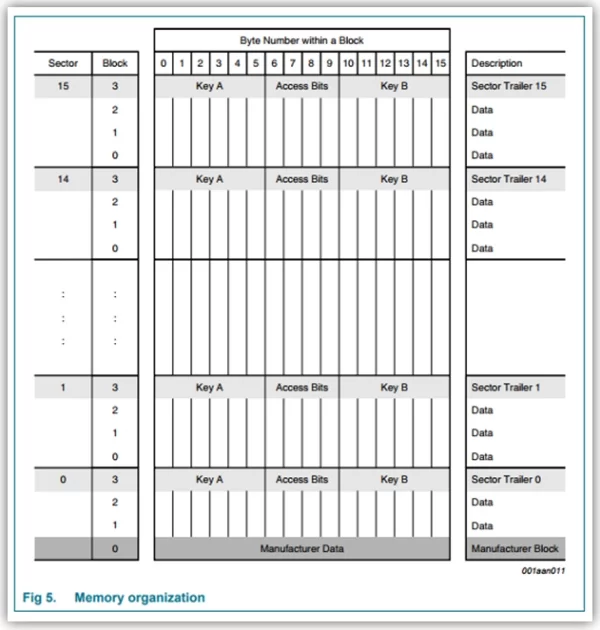
As mentioned, we have 1k of memory inside this type of chip. And, the EEPROM memory is organized as follows: there are 16 sectors of 4 blocks. Each block contains 16 bytes. Remember that within the source code, you only reference the block number.
Step 3: Circuit
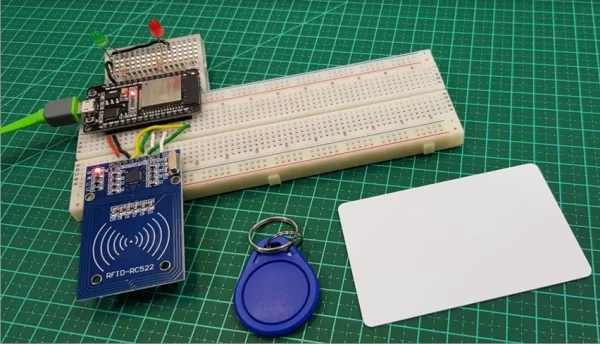
In this image we have a keychain that has an RFID chip and we have the traditional card, besides our assembly. And how does this circuit work? Well, on the internet, you will find the RFID-RC522 module being very used with Arduino, but the problem is that this Arduino, be it Mega, Nano, regardless of the model, it does not have communication, like WiFi network, Ethernet, between others. So we use ESP32 here. It already has Bluetooth, RF, that is, easy communication. I point out here, then, that almost anything that works with Arduino also works with ESP32.
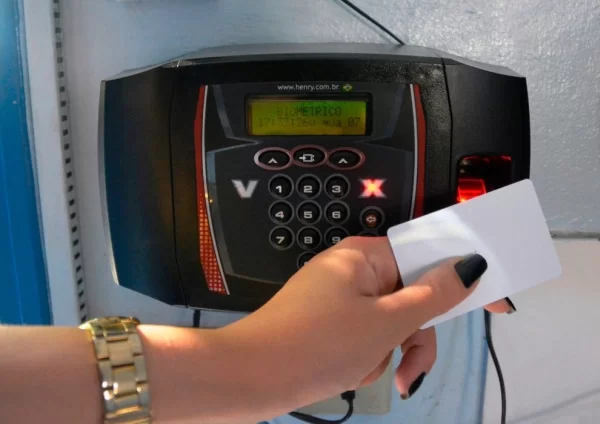
Returning to the circuit, when, during the analysis of a card or chip, the green LED lights up, this means that the identification has been made and the access is released. When the red LED is lit, the data has not been authenticated.
Step 4: WiFi NodeMCU-32S ESP-WROOM-32
Step 5: RFID-RC522
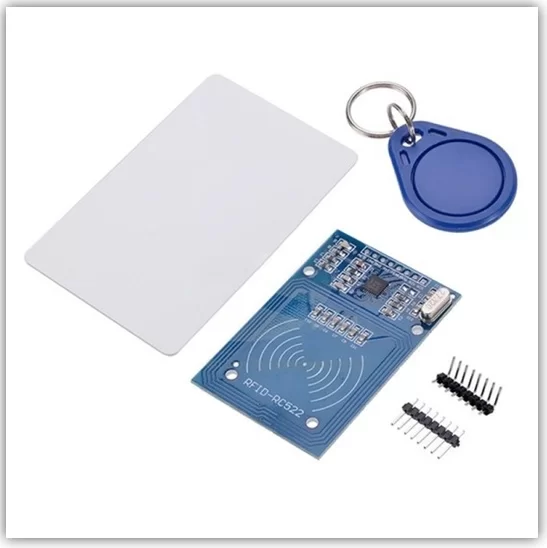
Here we have images of the card and the key ring, as well as the RFID antenna. An important detail is that its Interface is SPI.
Step 6: Assembly
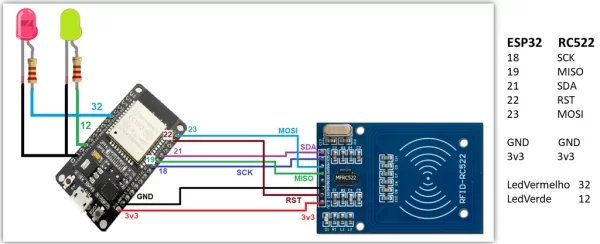
In our assembly we have the ESP32 powered by USB and also connected in the serial of the Arduino IDE, two leds to indicate whether the reading was successful or not, and the RFID reader, the RC522. We have the keyring with chip and the card.
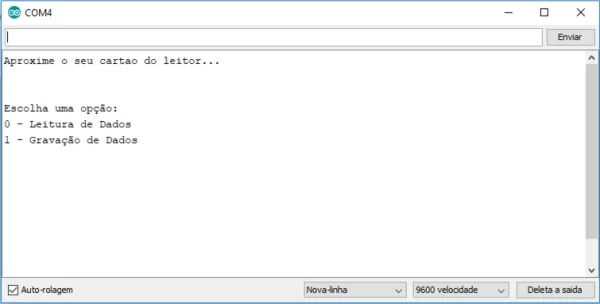
Placing the key ring over the player shows the option of 0 for reading data and 1 for recording this data. We do an example that shows that after reading the chip or card, if the green led is lit the reader recognized the number. In case of the red led, it means that some type of error occurred and the authentication was not performed.
In the example, I still show how to write data to the tag, which will be explained below.
Step 7: Libraries
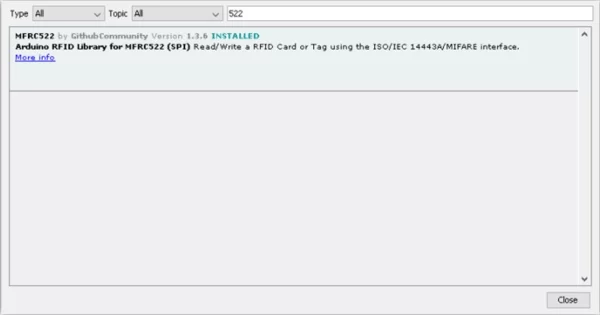
Add the following library “MFRC522”.
Simply access “Sketch >> Include Libraries >> Manage Libraries …”
Step 8: Source Code
Our program will work as follows: after starting, the program will wait for a card or tag to be identified. After that, a menu will appear for the user to choose between making a reading or recording something. Then the operation will be performed.
Step 9: Setup
In this part we deal with the inclusion of the libraries and define the buffer and block data sizes. We create objects and initialize the pins, as well as serial, SPI communication, LEDs and antenna service. I already start to include messages on the serial monitor.
#include <MFRC522.h> //library responsible for communicating with the module RFID-RC522
#include <SPI.h> //library responsible for communicating of SPI bus
#define SS_PIN    21
#define RST_PIN   22
#define SIZE_BUFFER     18
#define MAX_SIZE_BLOCK  16
#define greenPin     12
#define redPin       32
//used in authentication
MFRC522::MIFARE_Key key;
//authentication return status code
MFRC522::StatusCode status;
// Defined pins to module RC522
MFRC522 mfrc522(SS_PIN, RST_PIN);
void setup()
{
  Serial.begin(9600);
  SPI.begin(); // Init SPI bus
  pinMode(greenPin, OUTPUT);
  pinMode(redPin, OUTPUT);

  // Init MFRC522
  mfrc522.PCD_Init();
  Serial.println("Approach your reader card...");
  Serial.println();
Step 10: Loop
In the Loop we wait for the card to approach and select the same one. In the menu, we offer the options of reading or writing data. We instruct this part when the device should leave the ACTIVE state for the STOP state. We have to use such a method to enable new readings.
void loop()
{
   // Aguarda a aproximacao do cartao
   //waiting the card approach
  if ( ! mfrc522.PICC_IsNewCardPresent())
  {
    return;
  }
  // Select a card
  if ( ! mfrc522.PICC_ReadCardSerial())
  {
    return;
  }

    // Dump debug info about the card; PICC_HaltA() is automatically called
//  mfrc522.PICC_DumpToSerial(&(mfrc522.uid));</p><p>  //call menu function and retrieve the desired option
  int op = menu();

  if(op == 0)
    readingData();
  else if(op == 1)
    writingData();
  else {
    Serial.println(F("Incorrect Option!"));
    return;
  }

//instructs the PICC when in the ACTIVE state to go to a "STOP" state
  mfrc522.PICC_HaltA();
  // "stop" the encryption of the PCD, it must be called after communication with authentication, otherwise new communications can not be initiated
  mfrc522.PCD_StopCrypto1();
}
Step 11: Reading
In this part we treat the reading of the data of the card / tag. We have to prepare all the keys, handle the size of the buffer and authenticate the block that we are going to operate. Finally, we set the printing of the data read.
//reads data from card/tag
void readingData()
{
  //prints the technical details of the card/tag
  mfrc522.PICC_DumpDetailsToSerial(&(mfrc522.uid));

  //prepare the key - all keys are set to FFFFFFFFFFFFh
  for (byte i = 0; i < 6; i++) key.keyByte[i] = 0xFF;

  //buffer for read data
  byte buffer[SIZE_BUFFER] = {0};

  //the block to operate
  byte block = 1;
  byte size = SIZE_BUFFER;</p><p>  //authenticates the block to operate
  status = mfrc522.PCD_Authenticate(MFRC522::PICC_CMD_MF_AUTH_KEY_A, block, &key, &(mfrc522.uid)); //line 834 of MFRC522.cpp file
  if (status != MFRC522::STATUS_OK) {
    Serial.print(F("Authentication failed: "));
    Serial.println(mfrc522.GetStatusCodeName(status));
    digitalWrite(redPin, HIGH);
    delay(1000);
    digitalWrite(redPin, LOW);
    return;
  }

  //read data from block
  status = mfrc522.MIFARE_Read(block, buffer, &size);
  if (status != MFRC522::STATUS_OK) {
    Serial.print(F("Reading failed: "));
    Serial.println(mfrc522.GetStatusCodeName(status));
    digitalWrite(redPin, HIGH);
    delay(1000);
    digitalWrite(redPin, LOW);
    return;
  }
  else{
      digitalWrite(greenPin, HIGH);
      delay(1000);
      digitalWrite(greenPin, LOW);
  }

  Serial.print(F("\nData from block ["));
  Serial.print(block);Serial.print(F("]: "));

 //prints read data
  for (uint8_t i = 0; i < MAX_SIZE_BLOCK; i++)
  {
      Serial.write(buffer[i]);
  }
  Serial.println(" ");
}
Step 12: Recording
To write data to the card / tag we have to follow some steps. From the moment we choose the recording option, we have 30 seconds to make the data entry via serial. Enter the data to be written with the “#” character and prepare the key. You will need to clear the buffer and write to block 1, since in block 0 we have saved the card number, which is already in the factory. So we do not touch block 0.
We deal with the size of data and insert a command for authentication and enable secure communication. We also put error messages equal to the part of the reading for display in case of unauthenticated data. We recorded the data in the block due.
//prints thecnical details from of the card/tag
  mfrc522.PICC_DumpDetailsToSerial(&(mfrc522.uid));

  // waits 30 seconds dor data entry via Serial
  Serial.setTimeout(30000L) ;
  Serial.println(F("Enter the data to be written with the '#' character at the end \n[maximum of 16 characters]:"));  //prepare the key - all keys are set to FFFFFFFFFFFFh
  for (byte i = 0; i < 6; i++) key.keyByte[i] = 0xFF;  //buffer para armazenamento dos dados que iremos gravar
  //buffer for storing data to write
  byte buffer[MAX_SIZE_BLOCK] = "";
  byte block; //the block to operate
  byte dataSize; //size of data (bytes)  //recover on buffer the data from Serial
  //all characters before chacactere '#'
  dataSize = Serial.readBytesUntil('#', (char*)buffer, MAX_SIZE_BLOCK);
  //void positions that are left in the buffer will be filled with whitespace
  for(byte i=dataSize; i < MAX_SIZE_BLOCK; i++)
  {
    buffer[i] = ' ';
  }

  block = 1; //the block to operate
  String str = (char*)buffer; //transforms the buffer data in String
  Serial.println(str);   //authenticates the block to operate
   //Authenticate is a command to hability a secure communication
  status = mfrc522.PCD_Authenticate(MFRC522::PICC_CMD_MF_AUTH_KEY_A,
                                    block, &key, &(mfrc522.uid));  if (status != MFRC522::STATUS_OK) {
    Serial.print(F("PCD_Authenticate() failed: "));
    Serial.println(mfrc522.GetStatusCodeName(status));
    digitalWrite(redPin, HIGH);
    delay(1000);
    digitalWrite(redPin, LOW);
    return;
  }
  //else Serial.println(F("PCD_Authenticate() success: "));

  //Writes in the block
  status = mfrc522.MIFARE_Write(block, buffer, MAX_SIZE_BLOCK);
  if (status != MFRC522::STATUS_OK) {
    Serial.print(F("MIFARE_Write() failed: "));
    Serial.println(mfrc522.GetStatusCodeName(status));
    digitalWrite(redPin, HIGH);
    delay(1000);
    digitalWrite(redPin, LOW);
    return;
  }
  else{
    Serial.println(F("MIFARE_Write() success: "));
    digitalWrite(greenPin, HIGH);
    delay(1000);
    digitalWrite(greenPin, LOW);
  }

}
Step 13: Menu
Here we program the Menu. The monitor exposes all options and waits for data to be sent. When an option is selected, it removes 48 from the read value, which is 0 from the Ascii table. This table is old and not used on the PC, but on Arduino and microcontrollers you will have to deal with it. If you do not know, give one searched on the internet to know what it is.
//menu to operation choice
int menu()
{
  Serial.println(F("\nChoose an option:"));
  Serial.println(F("0 - Reading data"));
  Serial.println(F("1 - Writing data\n"));  //waits while the user does not start data
  while(!Serial.available()){};

  //retrieves the chosen option
  int op = (int)Serial.read();

  //remove all characters after option (as \n per example)
  while(Serial.available()) {
    if(Serial.read() == '\n') break;
    Serial.read();
  }
  return (op-48);//subtract 48 from read value, 48 is the zero from ascii table
}
Source: ESP32 With RFID: Access Control
- What components are required to build this RFID system?
The system requires a WiFi NodeMCU-32S ESP-WROOM-32, an RFID-RC522 module, two LEDs (green and red), an RFID card, and a keychain with an RFID chip. - How does the RFID system identify and authenticate users?
The reader emits a radio signal that energizes the tag, which then modulates stored information and sends it back to be decoded by the server application. - Can I write data to the RFID card using this project?
Yes, the program allows users to select option 1 in the menu to enter and write data to block 1 of the chip via the serial monitor. - Why is the ESP32 preferred over standard Arduino models for this circuit?
The ESP32 is used because it has built-in WiFi, Bluetooth, and RF capabilities, whereas standard Arduinos lack native network communication features. - How is the memory organized inside the RFID chip?
The 1k memory is organized into 16 sectors of 4 blocks, where each block contains 16 bytes of data. - What do the green and red LEDs indicate during operation?
A lit green LED means identification was successful and access is released, while a lit red LED indicates the data was not authenticated. - Which library must be added to the Arduino IDE for this project?
You must add the MFRC522 library through the Sketch menu under Include Libraries and Manage Libraries. - What character marks the end of data entry when writing to the tag?
The user must enter the data followed by the # character to signal the end of the input string.