Summary of Electronic Voting Machine Using PIC Microcontroller
Summary: This article describes an Electronic Voting Machine using a PIC16F877 microcontroller, push buttons for four candidates, a master enable button, a count/display button, an LCD for results, and a buzzer. The master button enables one voter at a time; after a vote is cast the system locks until reenabled. Embedded C (mikroC) code and a Proteus simulation are provided to demonstrate operation, voting logic, and result display.
Parts used in the Electronic Voting Machine Using PIC Microcontroller:
- PIC16F877 microcontroller
- Push switches (6 total)
- Buzzer
- LCD display
- Proteus simulation files (circuit diagram)
- Embedded C code (mikroC Pro)
Here you see how easily we can make Electronic Voting Machine Using PIC Microcontroller. By using this machine we can conduct any voting function like audience poll in school, college quiz competition or any small scale general election.
Project Description:
To make our project “Electronic Voting Machine Using PIC Microcontroller”, we need some component like
1) Microcontroller (PIC16f877)
2) 6 no push switch
3) Buzzer
4) LCD Display
Now question is how our Electronic Voting Machine is work? See below the proteus simulation circuit diagram.
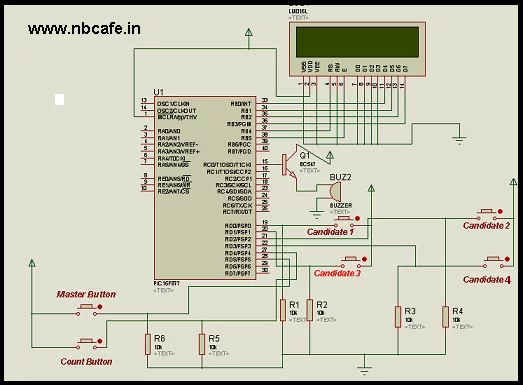
In above circuit diagram you see that four numbers of push button are used for voting four candidates. One master button is their which ensure that any participant can vote one candidate at a time. When a participant want to cast his vote master Switch has to be press to active the system and when participant press any puss button to vote the system will deactivated. Then any button will not work until press master button again. Bellow the master button there has a count button when we press that it will show the result candidate wise. For better to understand working principal see that video first.
See the embedded c code written in Mikroc Pro for PIC for our project “Electronic Voting Machine Using PIC Microcontroller”.
// Author : Subham Dutta
// Date : 11-08-14
// Website : www.nbcafe.in
sbit LCD_RS at RB4_bit;
sbit LCD_EN at RB5_bit;
sbit LCD_D4 at RB0_bit;
sbit LCD_D5 at RB1_bit;
sbit LCD_D6 at RB2_bit;
sbit LCD_D7 at RB3_bit;sbit LCD_RS_Direction at TRISB4_bit;
sbit LCD_EN_Direction at TRISB5_bit;
sbit LCD_D4_Direction at TRISB0_bit;
sbit LCD_D5_Direction at TRISB1_bit;
sbit LCD_D6_Direction at TRISB2_bit;
sbit LCD_D7_Direction at TRISB3_bit;
// End LCD module connectionschar txt[7],txt1[7],txt2[7],txt3[7];void main() {
int a=0,b=0;
int c=0,d=0,e=0;
trisd=1;
portd=0;
trisc=0;
portc=0;while(1)
{
Lcd_Init(); // Initialize Lcd
Lcd_Cmd(_LCD_CLEAR); // Clear display
Lcd_Cmd(_LCD_CURSOR_OFF); // Cursor off
Lcd_Out(1,1,”press button “); // Write text in first row
Lcd_Out(2,1,”cast your vote”); // Write text in second row
while(portd==0)
{ // This loop use for pusing the system
}
if (portd==0b00100000)
{
e=1;
}
while (e==1)
{
Lcd_Cmd(_LCD_CLEAR); // Clear display
Lcd_Out(1,1,”1:xyz 2:yzx”); // Write text in first row
Lcd_Out(2,1,”3:zxy 4:yxz”); // Write text in second row
while(portd==0)
{
}
portc=0b00000001;
delay_ms(100);
portc=0b00000000;
Lcd_Out(2,1,”voting”);
if (portd==0b00000001)
{
a=a+1;
e=0;
}
if (portd==0b00000010)
{
b=b+1;
e=0;
}
if (portd==0b00000100)
{
c=c+1;
e=0;
}
if (portd==0b00001000)
{
d=d+1;
e=0;
}
if (portd==0b00010000)
{
Lcd_Cmd(_LCD_CLEAR);
inttostr(a, txt);
inttostr(b, txt1);
inttostr(c, txt2);
inttostr(d, txt3);
delay_ms(500);
Lcd_out(1,1,”1:”); // Write text in first row
Lcd_out(1,4,txt); // Write text in first row
Lcd_out(2,1,”3:”); // Write text in second row
Lcd_out(2,4,txt2); // Write text in second row
delay_ms(2000);
Lcd_out(1,1,”2:”); // Write text in first row
Lcd_out(1,4,txt1); // Write text in first row
Lcd_out(2,1,”4:”); // Write text in second row
Lcd_out(2,4,txt3); // Write text in second row
delay_ms(2000);
}
}
}
}
Source : Electronic Voting Machine Using PIC Microcontroller
- What microcontroller is used in the project?
The project uses a PIC16F877 microcontroller. - How many push switches are used?
The article lists six push switches in total, with four used for candidate votes, one master button, and one count button. - How does the master button work?
The master button enables the system for one voter; after a vote is cast the system deactivates until the master button is pressed again. - Can the system display voting results?
Yes, pressing the count button shows candidate-wise results on the LCD. - What language and compiler are used for the code?
The embedded C code is written for mikroC Pro for PIC. - Is there a simulation available for the circuit?
Yes, a Proteus simulation circuit diagram is provided in the article. - Does the project include a buzzer?
Yes, a buzzer is listed among the components. - What happens after a voter presses a candidate button?
The system increments that candidate's count, deactivates voting, and requires the master button to be pressed again for the next voter.