Summary of Electronic Code locking system using PIC 16F877 Mircocontroller
This article explains how to build a simple PIC16F877-based electronic code lock using a 4x3 keypad, 16x2 LCD, and a relay. It describes wiring (LCD to PORTB, keypad to PORTD), the role of * to initialize and # to cancel, necessary supporting components (potentiometer, transistor, diode), and provides CCS C code for password entry, checking, and relay control using a predefined password 7196.
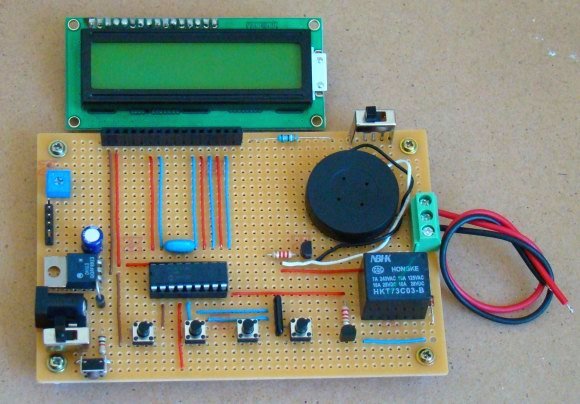
Parts used in the Electronic Code Locking System:
- PIC16F877 Microcontroller
- 4×3 Keypad
- 16×2 LCD
- 5V Relay
- Potentiometer (for LCD contrast)
- Transistor (to drive the relay)
- Diode (for flyback protection)
- Power supply (5V)
- Connecting wires and breadboard/PCB
Electronic code locking system is extremely useful in protecting our precious possessions and can be installed anywhere with bit of engineering in it. We are widely familiar with the Password based e-locks and might have installed in our house. But we are going for Electronic locks made by any company when you can make one by your own.
This project demonstrates you how to make a PIC microcontroller based simple digital lock and also explains the programming behind it.
WHAT YOU NEED:
- PIC 16F877 Microcontroller
- 4×3 Keypad – Key Input
- 16×2 LCD – Status Indicator
- 5V Relay – Activator
Additionally you need a POT which is used to adjust the contrast of the LCD, A transistor to drive the relay since the current obtained from a Pin of Microcontroller is very less. A diode to prevent the reverse flow of current which might damage the controller.
 DESIGN OF ELECTRONIC CODE LOCKING SYSTEM:
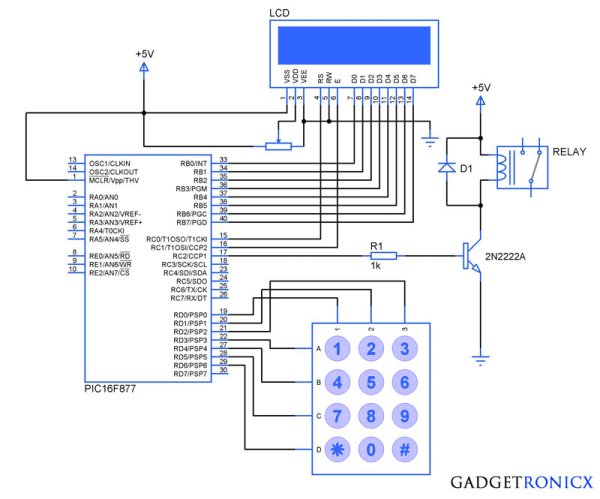
The design of the above Embedded Project is pretty straight forward, you need to interface a LCD to PORT B and Keypad to the PORT D of the Controller. If you are not familiar with it then i suggest you to go through this Interfacing LCD and Keypad with PIC Microcontroller. Now lets see how the system is designed to work as a Locker.
- “*” Key – This key is meant to initialize the system, when the system is turned ON the Controller will scan only this key and pressing this key will enable you to enter the password for your locker.
- “#” Key – When you are done with your locker , you should press this key which will turn off the system and turning off the relay as well.
The remaining keys are meant to feed the character values to the Microcontroller and in turn the Microcontroller will analyze the characters. Based on the Pre defined password in the Controller it will compare the input with it. Thereby it will recognize the correct or incorrect password input.
CODE:
#include<16F877.h>
#include
#bit led=0x05.0
#bit TRIS_led=0x85.0
#byte lcd=0x06
#byte TRIS_lcd=0x86
#bit rs=0x07.0
#bit TRIS_rs=0x87.0
#bit en=0x07.1
#bit TRIS_en=0x87.1
#bit relay=0x07.2
#bit TRIS_relay=0x87.2
#bit C1=0x08.0
#bit C2=0x08.1
#bit C3=0x08.2
#bit R1=0x08.3
#bit R2=0x08.4
#bit R3=0x08.5
#bit R4=0x08.6
#bit TRIS_C1=0x88.0
#bit TRIS_C2=0x88.1
#bit TRIS_C3=0x88.2
#bit TRIS_R1=0x88.3
#bit TRIS_R2=0x88.4
#bit TRIS_R3=0x88.5
#bit TRIS_R4=0x88.6
void display(unsigned char a,int b); //LCD subroutine
char keypad(); //Keypad Subroutine
void check(); //Password check routine
char password[5]={"7196"}; //Predefined password
char pswd[5];
unsigned char open_msg[15]="Enter Password";
unsigned char welcome_msg[8]="Welcome";
unsigned char close_msg[15]="Wrong Password";
char c;
int flag,i,count,j;
void main()
{
TRIS_lcd=TRIS_en=TRIS_rs=TRIS_led=TRIS_relay=0; //Directions set
TRIS_R1=TRIS_R2=TRIS_R3=TRIS_R4=count=0;
TRIS_C1=TRIS_C2=TRIS_C3=1;
while(TRUE)
{
c=keypad();
{
if(c=='*') //Initialize condition
{
flag=1; //Flag set to scan other keys
count=0;
display(0x01,0);
display(0x38,0);
display(0x0f,0);
display(0x80,0);
for(i=0;i<=13;i++)
{
display(open_msg[i],1);
}
display(0xc0,0);
}
else if(c=='#') //Turning off condition
{
count=0;
relay=0;
display(0x01,0);
display(0x0c,0);
}
else
{
display('*',1);
pswd[count]=c; //Storing input in new arrays
count=count+1;
check();
}
}
}
}
void display(unsigned char a,int b)
{
lcd=a;
rs=b;
en=1;
delay_ms(10);
en=0;
delay_ms(10);
}
char keypad()
{
if(flag==0) //Waiting for Initialization
{
while(TRUE)
{
R4=1;
R1=R2=R3=0;
if(C1==1)
{
while(C1==1);
count=0;
return '*';
}
if(C3==1)
{
while(C3==1);
count=0;
return '#';
}
}
}
else if(flag==1)
{
while(TRUE) //Keypad scan
{
R1=1;
R2=R3=R4=0;
if(C1==1)
{
while(C1==1);
return '1';
}
if(C2==1)
{
while(C2==1);
return '2';
}
if(C3==1)
{
while(C3==1);
return '3';
}
R2=1;
R1=R3=R4=0;
if(C1==1)
{
while(C1==1);
return '4';
}
if(C2==1)
{
while(C2==1);
return '5';
}
if(C3==1)
{
while(C3==1);
return '6';
}
R3=1;
R1=R2=R4=0;
if(C1==1)
{
while(C1==1);
return '7';
}
if(C2==1)
{
while(C2==1);
return '8';
}
if(C3==1)
{
while(C3==1);
return '9';
}
R4=1;
R1=R2=R3=0;
if(C1==1)
{
while(C1==1);
- What microcontroller is used in the project?
The PIC16F877 microcontroller is used. - How is the keypad connected to the controller?
The 4x3 keypad is interfaced to PORTD of the PIC controller. - How is the LCD connected to the controller?
The 16x2 LCD is interfaced to PORTB of the PIC controller. - What do the star and hash keys do?
The star key initializes the system to accept a password and the hash key turns off the system and deactivates the relay. - What additional components are recommended?
A potentiometer for LCD contrast, a transistor to drive the relay, and a diode to prevent reverse current are recommended. - How is the relay controlled?
The relay is driven by a microcontroller pin through a transistor; the relay pin is set to 0 to turn it off in the code. - What is the predefined password in the code?
The predefined password in the code is 7196. - Which compiler was used to build the code?
The code was built using the CCS compiler for the PIC microcontroller.