


Summary of DIY plug-in modules to make microcontroller breadboarding easier
This article introduces DIY plug-in modules designed to simplify microcontroller prototyping on breadboards. These pre-built components reduce wiring complexity, save space, and accelerate debugging for PIC-based projects. The author created them to avoid repeatedly assembling basic setups like power supplies, switches, and displays for every new experiment. By using these standardized modules, engineers can focus more on circuit logic rather than physical connections.Parts used in the DIY Plug-in Modules:
- PIC16F628A microcontroller
- PIC16F88 microcontroller
- PIC16F1827 microcontroller
- Male headers
- LM7805 voltage regulator IC
- Tact switches
- LEDs
- MAX232 IC
- External capacitors
- 4-digit common cathode seven segment LED display
- NPN transistors
- Current limiting resistors
- Female headers
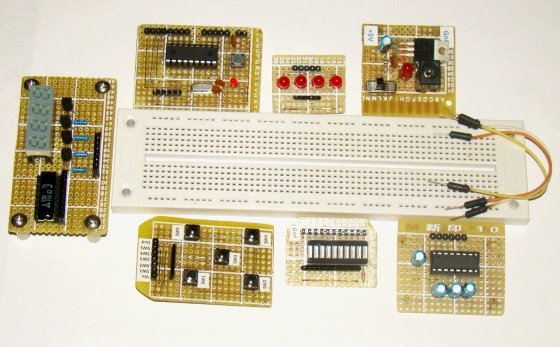
I got inspired to make these modules after getting tired of putting together the same basic microcontroller setup, tact switches and LEDs on breadboard again and again for testing every new project. If you are in a similar situation you may consider building these modules.
MCU module
This module carries a 18-pin PIC microcontroller (PIC16F628A, PIC16F88, PIC16F1827, etc). The power supply pins and the I/O ports of the microcontroller are accessible through male headers that can be easily plugged into a breadboard for rapid prototyping. The headers are arranged in such a way that all I/O pins of a port are available together in a row. This reduces the time to find a specific port pin. This module frees up a lot of space on the breadboard since the oscillator, reset, and ICSP connections are already on board. More details on this module is described.
Power Supply module
Microcontrollers and peripheral devices require electric power to operate. This module provides a regulated +5 V power supply for your circuit on the breadboard. The +5 V and Ground terminals are accessible through male headers that easily go into the breadboard. The module uses the popular LM7805 voltage regulator IC. More details can be found.
Tact switch, LED, and MAX232 modules
These are accessory modules that are frequently used in microcontroller circuits. LEDs are useful for checking the logic status of the output port, whereas tact switches can provide digital inputs. Sometimes, you may need to interface your project with a PC. Serial port communication is a good choice for doing that as it is easy to implement. However, you need a voltage translator to interface the TTL outputs from your microcontroller with a RS232 port of your PC. MAX232 IC serves this purpose very well with a few external capacitors for the internal charge pumps. The circuit diagram of these modules are pretty standard and I didn’t feel it necessary to provide here.
Seven segment LED display module
Seven segment LEDs are primarily used to display decimal numbers but they can also display a few alphabets and other characters. This module contains a 4-digit common cathode seven segment LED display, four NPN transistors for digit selection, and eight current limiting resistors for LED segments (a, b, c, d, e, f, g, DP). This module provides access to its LED segments and digit select pins through female headers. However, they can be replaced with male headers to make it plug-gable into the breadboard. The module uses a standard four digit multiplexed seven segment display circuit.
For more detail: DIY plug-in modules to make microcontroller breadboarding easier
- Why should I use these plug-in modules?
They reduce wire connections, expedite prototyping, and make debugging easier. - Which microcontrollers are supported by the MCU module?
The module supports 18-pin chips like PIC16F628A, PIC16F88, and PIC16F1827. - What IC is used in the Power Supply module?
The module uses the popular LM7805 voltage regulator IC. - How do I interface a microcontroller with a PC serial port?
You need a MAX232 IC to translate TTL outputs to RS232 levels. - What components are inside the Seven segment LED display module?
It contains a 4-digit display, four NPN transistors, and eight current limiting resistors. - Can the Seven segment module be plugged directly into a breadboard?
Yes, female headers can be replaced with male headers to make it plug-gable. - What function do tact switches serve in these circuits?
Tact switches provide digital inputs for the microcontroller. - Do LEDs help in checking the circuit status?
Yes, LEDs are useful for checking the logic status of the output port. - Are oscillator and reset connections included on the MCU module?
Yes, the oscillator, reset, and ICSP connections are already on board. - What type of display circuit does the Seven segment module use?
The module uses a standard four digit multiplexed seven segment display circuit.
Related projects
DHT11 Low Cost Humidity Sensor using PIC16F628A with Proteus Simulation
IntroductionThis microcontroller project demonstrates how to interface a low-cost DHT11 temperature and humidity sensor with a PIC16F628A using a Proteus simulation environment.The...
Motors & Robotics · PIC16F88Exploring the PIC16F88 Microcontroller for Remote-Controlled Robotics
I. Design Summary The objective of this mechatronics system design project is to develop a straightforward control and interface platform for robotics...
Meters & Test Instruments · PIC16F688Determine capacitance by measuring the charging time using PIC16F688
When TEST botton is pressed, RA3 pin is set to "1". R2 and R3 are divide the voltage to 1/2 Vra3 which...
Development Boards & Kits · PIC18F4520Voltage Measurement with A PIC Microcontroller
Voltage Measurement with PIC Microcontroller articulates a methodical framework for facilitating analog voltage measurement using the PIC18F4520, an advanced member of Microchip’s...
Development Boards & KitsUltra-Low Power: Microcontroller Standby Current to 130uA with OPEnS Power Control Board
At the OPEnS Lab, a key focus for our projects is achieving exceptionally long battery life. This was particularly true for the...
Development Boards & KitsAn Integrated Approach to Developing Applications with Microchip PIC Microcontrollers
1. Introduction In our daily lives, a variety of devices such as telephones, household appliances, and cars incorporate "smart" electronics, typically manifested...

Ibrar Ayyub
I am an experienced technical writer holding a Master's degree in computer science from BZU Multan, Pakistan University. With a background spanning various industries, particularly in home automation and engineering, I have honed my skills in crafting clear and concise content. Proficient in leveraging infographics and diagrams, I strive to simplify complex concepts for readers. My strength lies in thorough...