Summary of Display Custom Characters on 16×2 LCD using PIC Microcontroller and XC8
This tutorial explains how to display custom characters on a 16x2 LCD using a PIC16F877A microcontroller. It details the HD44780 controller's memory types, specifically Character Generator RAM (CGRAM), which allows users to define unique patterns. The process involves drawing a character pattern, converting it to binary, and storing it in CGRAM before displaying it. The project uses Proteus for simulation and builds upon previous tutorials regarding LCD interfacing and LED blinking.
Parts used in Display Custom Characters on 16x2 LCD:
- PIC16F877A Microcontroller
- 16x2 Dot Matrix LCD
- Hitachi HD44780 Controller IC
- MPLABX IDE
- XC8 Compiler
- Proteus Simulation Software
In our previous tutorial, we have learnt How to Interface a 16*2 LCD with PIC Microcontroller. We recommend you to go through it before going any further, if you are beginner in PIC microcontroller. Previously we have also learnt the basics of PIC using LED blinking Program and Timers in PIC Microcontroller. You can check here all the tutorials on Learning PIC Microcontrollers using MPLABX and XC8 compiler.
In this tutorial, let us make it more interesting by creating our own custom characters and displaying them on our LCD screen using PIC16F877A PIC Microcontroller. Also there are some pre-defined mostly used custom characters given by the HD44780A IC itself, we will also see how we can use them. As explained in our previous tutorial our LCD has a Hitachi HD44780 controller embedded on it which helps us to display characters. Each character that we display is already pre-defined inside the ROM of the HD44780 IC. We will learn about LCD controller IC HD44780, before displaying character on LCD.
16×2 Dot Matrix LCD Controller IC HD44780:
In order to display a custom character, we have to somehow tell the IC that how the custom character will look like. To do that we should know about the Three types of Memories present inside the HD44780 LCD controller IC:
Character Generator ROM (CGROM): It is the read only memory which, as said earlier, contains all the patterns of the characters pre-defined inside it. This ROM will vary from each type of Interface IC, and some might have some pre-defined custom character with them.
Display Data RAM (DDRAM): This is a random access memory. Each time we display a character its pattern will be fetched from the CGROM and transferred to the DDRAM and then will be placed on the screen. To put it simple, DDRAM will have the patterns of all characters that are currently being displayed on the LCD Screen. This way for each cycle the IC need not fetch data from CGROM, and helps in getting a short update frequency
Character generator RAM (CGRAM): This is also a Random access memory, so we can write and read data from it. As the name implies this memory will be the one which can used to generate the custom character. We have to form a pattern for the character and write it in the CGRAM, this pattern can be read and displayed on the Screen when required.
Now, since we got a basic understanding of the types of Memory present in the HD44780 interface IC. Let us take a look into its datasheet to understand a bit more.
As, the datasheet implies, the HD44780 IC has provided as 8 Locations to store our custom patterns in CGRAM, also on the right we can see that there are some pre-defined characters which can also be displayed on our LCD Screen. Let us see how we can do it.
Displaying a Custom Character on 16×2 LCD:
To display a custom character we must first generate a pattern for it and then save it to the CGRAM. Since we have the library functions with us already, it should be easy to do this with some simple commands. Here is the Library for LCD functions, but here we have copy-pasted all the Library functions in the program itself, so no need to include this header file in our program. Also check this article for Basic LCD working and its Pinouts.
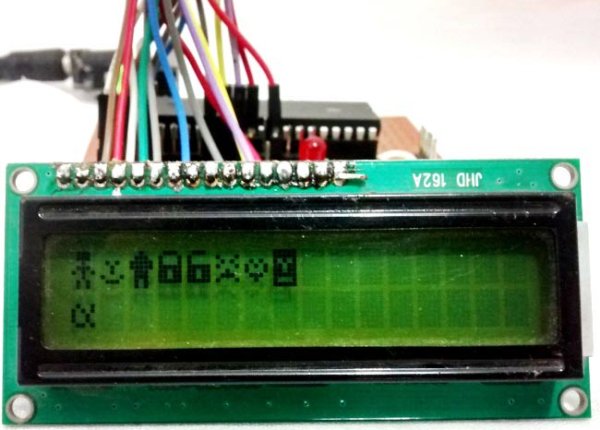
The first step is to generate a pattern or the custom character. As we know each character is a combination of 5*8 dots. We have to select which dot (pixel) should go high and which should stay low. Simply draw a box like below and shade the regions based on your character. My character here is a stick man (hope it looks like one). Once shaded, simple write the equivalent binary value of each byte
Circuit Connections and Testing:
This project does not have any additional hardware requirement, we have simply used the same connections from the previous LCD interfacing tutorial and used the same board which we have created in LED blinking Tutorial. As always let’s simulate the program using Proteus to verify our output.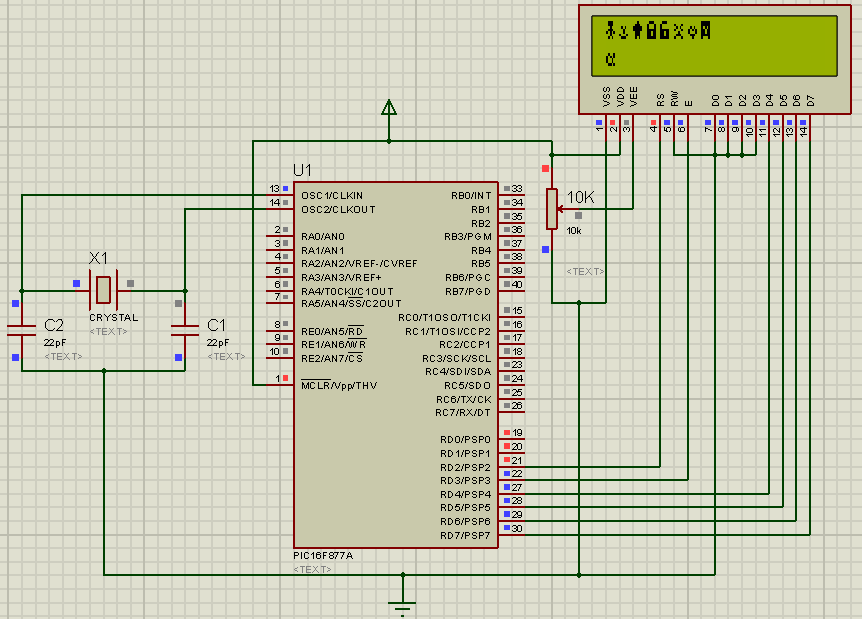
For more detail: Display Custom Characters on 16×2 LCD using PIC Microcontroller and XC8
- How do I create a custom character on the LCD?
You must generate a pattern by shading regions in a 5x8 dot matrix box, then write the equivalent binary value of each byte into the Character Generator RAM. - What is the role of CGRAM in this project?
Character Generator RAM is a random access memory used to store user-defined custom character patterns that can be read and displayed on the screen. - Does the HD44780 IC have pre-defined characters?
Yes, the HD44780 IC contains pre-defined characters in its Character Generator ROM and provides eight locations to store custom patterns. - Which microcontroller is used to interface the LCD?
The project utilizes the PIC16F877A PIC Microcontroller to control the display operations. - Can I use external libraries for this code?
No, the tutorial copies all library functions directly into the program so there is no need to include an external header file. - How many locations are available for custom patterns?
The datasheet implies that the HD44780 IC provides eight specific locations to store custom patterns in the CGRAM. - What software is used to verify the output?
The program is simulated using Proteus to verify the correct display of custom characters on the LCD. - Is the DDRAM responsible for storing the character definition?
No, DDRAM stores the patterns of characters currently being displayed, while CGRAM is used to generate and store the custom character definitions.