Summary of Display custom characters on 16×2 lcd using Microchip Pic16f877 Microcontroller
This article explains how to create and display custom characters on a 16x2 LCD using a Microchip PIC16F877 microcontroller. It details the process of defining character patterns in CG-RAM, utilizing C language with MP-LAB IDE and High Tech C compiler, and managing LCD initialization and control functions.
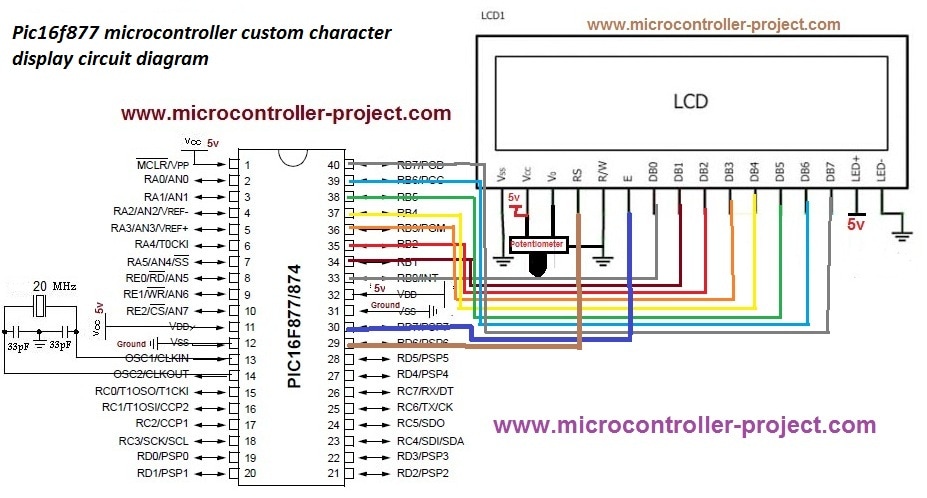
Parts used in the Custom Characters on 16x2 LCD Project:
- Microchip PIC16F877 microcontroller
- 16x2 LCD module
- 20 MHz crystal oscillator
- MP-LAB IDE
- High Tech C compiler
- htc.h header file
Here is a simple project on how to build/generate/make custom characters in 16×2 lcd and then print/display them on lcd using microchip pic16f877 microcontroller. Character lcd contains a set of ascii characters and some Chinese characters in their controllers. We invoke the ascii characters present in the ram for displaying them on lcd. But if we want to display some special characters, symbols or similes we first have to make/declare them in the ram of lcd controller since they are not present in the ascii character set of the lcd. Then we can invoke them for displaying on the lcd when ever is required.
Building and displaying self made custom characters on lcd is not a very hard task. To carry out this task you must know about the internal structure of character lcd. The size of the lcd controller ram, registers of the lcd and CG-RAM(Character generated ram) of lcd. CG-RAM is the most important part of lcd for generating and displaying self made custom characters. CG-RAM is a whole big topic so it is kept in a separate post. CG-RAM is fully discussed in the tutorials below. I recommend you to please take the tutorials other wise you will not unable to understand the code below.
Code is written in c language. MP-LAB ide and High TECH C compiler is used to compile the code. First i included the header file htc.h. This file must be included in every project which is going to be compiled in High Tech c compiler. Then frequency of the crystal is defined which is 20 MHz. Lcd control pins are defined next. Then some character arrays are defined. These character arrays are actually the custom characters which we are going to display on lcd. Delay function is used to give some arbitrary delay where needed. lcdcmd() function is sending commands to lcd. display() function is displaying characters on lcd. lcdint() function is initializing our lcd. In the main function I am generating and then displaying character on lcd.
To understand the code you must first know the internal structure of lcd. The tutorials links given above are very helpful for understanding the working and internal structure of CG-RAM of lcd. If you didn’t take the tutorials. I recommend you to please go through them before going through the code below.
- What is required to display special characters on an LCD?
You must first declare them in the RAM of the LCD controller because they are not present in the standard ASCII character set. - Which memory area is most important for generating custom characters?
CG-RAM (Character Generated RAM) is the most important part of the LCD for generating and displaying self-made custom characters. - What programming language is used in this project?
The code is written in C language. - Which tools are used to compile the code?
MP-LAB IDE and High Tech C compiler are used to compile the code. - Why is the htc.h file included in the project?
This file must be included in every project that is going to be compiled in the High Tech C compiler. - What frequency is defined for the crystal in the code?
The frequency of the crystal is defined as 20 MHz. - What function is used to send commands to the LCD?
The lcdcmd() function sends commands to the LCD. - Can I understand the code without prior tutorials?
No, the author recommends reading tutorials on the internal structure of CG-RAM before attempting to understand the code.