
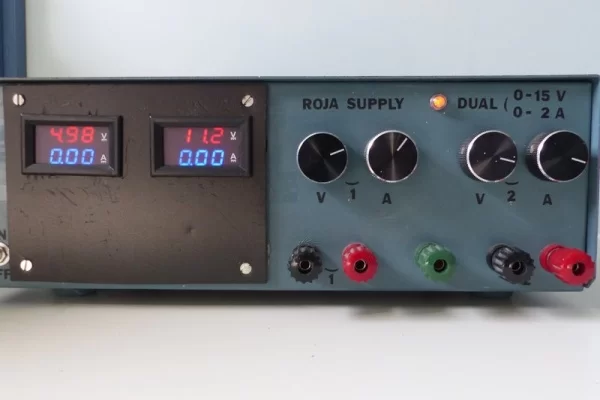
In myteenage years, about 40 years ago, I created a dual linear power supply. I got the schematic diagram from a magazine called ‘Elektuur’, nowadays called ‘Elektor’ in The Netherlands. This power supply used one potentiometer for the voltage adjustment and one for the current adjustment. After many years these potentiometers did not function correctly anymore which made it difficult to get a stable output voltage. This power supply is shown in the picture.
In the mean time I picked up embedded software development as part of my hobby, using the PIC microcontroller and the JAL programming language. Since I still want to use my power supply – yes you can buy cheaper switch mode variants nowadays – I got the idea to replace the old potentiometers by a digital version and so a new PIC project was born.
For adjusting the voltage of the power supply I am using a PIC 16F1823 microcontroller that uses 6 push buttons as follows:
- One push button for switching the output voltage on or off without the need to switch the power supply on or off completely
- One push button to increase the output voltage and another one push button to decrease the output voltage
- Three push buttons to be used as preset. After having set a certain output voltage, that exact voltage can be stored and retrieved using these preset push buttons
The power supply is capable of outputting a voltage between 2.4 Volt and 18 Volt with a maximum current of 2 Ampere.
Step 1: The Initial Design (revision 0)
I made some modifications to the original schematic diagram as to make it suitable for controlling it with the digital potentiometer. Since I never used the original potentiometer for the current adjustment in the past, I removed it and replaced it by a fixed resistor, limiting the maximum current to 2 Ampere.
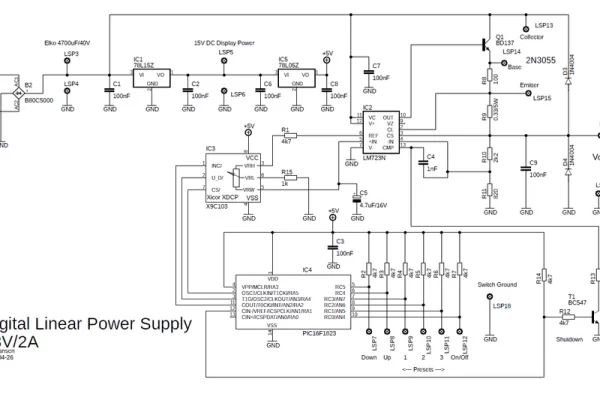
The schematic diagram shows the power supply, built around the old but reliable LM723 voltage regulator. I also created a printed circuit board for it. The LM723 has a temperature compensated reference voltage with a current limiting feature and a wide voltage range. The reference voltage of the LM723 goes to the digital potentiometer of which the wiper is connected to the non-inverting input of the LM723. The digital potentiometer has a value of 10 kOhm and can be changed from 0 Ohm to 10 kOhm in 100 steps using a 3 wire serial interface.
This Power Supply has a digital volt & ampere meter which receives its power from a 15 Volt voltage regulator (IC1). This 15 Volt is also used as input for the 5 Volt voltage regulator (IC5) that powers the PIC and the digital potentiometer.
Transistor T1 is used to shut down the LM723 which brings the output voltage to 0 Volt. Power resistor R9 is used to measure the current, causing a voltage drop over the resistor when current flows through it. This voltage drop is used by the LM723 to limit the maximum output current to 2 Ampere.
In this initial design the Electrolytic Capacitor and the Power Transistor (type 2N3055) are not on the board. In my original design from many years ago the Electrolytic Capacitor was on a separate board so I kept that. The power transistor is mounted on a cooling plate outside of the cabinet for better cooling.
The push buttons are on the front panel of the cabinet. Each push button is pulled-up high by the 4k7 resistors on the board. The push buttons are connected to ground which makes them active low.
You need the following electronic components for this project (alsosee revision 2):
- 1 PIC microcontroller 16F1823
- 1 digital potentiometer of 10k, type X9C103
- Voltage regulators: 1 * LM723, 1 * 78L15, 1 * 78L05
- Bridge rectifier: B80C3300/5000
- Transistors: 1 * 2N3055, 1 * BD137, 1 * BC547
- Diodes : 2 * 1N4004
- Electrolytic Capacitors: 1 * 4700 uF/40V, 1 * 4.7 uF/16V
- Ceramic Capacitors: 1 * 1 nF, 6 * 100 nF
- Resistors: 1* 100 Ohm, 1* 820 Ohm, 1 * 1k, 2 * 2k2, 8 * 4k7
- Power resistor: 0.33 Ohm / 5 Watt
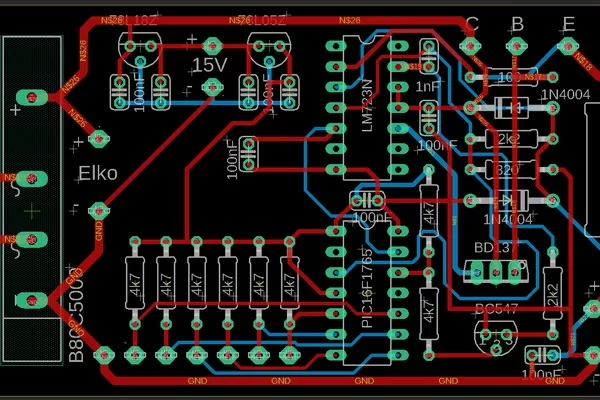
I also designed a printed circuit board which is shown in the attached screenshot and picture.
Step 2: The Revised Design (revision 2)
After having ordered the printed circuit boards I came up with the idea to add a feature that I call ‘voltage protection’. Since I had still a lot of program memory available in the PIC I decided to use the PIC’s built-in Analog to Digital Converter (ADC) to measure the output voltage. In case this output voltage – for whatever reason – goes up or down, the power supply is switched off. This will protect the connected circuit against over voltage or will stop any short circuit. This was revision 1 which is an extension to revision 0, the initial design.
Although I tested the design using a breadboard (see picture), I still was not happy with it. Sometimes it seemed that the digital potentiometer was not always exactly at the same position, e.g. when recovering a preset value. The difference was small but disturbing. It is not possible to read the value of the potentiometer. After some thought I created a revision 2 which is a small redesign of revision 1. In this design, see schematic diagram revision 2, I did not use a digital potentiometer but I used the built-in Digital to Analog Converter (DAC) of the PIC to control the output voltage via the LM723. The only problem was that the PIC16F1823 only has a 5-bit DAC which was not sufficient because the up steps and down steps would be too big. Because of that I switched to a PIC16F1765 which has a 10-bit DAC on board. This version with the DAC was reliable. I could still use the initial printed circuit board since I only need to remove some components, replace 1 capacitor and add 2 wires (1 wire was already needed for adding the voltage detection feature of revision 1). I also changed the 15 Volt regulator to an 18 Volt version to limit power dissipation. See the schematic diagram of revision 2.
So if you want to go for this design you need to do the following compared to revision 0:
- Replace the PIC16F1823 by a PIC16F1765
- Optional: Replace the 78L15 by a 78L18
- Remove digital potentiometer type X9C103
- Remove resistors R1 and R15
- Replace the electrolytic capacitor C5 by a ceramic capacitor of 100 nF
- Make a connection between IC4 pin 13 (PIC) to IC2 pin 5 (LM723)
- Make a connection between IC4 pin 3 (PIC) to IC2 pin 4 (LM723)
I also updated the printed circuit board but did not order this version, see screenshot.
Step 3: (Dis) Assembly
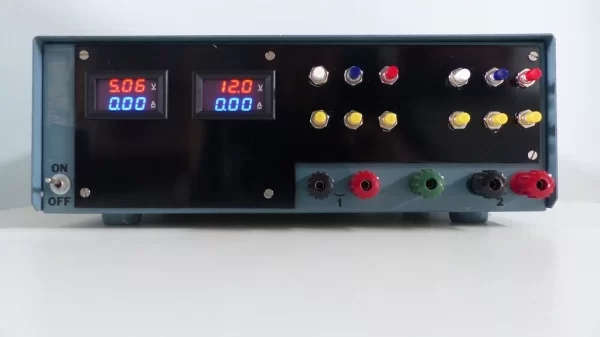
In the picture you see the power supply before and after the upgrade. To cover the holes that were made by the potentiometers I added a front panel on top of the front panel of the cabinet. As you can see I had made a dual power supply where both power supplies are completely independent of each other. This makes it possible to put them in series in case I need a higher output voltage than 18 Volt.
Due to the printed circuit board it was easy to assemble the electronics. Remember that the big electrolytic capacitor and the power transistor are not on the printed circuit board. The foto shows that for revision 2 some components are not needed anymore and 2 wires were needed one to add the voltage detection feature and the other one due to the replacement of the digital potentiometer by the Digital to Analog Converter of the PIC microcontroller.
Of course you need a transformer that is capable of supplying 18 Volt AC, 2 Ampere. In my original design I used a ring core transformer because they are more efficient (but also more expensive).
Step 4: The Software for Revision 0
The software performs the following main tasks:
- Controlling the output voltage of the power supply via the digital potentiometer
- Handle the features of the push buttons, which are:
- Power On/Off. This is a toggle function which sets the output voltage to 0 Volt or to the last selected voltage
- Voltage up/Voltage down. With each push on the button the voltage goes slightly up or slightly down. When these push buttons stay pressed a repeat function is activated
- Preset store/Preset retrieve. Any voltage setting can be stored in the EEPROM of the PIC by pressing the preset push button for at least 2 seconds. Pressing it shorter will retrieve the EEPROM value for that preset and set the output voltage accordingly
At power on, all pins of the PIC are set as input. In order to prevent that an undefined voltage is present at the output of the power supply the output stays at 0 Volt until the PIC is up and running and the digital potentiometer is initialized. This power down is achieved by the pull-up resistor R14 which makes sure that the transistor T1 shuts down the LM723 until it is released by the PIC.
The rest of the software is strait forward. Push buttons are scanned and if something needs to change, the value of the digital potentiometer is changed using a three wires serial interface. Note that the digital potentiometer also has an option to store the setting but this is not used since all settings are stored in the EEPROM of the PIC. The interface with the potentiometer does not offer a feature to read the value of the wiper back. So whenever the wiper needs to be preset to a certain value, the first thing that is done is putting the wiper back to the zero position and from that point on send the number of steps to put the wiper in the correct position.
To prevent that the EEPROM is written with every push of a button, and thus lowering the lifespan of the EEPROM, the EEPROM contents is written 2 seconds after the push buttons are no longer activated. This means that after the last change of the push buttons, make sure to wait for at least 2 seconds before switching of the power as to make sure that the last setting is stored. When switched on, the power supply will always start with the last selected voltage stored in EEPROM.
The JAL source file and the Intel Hex file for programming the PIC for revision 0 are attached.
Attachments
Step 5: The Software for Revision 2
For revision 2 the main changes in software are the following:
- The Voltage Detection feature was added by measuring the output voltage of the power supply after it has been set. For this the ADC converter of the PIC is used. Using the ADC, the software takes samples of the output voltage and if after a few samples the output voltage is about 0.2 Volt higher or lower than the set Voltage, the power supply is switched off.
- Using the DAC of the PIC to control the output voltage of the power supply instead of using a digital potentiometer. This change made the software simpler since there was no need to create the 3-wire interface for the digital potentiometer.
- Replace the storage in EEPROM by storage in High Endurance Flash. The PIC16F1765 does not have EEPROM on board but uses a part of the program Flash for storing non-volatile information.
Note that the Voltage Detection is not activated initially. At power up the following buttons are checked for being pushed:
- Power on/off push button. If pressed both voltage detection features are switched off.
- Down push button. If pressed the low voltage detection is activated.
- Up push button. If pressed the high voltage detection is activated.
This voltage detection settings are stored in the High Endurance Flash and are recalled when the power supply is switched on again.
The JAL source file and the Intel Hex file for programming the PIC for revision 2 are also attached.
Attachments
- 16f1765_Digital_Power_Supply_Revision_2.txtDownload
- 16f1765_Digital_Power_Supply_Revision_2.hexDownload
Step 6: The Final Result
In the video you see the power supply revision 2 in action, it shows the power on/power off feature, voltage up/voltage down and the usage of the presets. For this demo I also connected a resistor to the power supply as to show that real current is flowing through it and that the maximum current is limited to 2 Ampere.
If you are interested in using the PIC microcontroller with JAL – a Pascal like programming language – visit the JAL website.
Have fun making this Instructable and looking forward to you reactions and results.
Source: Digital Controlled Linear Power Supply
About The Author
Muhammad Bilal
I am a highly skilled and motivated individual with a Master's degree in Computer Science. I have extensive experience in technical writing and a deep understanding of SEO practices.