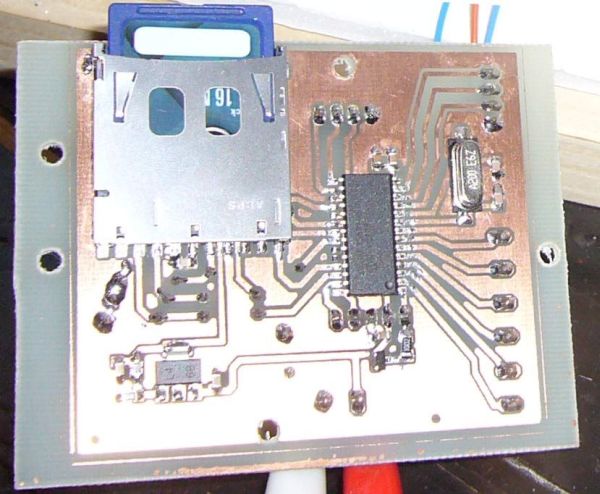
Daft Punk Table Replica Graphics Controller
This instructable presents a graphics controller card for something like the Daft Punk Table Replica. This should be used in conjunction with a driver board (output expander) like this one, which will drive the high loads presented by the table. This is a work in progress and collaborations on this instructable are welcome.
*audio used under creative commons license, see youtube for details.
The graphics controller does three things:
1) Accepts display instructions from a USB port (virtual com port compatible with old winamp plugins).
2) Reads display scripts from an SD card. Display scripts are made on a PC using the seq_txt program (and source) attached to this instructable.
3) Decodes display instructions and sends them to the driver board(s).
USB
The board uses a 28 pin PIC with USB hardware. This is super easy to implement using the microchip USB CDC driver. I haven’t bothered to implement this yet. I don’t plan to use it and a bit of memory trickery is required. The 18fX550 USB PICs only have 2K of ram. The FAT file system (below) uses 2 512K buffers to read the SD card. That is taken from the upper 1k normally reserved for USB by the microchip CDC driver. SO: since USB use will always take priority (ie SD card play will stop and the table waits for instructions after USB is plugged in) we can just reuse the FAT memory buffers for the USB when connected. Also note:the USB Vcc pin is actually connected to a PIC pin. This is so we can detect a usb cable without full enumeration (maybe?).
SD card
Animation files can be made with the seq_txt.exe (windows) program (and source) attached to this instructable. The original files can be found here. I did not write these. I believe they were created by instructables user Mathieu Roncheau. Its a bare EXE file from an unknown source. Use at your own risk (but I’ve had no problems). Click on the squares in this program to create images that will display on the daft punk table, click ‘>’ to make a new frame. Click the disk to save a plain text representation of the images you drew.
Here is an example of the file that goes with the image shown in the screen shot below:
1 2 4 8 16
This is the ascii representation of the binary equivalent of each column, with the top as 0. The first column is 10000 = 1, the third is 00100=4, and so on. Each line represents a frame, each line is terminated with both \r and \n.
These animation files are copied to an SD card (like your digital camera uses) just like any other disk. The controller accepts SD cards in any of the common formats (FAT12/16/32) thanks to a stripped down version of DOSFS by Lewin Edwards.
The controller reads through all the *.dpt (daft punk table) files in the root directory of the SD card and ‘plays’ each one. When all files are read it starts over at the beginning.
Display Decoding
No matter how the data gets into the controller, it arrives as ASCII representations of bitmap images. Yuck.
We need to convert the ascii data to a real integer. In the example above the last column (00001 in binary) is represented by 16 in decimal. 16 is actually represented by two bytes on a PC – 1 & 6. Furthermore, these bytes are encoded as ASCII, 1 is actually 0x31 and 6 is actually 0x36.
A) Subtract 0x30 from each digit (|= 0x30…xor?).
B) Add first digit to new variable X
C) Multiply X by 10
D) Add second digit, repeat C & D as needed to process all digits.
Once that is finished its just a matter of banging the bits out a few pins.
Code Status
The code is just barely alpha. I wanted to get the PCB and code posted because a few people have written expressing interest. The USB driver is not yet implemented and requires some attention to memory organization. The FAT & SD libs work great, it reads files in a loop without any problem, but only FAT 16 has been tested. The code has not yet been moved into neat functions, its simply ‘as is’ from my first working prototype.

Future improvements:
- USB connectivity through CDC (virtual com/serial port).
- Built in font for rendering plain text over USB or reading .txt files from the SD card.
- Use built in font to display NO CARD/BAD CARD messages.
- Error handling on SD reads and animation parsing.
- ADC ports were left available for beat detection based speed control.
- ADC/DIO ports left free for switches or potentiometers.
- Add loop and speed instructions to the animation script format…since bitmap values are always 0-31, a value of 32 could trigger a loop of N times determined by the next digit. A value of 33 could specify a new update rate (speed).
- Hardware test/power on self test (POST) – write bytes into the IO expander, and read output from last board in the chain. If bytes out=bytes in then hardware is functioning correctly (requires loop-back connection to last output expander board in the chain).
For more detail: Daft Punk Table Replica Graphics Controller using PIC18f2550
