Introduction
Our project is a collaborative game in which two people work together on different devices to navigate a maze, one on the PIC and the other on a VR headset. Each player lacks crucial knowledge about the maze that would allow them to reach the end — the user on the PIC has a bird’s eye view of the maze displayed on the TFT and can see an indication of where the end of the maze is but has no idea where the other user is inside of it, while the player in the VR can wander through the maze and can see where they are, but have no global knowledge of its layout. Together, they have to coordinate to lead the VR player to the correct end location and indicate that they’ve correctly identified it as the end point in order to win.
We chose this project concept because we wanted to implement a game that could use Zoom and social distancing not as a barrier to gameplay, but as an important element of it. We were especially inspired by the game Keep Talking and Nobody Explodes on Steam, in which one user defuses a virtual bomb instructed by the other using a manual.
High Level Design
The sequence of gameplay can be summarized as follows:
- In the VR interface, the player pushes a button to indicate they are ready to start playing
- The Unity code uses Python scripts and pushes and pulls to Github repositories to tell the PIC code to generate a new, 8×8 maze
- The PIC code uses a modified version of Prim’s Algorithm to generate the maze with known beginning and ending points
- The PIC code draws the maze on the TFT for the PIC player to see, with the end but not the start indicated
- The PIC uses Python scripts and pushes and pulls to Github repositories to send a JSON with the information for the maze in it to Unity
- The Unity code parses the JSON and uses it to generate the maze
- The Unity game indicates to the user that they can now traverse the maze
- Both players must use their knowledge of the maze to determine where the exit is together and have the VR player reach that room
- The VR player indicates on their controller that they believe they are in the end room
- If they are correct, the glowing orb they hold turns blue. If they are incorrect, the orb turns red and the lights all dim, making it more difficult to continue and discouraging random guessing
To implement this, we wrote code in three locations and in three different languages: C in MPLAB X 3.05 for the PIC, Python on the remote desktop, and C# in Unity. To get the maze information from the remote desktop in Phillips, we used a series of Github pushes and pulls to repositories we made. While this communication protocol is far from ideal, it was the only way we were able to do it while abiding by the security protocols put in place by Cornell.
PIC-32 (with TFT)
There are three major parts of the C code on the PIC, the maze generation code, the Python interface, and the drawing of the maze onto the TFT:
Maze Generation Code
This algorithm begins with all nodes on a grid of cells of pre-determined size. For our implementation, we chose to make it 8×8. To start, it chooses a random starting node and adds it to the maze. The code then adds the four adjacent nodes to a list of neighboring nodes. Then the code chooses a neighboring node at random and adds it to the maze. It then deletes the wall between the two nodes and adds all of this node’s neighbors to the list of neighboring nodes. The code then iterates until all nodes are connected to the maze — randomly choosing a new neighbor, adding it to the maze by deleting a wall, and then adding its neighbors to the list. This algorithm creates a “perfect maze” every time, i.e. one in which every node can be reached from any other node.
To implement this in C, we made use of a Struct to store all of the relevant information for each node.
                // maze will be a square of size maze_size x maze_size
                #define maze_size 8

                // define the struct for a single maze node (or room) with necessary fields
                typedef struct Maze_t {
                    short north; // 0 if wall, 1 if door
                    short south; // 0 if wall, 1 if door
                    short east; // 0 if wall, 1 if door
                    short west; // 0 if wall, 1 if door
                    short x; // location of specific node in maze
                    short y;
                    // for maze generation, not important for data transfer
                    short isConnected; //is in neighbors list
                    short inMaze; // is included in the valid maze area
                }Maze_node;
                // array of structs of maze nodes
                Maze_node maze[maze_size][maze_size];
The code above initializes the struct with 8 fields: four for the cardinal directions: north, south, east, and west, two for x and y, and two to indicate the state of the node: isConnected and inMaze. The cardinal direction fields contain 0 or 1 to indicate if there are walls or openings on those sides for the node. The x and y fields contain values [0, 7] to indicate their location in the coordinate system of the maze, with (0, 0) in the bottom left and (7,7) in the top right. The isConnected field begins as 0 and is set to 1 once the node is added to the list of neighboring nodes, which we added to ensure we wouldn’t have the same neighbor node added to the list multiple times. The inMaze field begins as 0 and is set to 1 once the node is removed from the list of neighboring nodes and added to the maze itself. Below the struct initialization, it also creates a global variable for the entire maze of a 2D array of Maze_node structs.
The generate_maze function is the primary function that controls the generation of the maze. In the beginning, it initializes the neighbor list as a 1D array of Maze_node** objects of size (maze_size*maze_size)/2 because more than half of the neighbor nodes at any given time cannot be marked as neighbors. To start, all fields are set to NULL. We then randomly chose the startX and startY values of the maze to be in the range [0, maze_size-1]. The starting node, cur_node, is then set to the pointer to the element in the maze array at [startX,startY] to begin. We chose to use pointers to these structs instead of the actual values in order to save memory.
As the first element to be added to the maze, the inMaze field of cur_node is set to 1. We then use a helper function, getNeighbors(cur_node, neighbors) to add the neighbors of the node to the neighbors list. This helper function will ensure that the neighbors added both exist by making sure that the nodes they are adding exist in the maze, skipping over the sides where cur_node is an edge as well as aren’t already in the neighbors list. When these nodes are added to the neighbors list, their isConnected field is set to 1.
Then we randomly select a valid element of the neighbors list to connect to the current node. To connect the nodes, we made use of the helper function connect_nodes(cur_node, temp, neighbors, index) which will connect cur_node and temp, which is the neighbor just randomly selected. This function will remove the wall between cur_node and temp, adding temp to the maze and setting its inMaze field to 1. It also takes in the neighbors list and the index of temp in the neighbors list so it can properly remove the node from the neighbors list.
Once the second element of the maze is added, we use a large do{}while() loop to perform the rest of the maze generation iteratively. As the while condition, we use the have_neighbors(neighbors) function to check if there are still neighbors in the list. The function iterates through the neighbors list to check if any element is not NULL, returning 1 as soon as it finds any nonNULL elements in the list. Once the function returns 0, meaning that there are no more neighbors in the neighbors list, the maze is complete.
Inside the do{}while(), we first pick a random element of the neighbor list to add to the maze. We assign that node to the neigh variable of type Maze_node*, indicating that it will be the next node to add to the maze. We then have to find one of its neighbors that is already in the maze to connect it to, and if it has multiple, choose which one randomly to avoid bias in any direction. To accomplish this, we use another do{}while() statement that uses a rand() function to select a number between 0 and 3 and assign it to a short variable side. We arbitrarily chose for it to check north if side is 0, east if side is 1, south if side is 2, and west if side is 3 using a switch statement. Within each case, it will check if a node exists at all to that side, and if it does, assign it to the variable cur_node. The do{}while() will terminate when a neighboring node is found that is already in the maze.
Once we’ve identified both a node in the neighbors list and one of its neighbors that is already in the maze, they are connected using the connect_nodes function which will also remove it from the neighbors list, set its inMaze field to 1, and add its neighbors to the list. We also set the endX and endY variables of type short to the x and y fields of neigh so that whenever the code terminates, the endX and endY will be set to the last node added to the maze.
When the generate_maze code completes, the end result is the maze 2D array of Maze_nodes with all fields accurately set so that it can be both drawn on the TFT and sent via Python to the Unity code.
Drawing on the TFT
The draw_maze() function is responsible for drawing the maze generated by Prim’s Algorithm onto the PIC so that the player on the Lab computer can see the bird’s eye view of the maze. It begins by drawing the outer borders using the draw_Rect function. We then iterate through the maze[8][8] array of Maze_nodes to draw the walls one node at a time using the draw_wall function.
The draw_wall function takes in a single pointer to a Maze_node. This function uses the x, y, north, south, east, and west fields to determine where to draw the lines. It calculates where the x and y coordinates will correspond to in pixels on the TFT and then uses the cardinal direction fields to determine whether or not to draw walls at its boundaries.
After the maze is fully drawn, we use the global variables for the coordinates of the ending node as dictated by the generate_maze function to draw a red square in the middle of the end node on the TFT. To activate an easier mode of the game in which the start position is known, we also have code that draws the start node of the maze that is currently commented. We often used this for debugging purposes as we created the game, but feel that excluding this code makes the game more difficult and interesting.
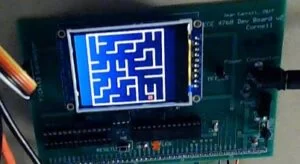
An example maze drawn on the TFT. The red square indicates the end point.
Serial Python interface
The serial python interface code on the PIC side is handled by the process_cmd thread, which continually checks to see if it has received a command using the global short variable process_cmd. The thread yields until the variable new_cmd is set to 1, meaning that a new script has been received, after which the new_cmd variable is reset to 0. The python serial thread ensures that when a string is received that begins with the character ‘c’ that the thread is saved using the strcpy thread into receive_string and that new_cmd is set to 1 to signal to the process_cmd thread to begin.
In the process_cmd thread, a new command indicates that the C code will need to generate a new maze, so the code next resets all the elements of the maze array so that all nodes contained have the correct values set for x and y, as well as all other variables set to 0 so that every node begins with all walls, not in the neighbors list and not contained yet in the maze. We then seed the randomization using ReadTimer2() to ensure that a new maze is generated every time. The generate_maze() function is called to make a new maze, followed by clearing the TFT screen and using the draw_maze() function to draw it on the TFT for the PIC player.
Then, the code uses two nested for loops to send each node in the maze individually using a helper function called send_maze, which takes in a single node in the 2D maze array. The send_maze thread sends the information for a single node using a printf statement. In addition to sending the fields of x, y, and the cardinal directions to the Python script, it also checks if each node is the start or end node by checking its x and y with the global variables startX, startY, endX, and endY and sends 1 or 0 for short variables isStart and isEnd.
Python
We based the python code for interfacing with the PIC through serial communication off of the GUI code provided for us in lab 0. Using this baseline code, we became familiar with how to both send and receive serial messages to/from the PIC. Additionally, we made use of the json, os, and subprocess libraries to allow communication to the unity code by pushing jsons to a git repo.
We initially intended to have the python send and receive different types of command messages to/from the PIC but due to time constraints only ended up implementing a make maze command. After sending the serial message requesting the PIC to make a maze, the python code waits for serial messages from the PIC containing information about each node in the maze. The python saves each received node in a 2d array of internally defined maze_node objects, sending the full maze data to the unity once the array is filled.
Having the python and unity communicate took a lot of trial and error to find a relatively efficient medium that wasn’t restricted by Cornell’s IT policies for lab computers. We ultimately settled on using git repos pushed and pulled to/from by both the python and unity codes. The python starts by pulling a command file over and over to see if there is a command from unity (make maze being the only one implemented) before passing that command onto the PIC. Once the full maze data has reached the python, it loops through all the maze nodes and stores their data in a json file before pushing that to the repo for it to be pulled on the unity side.
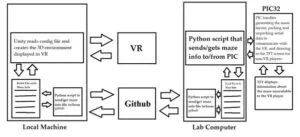
Block diagram of the communication protocol
Unity
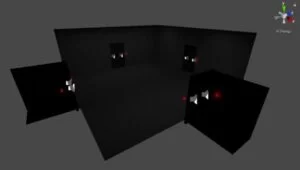
To turn our generated maze into an explorable virtual environment, we used Unity, a free game engine. Whereas the PIC generates the maze and draws a two dimensional map onto the TFT screen, Unity is responsible for constructing the maze in a three dimensional, virtual space and allowing the player to interact with it. Unity provided us with a medium through which we could build our game and interface with our chosen peripherals. To integrate the VR headset into our project, we used Valve’s SteamVR assets. This Unity asset pack provided everything that we needed to incorporate the VR headset into our project.
Above, it is mentioned that the python program responsible for sending the maze JSON checks for commands from Unity. This process starts with a button in the game. Once the player has pressed the button Unity modifies a file and adds a command to it. This command is pushed to a git repository, where it is picked up by the Python script. After sending the command, Unity checks the file valid.txt to see if the maze configuration file has been updated. Once it has, Unity resets the valid status and begins constructing the maze.
The construction of the actual maze consists of instantiating a number of pre-made maze rooms. These rooms were constructed by us in the Unity editor and consist of everything that is contained within pre in the maze. Each maze room consists of a floor, ceiling, lights, set of four walls without doors, and a set of four walls with door. Each component of a room can be toggled on or off within a C# scripts, which is how the maze is constructed. Unity reads the information from the JSON into a class containing a list of maze rooms. Each of these rooms contains information about the doors leading into and out of that room. Based on which connections should be made, either the wall or door component is enabled. The rooms are spaced using their positions in the array and a constant offset. Information about which room is the start room and which room is the end room is contained within the script itself. Once the correct maze rooms have been placed, the room that the player starts in, as well as all of the objects in it, are moved over the correct starting room, and the elevator door ominously swings open.
        for (int i = 0; i < nodeList.Length; i++)
        {
            // Create the room
            GameObject gameObj = Instantiate(Resources.Load("MazeRoom"), new Vector3(nodeList[i].X * 22, 0, nodeList[i].Y * 22), Quaternion.identity) as GameObject;

            // Now that the room has been created, we need to enable the correct wall type for each directions
            if (nodeList[i].North == 0)
            {
                gameObj.transform.Find("DoorWallNorth").gameObject.SetActive(false);
                gameObj.transform.Find("WallNorth").gameObject.SetActive(true);
            }
            if (nodeList[i].East == 0)
            {
                gameObj.transform.Find("DoorWallEast").gameObject.SetActive(false);
                gameObj.transform.Find("WallEast").gameObject.SetActive(true);
            }
            if (nodeList[i].South == 0)
            {
                gameObj.transform.Find("DoorWallSouth").gameObject.SetActive(false);
                gameObj.transform.Find("WallSouth").gameObject.SetActive(true);
            }
            if (nodeList[i].West == 0)
            {
                gameObj.transform.Find("DoorWallWest").gameObject.SetActive(false);
                gameObj.transform.Find("WallWest").gameObject.SetActive(true);
            }
A single room prefab with four doors
A large number of features are at work while the player is adventuring through the maze. For instance, each of the doors, and the corresponding buttons that open them, are controlled by C# scripts. These scripts specify the amount of time that the doors should be open, how fast the door opens and closes, what sound the doors make, and more. In addition to controlling doors, other scripts exist to assist the player in picking up items, check whether or not a player is at the end of the maze, and more.
When the player wants to make a guess as to whether or not they are at the end of the maze, they pull the trigger on the hand that is holding the sphere. A script attached to the sphere then converts the position of the player into an ID and checks the ID against the ID that is specified for the ending room. The color and luminous intensity of the sphere are updated according to whether or not the player made a correct guess.
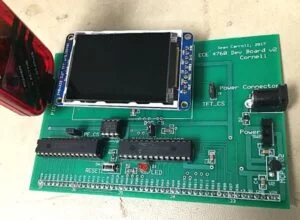
Hardware Design
The only hardware components on the PIC side for this project are a thin film transistor (TFT) display and the serial connection, both of which were used in previous labs for this course. The serial connection used for communication between the PIC and python code involved plugging the board into the desktop via USB and writing the following line in the python: ser = serial.Serial(‘COM5’, 115200, timeout=0.001) where COM5 corresponds to the USB port used on the desktop.
The TFT display was handled by connecting it to the Thin Film Transistor (TFT) display through the header socket present on the Sean Caroll’s Big Board (SECABB) board provided to us. The SECABB itself connected to the PIC through ports RB0 (D/C), RB1 (SPI chip select), RB2 (reset), RB11 (SPI MOSI), and RB14 (SPI Sclock). We then interfaced with the display using the PIC32 Peripheral Library (PLIB) function tft_drawRect to draw the maze walls in white and the maze exit as a red square. Additionally we used tft_fillScreen to clear the screen with black before drawing a maze. Wiring diagrams are shown below:
Results
Using Unity has enabled us to build a high fidelity virtual environment without worrying about optimizations that impact performance. For the most part, performance in games is constant and high enough to be an enjoyable experience. There is a moment of lag when the maze is first created; during this time, the Unity engine is instantiating and placing a number of objects at once, which momentarily prevents other objects from updating.
On the PIC side of things, it is hard to quantify the time complexity of our maze generation algorithm. The algorithm at the core of our implementation, Prim’s algorithm, has a time complexity that is O(n^2). However, to simplify our implementation, we have our algorithm pick a random location in the list of neighbors. This has the potential to pick an empty index, in which case the algorithm tries again. Theoretically, the PIC could never choose a non-empty index, though this is not the case in practice. Though it’s hard to define the time complexity, for the purposes of this project, we are more interested in the total time that it takes for the maze to be captured by the Python script after the command has been issued. For 100 trials, the average time between the python script issuing the make maze command to the time when the maze JSON was written was .249 seconds.
Our project should have no interference with other designs, and is generally usable by anyone without visual or auditory disabilities. Color-blindness should not have a major impact on game experience, as other cues like text and brightness should indicate to the user the meaning of lights and colors in the maze. Those with hearing disabilities would require some add-in within the VR environment to be able to communicate to the other user without audio.
Conclusion
Overall, we are very satisfied with the result of our game considering the short amount of time we had to execute it and our lack of previous experience with Unity. We had plans to add puzzles into the gameplay, such as not being able to unlock certain doors until you solve a puzzle in the room like a Caesar cipher, but ultimately ran out of time.
We credit our success to several hours of planning we did on our first few lab sessions with milestones that we laid out for ourselves to stay on track. With the lack of outside structure and guidance, it was crucial to be able to assemble a final project in the given timeframe and ensure we were all on the same page about what kind of end result we were working towards. One element that planning and documentation were important for was the data transfers using Python and Github between the computers, where we had to be very clear about our syntax and method in our documentation to avoid compounding errors occurring with misinterpretation of data at each step. If we were to do this project again, it would be excellent if we could determine a better way to handle the data transfer to and from the lab computer which was made difficult by Cornell IT security standards, but in the interest of completing the project on time, the Github solution was the only way we could figure out how to do it.
While our design took some inspiration from existing games like Keep Talking and Nobody Explodes, our final design is our own and raises no concerns we know of concerning intellectual property. In our implementation, we based our maze algorithm on Prim’s algorithm which is in the public domain, and did not copy any code written by others on the internet to implement it other than taking guidance from high-level pseudocode. We also used a script from Intel to maintain lighting across prefabs in our Unity design which is licensed by the Intel Sample Source Code License Agreement and is therefore permitted for us to use for educational purposes. We also found several audios from the website freesound.org, which is a database of free audio samples under a creative commons license, which we can use as long as we credit the original authors, as we do in the Appendix.
Due to our use of virtual reality, the IEEE standards on Digital Reality are relevant to our development of this game. This concerns environment safety, the user interface, and the interoperability between virtual objects and the real world.
For example, environment safety for VR will include possible injury due to being unaware of your surroundings with a headset on, headaches from prolonged use of the headset, nausea, and many more. We ended up having the player use their controllers to teleport around the maze rather than walking in real life to avoid issues with their surrounding environment.
The only legal considerations would be if we wanted to publish our design as a game, we would have to properly credit all the sources used for game assets and reference code. These include freesound.org for the sound effects and music in the game, Alejandr Castedo of intel software for their code sample on lightmapping prefabs, valve corporation for steamvr assets used, Frank01001 for control flick detection code referenced from their github, and Youtube user Valem for their tutorials on using steamvr. All of which are cited in the references section below.
Appendix
The group approves this report for inclusion on the course website.
The group approves the video for inclusion on the course youtube channel.
Cost by Part
- Only using provided hardware on the side of the remote desktop
- Free Unity Download
- This is intended to work with an external VR headset, the cheapest of which costs $25 (Google cardboard), but for current implementation, an Oculus Quest ($299) or Valve Index headset ($499) is necessary
Team Member Contributions
Michaela
- Helped write the outlined plans for the project
- Wrote part of the PIC and Python code on the Remote desktop
- Helped other team members write most of the rest of the code, debug etc.
- Moved all information into website
- Parts written in this writeup:
- Introduction
- High Level Design outline and PIC-32 code description (mostly for maze generation)
- Part of conclusion
- Appendix
Dan
- Helped write the outlined plans for the project
- Wrote part of the PIC and Python code on the Remote desktop
- Set up maze randomization and drawing 8×8 maze
- Helped write/debug Unity code
- Contributed to the writeup:
- Remote desktop python code discussion
- Hardware design
- Part of conclusion
Cameron
- Helped write the outlined plans for the project
- Contributed to PIC maze generation code
- Wrote local machine python script
- Designed Unity environment and wrote C# scripts for player interactions
- Contributed to lab computer Python script
- Contributed to writeup:
- High Level Design Outline for Unity Specifics
- Results Section. Ran timing analysis on the maze generation and packaging
References
This game uses the code sample “Lightmapping code for prefabs in Unity” by Alejandr Castedo licensed under the Intel Sample Source Code License Agreement.
This game uses these sounds from freesound:
- “Big Elevator Going Up” by finalCrystine licensed under CCBYNC 3.0
- “Elevator Door Opens and Closes” by NachtmahrTV licensed under CCBYNC 3.0
- “Dark loops 204 piano short loop 60 bpm” by josefpres licensed under CCBYNC 3.0
While we didn’t copy any code from these sources, they were greatly helpful for learning how to use the Unity environment
- Detecting control flick using dot product of camera and controller velocity vector
- Miscellaneous Unity Information
- SteamVR Tutorial Part1
- SteamVR Tutorial Part2
Commented Code Listing
PIC-32 C code
/*
 *  This code file was adapted from the Python control prototype made by Bruce Land by
 * Michaela Bettez, Cameron Haire, and Dan Batan in Spring 2021
 * File:        Python control prototype
 *
 * Author:      Bruce Land
 * For use with Sean Carroll's Big Board
 * http://people.ece.cornell.edu/land/courses/ece4760/PIC32/target_board.html
 * Target PIC:  PIC32MX250F128B
 *
 * This template instantiates threads to communicate events from a Python
 * control interface. The python GUI supports push buttons,
 * toggle switches (checkbox), Sliders and general text input/putput
 *
 * Start the python script or this program in either order
 * (The python text is included as a comment at the end of this file)
 * Clicking on the LED button turns on the on-board LED
 * Clicking on the Clear LCD button clears the TFT
 * Clicking the Dot Color checkbox modifies a graphic red/green dot
 * The slider sets a cursor position on the TFT
 * The DDS checkbox turns DDS ON/OFF
 * Scrollig and clicking a Listbox entry will set the DDS waveform if DDS-ON
 * Typing anything in the Text input line causes the PIC to echo it into the receive window.
 *   Typing a command of the form "f 400" will result in a 400 Hz sinewave at the DACA output if DDS-ON
 *   Typing a command of the form "v 1.25" will set that voltage at the DACA output if DDS-OFF
 *   Typing a command of the form "h" will echo back the form of the other commands
 * Checking the reset_enable, then clicking RESET PIC does the expected IF the circuit is connected
 */
// =============================================
// NOTE!! -- to use serial spawned functions
// you MUST EDIT config_1_3_2 to
// (1) uncomment the line -- #define use_uart_serial
// (2) SET the baud rate to match the PC terminal
// =============================================
////////////////////////////////////
// clock AND protoThreads configure!
// You MUST check this file!
#include "config_1_3_2.h"
// threading library
#include "pt_cornell_1_3_2_python.h"
#include
#include
#include

////////////////////////////////////
// graphics libraries
// SPI channel 1 connections to TFT
#include "tft_master.h"
#include "tft_gfx.h"

//== Timer 2 interrupt handler ===========================================
// direct digital synthesis of sine wave
#define two32 4294967296.0 // 2^32
#define Fs 40000
#define WAIT {}

// initialize variables for start and end locations in maze
short startX = 1;
short startY = 1;
short endX;
short endY;

// maze will be a square of size maze_size x maze_size
// code alteration to TFT drawing and neighbor list size may be necessary if changing
#define maze_size 8

// define the struct for a single maze node (or room) with necessary fields
typedef struct Maze_t {
    short north; // 0 if wall, 1 if door
    short south; // 0 if wall, 1 if door
    short east; // 0 if wall, 1 if door
    short west; // 0 if wall, 1 if door
    short x; // location of specific node in maze
    short y;
    // for maze generation, not important for data transfer
    short isConnected; //is in neighbors list
    short inMaze; // is included in the valid maze area
}Maze_node;
// array of structs of maze nodes
Maze_node maze[maze_size][maze_size];
// Global int to count the number of nodes in the maze. When we finish, this
// should be maze_size^2
int nodes = 0;

// finds the first empty index in the neighbors array
int find_empty_index(Maze_node** neighbors){
    int i;
    for(i=0; i<(maze_size*maze_size/2); i++){
        if(neighbors[i] == NULL){
            //printf("Valid Index at: %d\n", i);
            return i;
        }
    }
}

// returns 1 if the neighbor list is not empty, 0 if empty
int have_neighbors(Maze_node** neighbors){
    int i;
    for(i=0; i<(maze_size*maze_size/2); i++){
        if(neighbors[i] != NULL){
            return 1;
        }
    }
    return 0;
}

// take current node, check if neighbors are connected
// if not connected, then add to end of neighbors array
void getNeighbors(Maze_node* cur_node, Maze_node** neighbors){
    Maze_node* temp;

    // check if neighbor exists on the right side and not already in neighbors
    // if so adds to first empty element in neighbors list
    if((cur_node->x) + 1 < maze_size){
        temp = &maze[(cur_node->x)+1][cur_node->y];
        if(!temp->isConnected){
            temp->isConnected = 1;
            //printf("Adding East Neighbor\n");
            neighbors[find_empty_index(neighbors)]=temp;
        }
    }
    // check if neighbor exists on the left side and not already in neighbors
    // if so adds to first empty element in neighbors list
    if((cur_node->x) - 1 >= 0){
        temp = &maze[(cur_node->x)-1][cur_node->y];
        if(!temp->isConnected){
            temp->isConnected = 1;
            //printf("Adding West Neighbor\n");
            neighbors[find_empty_index(neighbors)]=temp;
        }
    }

    // check if neighbor exists above and not already in neighbors
    // if so adds to first empty element in neighbors list
    if((cur_node->y) + 1 < maze_size){
        temp = &maze[(cur_node->x)][(cur_node->y)+1];
        if(!temp->isConnected){
            temp->isConnected = 1;
            //printf("Adding North Neighbor\n");
            neighbors[find_empty_index(neighbors)]=temp;
        }
    }

    // check if neighbor exists below and not already in neighbors
    // if so adds to first empty element in neighbors list
    if((cur_node->y) - 1 >= 0){
        temp = &maze[(cur_node->x)][(cur_node->y)-1];
        if(!temp->isConnected){
            temp->isConnected = 1;
            //printf("Adding South Neighbor\n");
            neighbors[find_empty_index(neighbors)]=temp;
        }
    }
}
    /* Connect the current node to the chosen neighbor by figuring which side
     * they're connected and removing the wall/adding a door between them
     *  chosen neighbor is removed from neighbors list and added to maze
     * index is the index of the temp node in the neighbors array*/
void connect_nodes(Maze_node* cur_node, Maze_node* temp, Maze_node** neighbors, short index){

    short curX = cur_node->x;
    short curY = cur_node->y;
    short neighX = temp->x;
    short neighY = temp->y;

    //printf("CurrNode at X: %d Y: %d Connecting to Neighbor at X: %d, Y: %d\n", curX, curY, neighX, neighY);
    // Figure out which side of the current node the neighbor is on
    // If neighX is greater than curX, it's east of cur_node
    if(neighX > curX){
        // Connect the two nodes
        cur_node->east = 1;
        cur_node->isConnected = 1;
        temp->west = 1;

        // Remove the now connected neighbor from the neighbors list
        neighbors[index] = NULL;
        temp->inMaze = 1;

        //printf("Connecting to East Side of CurrNode\n");
        //printf("Removing Index %d from Neighbors List\n", index);
    }
    // If neighX is less than curX, it's west of cur_node
    else if(neighX < curX){
        // Connect the two nodes
        cur_node->west = 1;
        cur_node->isConnected = 1;
        temp->east = 1;

        // Remove the now connected neighbor from the neighbors list
        neighbors[index] = NULL;
        temp->inMaze = 1;

        //printf("Connecting to West Side of CurrNode\n");
        //printf("Removing Index %d from Neighbors List\n", index);
    }
    // If neighY is greater than curY, it's north of cur_node
    else if(neighY > curY){
        // Connect the two nodes
        cur_node->north = 1;
        cur_node->isConnected = 1;
        temp->south = 1;

        // Remove the now connected neighbor from the neighbors list
        neighbors[index] = NULL;
        temp->inMaze = 1;

        //printf("Connecting to North Side of CurrNode\n");
        //printf("Removing Index %d from Neighbors List\n", index);
    }
    // If neighY is less than curY, it's south of the cur_node
    if(neighY < curY){
        // Connect the two nodes
        cur_node->south = 1;
        cur_node->isConnected = 1;
        temp->north = 1;

        // Remove the now connected neighbor from the neighbors list
        neighbors[index] = NULL;
        temp->inMaze = 1;

        //printf("Connecting to South Side of CurrNode\n");
        //printf("Removing Index %d from Neighbors List\n", index);
    }

    // Add the neighbors of the new node to the list of neighbors
    getNeighbors(temp, neighbors);

    // Increment debug variable
    nodes++;
}

// generate a randomized, maze_size x maze_size maze using Prim's algorithm
void generate_maze(){
     // initialize neighbors
    Maze_node* neighbors[maze_size*maze_size/2];
    //printf("Start Generating\n");
    int i;
    for (i=0;i<maze_size*maze_size 2;i++){="" neighbors[i]="NULL;" }="" randomize="" new="" startx="" and="" start="" y="" starty="(short)(rand()%(maze_size));" printf("starting="" with="" x:="" %d,="" y:="" %d\n",="" startx,="" starty);="" maze_node*="" cur_node="&maze[startX][startY];" cur_node-="">inMaze = 1;
    nodes++; //Increment debug variable
    getNeighbors(cur_node, neighbors);

    // find a random neighbor from neighbor array
    short index; // Random index to start looking at
    Maze_node* temp = NULL;
    do{
        index = rand()%(maze_size*maze_size/2);
        temp = neighbors[index];
    }while(temp == NULL);


    // Connect the current node to the chosen neighbor
    connect_nodes(cur_node, temp, neighbors, index);

    // Now that we've begun the generation process, things get a little different.
    // Now we pick a random neighbor from the list, pick one of it's neighbors
    // at random until we get one that's in the maze, and connect the two. Then,
    // we want to add all of the neighbor's neighbors to our neighbors list and
    // repeat the process until every node is in the maze.

    // When every node is in the maze, the neighbors list will be empty
    do{
        // STEP 1: Pick a random neighbor. Works similar to above
        Maze_node* neigh; //Neighbor being considered
        do{
            index = rand()%(maze_size*maze_size/2);
            neigh = neighbors[index];
        }while(neigh == NULL);
        //printf("Considering Neighbor at X: %d Y: %d\n", neigh->x, neigh->y);
        //printf("Above Neighbor at Index %d in Neighbor List\n", index);

        // STEP 2: Find random neighbor neighbor that's in the maze
        // Instead of creating a new temp node, reuse cur_node here
        short side = rand()%4; //Random side to start looking from
        short updated = 0;
        do{
            short side = rand()%4; //Random side
            switch(side){
                case 0:
                    // North Side
                    // Ensure the North node is valid
                    if((neigh->y) + 1 < maze_size){
                        cur_node = &maze[neigh->x][(neigh->y)+1];
                        updated = 1;
                    }
                    break;
                case 1:
                    // East Side
                    // Ensure the East node is valid
                    if((neigh->x) + 1 < maze_size){
                        cur_node = &maze[(neigh->x) + 1][(neigh->y)];
                        updated = 1;
                    }
                    break;
                case 2:
                    // South Side
                    // Ensure the South node is valid
                    if((neigh->y) - 1 >= 0){
                        cur_node = &maze[(neigh->x)][(neigh->y) - 1];
                        updated = 1;
                    }
                    break;
                case 3:
                    // West Side
                    // Ensure the West node is valid
                    if((neigh->x) - 1 >= 0){
                        cur_node = &maze[(neigh->x) - 1][(neigh->y)];
                        updated = 1;
                    }
                    break;
                default:
                    break;
            }

            // Increment side
            side = (side + 1)%4;

        // While the chosen node is not in the maze, or the chosen node
        // hasn't been updated (that is, it is the same as in the last
        // iteration) we need to do the loop again.
        }while(cur_node->inMaze == 0 || updated == 0);

        // STEP 3: Connect the two nodes and add new neighbors
        //printf("Connecting to Neighbor at Index %d\n", index);
        connect_nodes(cur_node, neigh, neighbors, index);

        // STEP Extra: Set the last connected node as the finish
        endX = neigh->x;
        endY = neigh->y;

        int i;
        //printf("Neighbors List: [");
        //printf("]\n");
    }while(have_neighbors(neighbors));

    // At this point (theoretically) the maze is constructed.
    //printf("Nodes: %d\n", nodes);
}

/* Draw the walls (or lack therof) for each node/room in the maze
 * note that x and y are given in terms of maze */
void draw_wall(Maze_node* cur_node){
    short x = cur_node->x;
    short y = cur_node->y;

    // 0,0 in bottom left
    short grid_x = 40 + 30*x;
    short grid_y = 240 - 30*y;
    if(cur_node->north == 0){
        tft_drawRect(grid_x, grid_y - 30, 30, 2, 0xffff);
    }
    if(cur_node->east == 0){
        tft_drawRect(grid_x + 30, grid_y - 30, 2, 30, 0xffff);
    }
    if(cur_node->south == 0){
        tft_drawRect(grid_x, grid_y, 30, 2, 0xffff);
    }
    if(cur_node->west == 0){
        tft_drawRect(grid_x, grid_y - 30, 2, 30, 0xffff);
    }
}

/* Draw the maze onto the TFT*/
void draw_maze(){
  // draw outer borders
  tft_drawRect(40, 0, 2, 240, 0xffff);
  tft_drawRect(280, 0, 2, 240, 0xffff);
  tft_drawRect(40, 0, 240, 2, 0xffff);
  tft_drawRect(40, 238, 240, 2, 0xffff);

  //draw walls as one box at a time
  // coordinates are from bottom left corner of each box
  int i;
  int j;
  for(i = 0; i < maze_size; i++){
      for(j=0; j< maze_size; j++){
          draw_wall(&maze[i][j]);
      }
  }

  // Draw start and end nodes
  //tft_drawRect(30*startX + 50, 220 - 30*startY, 10, 10, ILI9340_GREEN); uncomment for easy mode
  tft_drawRect(30*endX + 50, 220 - 30*endY, 10, 10, ILI9340_RED);
}

char new_string = 0;
char new_button = 0;
char button_id, button_value ;
char receive_string[64];

// keeps track of when its sending a message or receiving
// receiving when 0
// sending when 1
short send_new_message = 0;
// Keeps track of command that was received last
// cmd = 0 is make maze
// cmd = 1 is update location
// cmd = 2 is check end
short cmd = 0;

short isStart;
short isEnd;

/*Send a single node in the maze to the Python script*/
void send_maze(Maze_node* node){
    isStart = (node->x == startX && node->y == startY);
    isEnd = (node->x == endX && node->y == endY);
    printf("0%d%d%d%d%d%d%d%d\r",node->x, node->y,node->north,node->east,
            node->south,node->west,isStart,isEnd);
}

short new_cmd = 0;
/* This thread handles all interfacing with the Python script
    When the command to begin is received, it generates the maze,
    draws it onto the TFT, then sends the information to Python*/
static PT_THREAD (protothread_process_cmd(struct pt *pt)) {
    PT_BEGIN(pt);
    while(1) {
        PT_YIELD_UNTIL(pt, new_cmd==1);
        new_cmd = 0;
        static int i;
        static int j;
        // check command to determine what we want to send
        cmd = receive_string[0];
        switch(cmd){
            case '0' ://make maze
                //printf("dstart case 0\r");
                for (i=0; i<maze_size;i++){ for="" (j="0;" j<maze_size;j++)="" {="" maze_node*="" temp="&maze[i][j];" temp-="">isConnected = 0;
                        temp->inMaze = 0;
                        temp->north = 0;
                        temp->east = 0;
                        temp->south = 0;
                        temp->west = 0;
                        temp->x = i;
                        temp->y = j;
                        //printf("%d,%d\r", i, j);
                    }
                }
                //printf("test\r");
                srand(ReadTimer2());
                generate_maze();
                tft_fillScreen(ILI9340_BLACK);
                draw_maze();
                //printf("a\r");
                // will send fields of starting coordinates
                for (i=0;i<maze_size;i++){ for="" (j="0;j<maze_size;j++){" send_maze(&maze[i][j]);="" }="" break;="" pt_end(pt);="" =="=" python="" serial="" thread="===================================================" you="" should="" not="" need="" to="" change="" this="" unless="" add="" new="" control="" types="" static="" pt_thread="" (protothread_serial(struct="" pt="" *pt))="" {="" pt_begin(pt);="" char="" junk;="" while(1){="" there="" is="" no="" yield="" in="" loop="" because="" are="" yields="" the="" spawned="" threads="" that="" determine="" execution="" rate="" while="" waiting="" machine="" input="" note!!="" --="" use="" functions="" must="" edit="" config_1_3_2="" (1)="" uncomment="" line="" #define="" use_uart_serial="" (2)="" set="" baud="" match="" pc="" terminal="" now="" wait="" from="" terminate="" on="" usual="" <enter="" key="">
        PT_terminate_char = '\r' ;
        PT_terminate_count = 0 ;
        PT_terminate_time = 0 ;
        // note that there will NO visual feedback using the following function
        PT_SPAWN(pt, &pt_input, PT_GetMachineBuffer(&pt_input) );

        // Parse the string from Python

        if (PT_term_buffer[0]=='c'){
            // signal parsing thread
            strcpy(receive_string, PT_term_buffer+1);
            new_cmd = 1;
        }

    } // END WHILE(1)
    PT_END(pt);
} // thread blink

// === Main  ======================================================

void main(void) {
  // Set up timer2 on,  interrupts, internal clock, prescalar 1, toggle rate
  OpenTimer2(T2_ON | T2_SOURCE_INT | T2_PS_1_1, 0xFFFF);

  INTEnableSystemMultiVectoredInt();
  // === TFT setup ============================
  // init the display in main since more than one thread uses it.
  // NOTE that this init assumes SPI channel 1 connections
  tft_init_hw();
  tft_begin();
  tft_fillScreen(ILI9340_BLACK);
  //240x320 vertical display
  tft_setRotation(1); // Use tft_setRotation(1) for 320x240

    // === config threads ========================
  PT_setup();

  pt_add(protothread_process_cmd, 0);
  pt_add(protothread_serial, 0);
  // === initalize the scheduler ====================
  PT_INIT(&pt_sched) ;
  // >>> CHOOSE the scheduler method: <<<
  // (1)
  // SCHED_ROUND_ROBIN just cycles thru all defined threads
  pt_sched_method = SCHED_ROUND_ROBIN ;

  // NOTE the controller must run in SCHED_ROUND_ROBIN mode
  // ALSO note that the scheduler is modified to cpy a char
  // from uart1 to uart2 for the controller

  // === scheduler thread =======================
  // scheduler never exits
  PT_SCHEDULE(protothread_sched(&pt_sched));
  //


} // main
// === end  ======================================================


  </maze_size;i++){></maze_size;i++){></maze_size*maze_size>
Python code
    import serial
    import time
    import json
    import os
    import subprocess

    ser = serial.Serial('COM5', 115200, timeout=0.001)
    serial_var = []
    int_array = []
    int_val = 0
    updated = 0

    #class that keeps track of maze nodes
    class Maze_Node:
            def __init__(self,x,y,north,east,south,west,isStart,isEnd):
              self.x = x #x positon
              self.y = y #y position
              self.north = north #is there a room to the north?
              self.east = east #is there a room to the east?
              self.south = south #is there a room to the south?
              self.west = west #is there a room to the west?
              self.isStart = isStart #is this the start room?
              self.isEnd = isEnd #is this the end room?

            #returns json with this maze node's fields
            def toDict(self):
              jayson = {
                       "X"       : self.x,
                       "Y"       : self.y,
                       "North"   : self.north,
                       "East"    : self.east,
                       "South"   : self.south,
                       "West"    : self.west,
                       "IsStart" : self.isStart,
                       "IsEnd"   : self.isEnd
                       }
              return jayson

    cols = 8
    rows = 8
    nodes = [[Maze_Node(0, 0, 0, 0, 0, 0, 0, 0) for j in range(cols)] for i in range(rows)]
    command = 0
    isEnd = 0

    # This logic is for only pulling from the git repos either before the maze has been
    # loaded (in anticipation of receiving the command to load the maze) or after the
    # maze has been loaded and we are looking for commands that have just a one line
    # response. If we try to pull while sending the maze, we'll only get one room because
    # the git pull takes too much time.
    maze_not_loaded = True
    maze_finished_loading = False

    print("Starting")

    while 1:
      #decide which command to send
      if maze_not_loaded: # or maze_finished_loading:
          #pull from the Cmd Repo to see if we need to send a command
          #to the PIC
          subprocess.call('cd ../MazeCmd && git pull && cd ../MazeJSON', shell=True)
          subprocess.call('git pull', shell=True)
          f = open("../MazeCmd/cmd.txt")
          cmd = f.read()
          f.close()

          #Sleep for five seconds to avoid too many pulls
          time.sleep(5)

          #make maze command
          if cmd == "Make Maze":
              #clear the contents of the command file
              f = open("../MazeCmd/cmd.txt", "w")
              f.write("None")
              f.close()
              subprocess.call('cd ../MazeCmd && git add . && git commit -m "Update" && git push &&          ⠀⠀⠀⠀cd ../MazeJSON', shell=True)

              #send make maze command to the PIC
              toSend = "000000"
              ser.write(('c' + toSend + '\r').encode())
              maze_not_loaded = False

      #wait for serial data to be available
      while ser.in_waiting > 0 and updated == 0:
        # Read the data into a variable
        pic_char = chr(ser.read(size=1)[0])

        #if the character isn't the terminating character, add it to
        #our array of chars. If it is, set updated to 1
        if (pic_char) == '\r':
          updated = 1
        else:
          serial_var.append(pic_char)

        #when updated, check command and update variables accordingly
        if updated == 1:
          updated = 0

        #if the first character is a '0', we are receiving maze data
        if(serial_var[0] == '0'): # command = make maze
          # Convert strings to ints
          for i in range(len(serial_var)):
            serial_var[i] = int(serial_var[i])

          #assign the x,y index in serial_var to the x,y maze node
          nodes[serial_var[1]][serial_var[2]].x       = serial_var[1]
          nodes[serial_var[1]][serial_var[2]].y       = serial_var[2]
          nodes[serial_var[1]][serial_var[2]].north   = serial_var[3]
          nodes[serial_var[1]][serial_var[2]].east    = serial_var[4]
          nodes[serial_var[1]][serial_var[2]].south   = serial_var[5]
          nodes[serial_var[1]][serial_var[2]].west    = serial_var[6]
          nodes[serial_var[1]][serial_var[2]].isStart = serial_var[7]
          nodes[serial_var[1]][serial_var[2]].isEnd   = serial_var[8]

          #once the array is full, we can convert to JSON and write to the file
          if(serial_var[1] == 7 and serial_var[2] == 7):
            jayson = { "Nodes" : [] }
            for i in range(8):
              for j in range(8):
                jayson["Nodes"].append(nodes[i][j].toDict())
            print(json.dumps(jayson, sort_keys=True, indent=4))

            #push the json to the git repo
            f = open("MazeJSON.json", "w")
            f.write(json.dumps(jayson, sort_keys=True, indent=4))
            f.close()
            f = open("valid.txt", "w")
            f.write("1")
            f.close()
            subprocess.call('git add . && git commit -m "Update" && git push', shell=True)
            maze_not_loaded = True #maze_finished_loading = True

          elif(serial_var[0] == 'd'): #debug messages
            #print the debug message
            serial_var = serial_var[1:]
            debug = ""
            for char in serial_var:
              debug += char
            print(debug)

          else: #unrecognized command
            #print the contents of the unrecognized command
            serial_var = serial_var[1:]
            err = ""
            for char in serial_var:
              err += char
            print("Unrecognized Command: " + err)

          #clear the serial variable in preparation for next message
          serial_var = []
Unity code
//--------------------------------------------------------------------------------------
// MazeGenerator.cs
//--------------------------------------------------------------------------------------
// This script handles the actual generation of the maze. It parses the JSON file that
// describes the maze and constructs it in the scene using the prefabs.
using System.Collections;
using System.Collections.Generic;
using UnityEngine;
using System.IO;
public class MazeGenerator : MonoBehaviour
{
// Create a variable to store whether or not we are waiting for a MazeJSON
private bool waiting = false;
// We need to store the positions of the start and end
public int startID = 0;
public int endID = 0;
// We need a variable to store the starting room and the player
// for when we move the starting room above the room in the maze
// that we want to start in. We also add more variables for other
// objects that we want to keep in the starting room.
public GameObject startRoom;
public GameObject player;
public GameObject lightSphere;
public GameObject cube;
public GameObject hunterPainting;
// Need some variables to handle waiting for the player to press
// a button in the starting room before we generate the maze
public bool gen;
private bool generated = false;
// Need a variable to store the status lights so that we can adjust
// them. We also need one for the elevator so that we can open the
// door when we've finished generating the maze.
public GameObject statusLights;
public GameObject elevator;
// Create a class to hold the rooms so that we can identify
// by ID
public class GeneratedObject
{
public GeneratedObject(int id_val, GameObject gameobject_val)
{
Id = id_val;
Gameobject = gameobject_val;
}
public int Id { get; set; }
public GameObject Gameobject { get; set; }
}
// This class holds all of the information for each room
// that is specified in the JSON
[System.Serializable]
public class Node
{
public int East;
public int IsEnd;
public int IsStart;
public int North;
public int South;
public int West;
public int X;
public int Y;
}
// This class holds the list of rooms in the maze
[System.Serializable]
private class Maze
{
public Node[] Nodes;
}
// Create a list of GameObjects that are created on startup
public List generatedObjects = new List();
// This method with take a NannyGenerator object and instantiate all of the
// objects that it holds
private void Create(ref Maze gen)
{
Node[] nodeList = gen.Nodes;
for (int i = 0; i < nodeList.Length; i++)
{
// Create the room
GameObject gameObj = Instantiate(Resources.Load("MazeRoom"), new Vector3(nodeList[i].X * 22, 0, nodeList[i].Y * 22), Quaternion.identity) as GameObject;
// Now that the room has been created, we need to enable the correct wall type for each directions
if (nodeList[i].North == 0)
{
gameObj.transform.Find("DoorWallNorth").gameObject.SetActive(false);
gameObj.transform.Find("WallNorth").gameObject.SetActive(true);
}
if (nodeList[i].East == 0)
{
gameObj.transform.Find("DoorWallEast").gameObject.SetActive(false);
gameObj.transform.Find("WallEast").gameObject.SetActive(true);
}
if (nodeList[i].South == 0)
{
gameObj.transform.Find("DoorWallSouth").gameObject.SetActive(false);
gameObj.transform.Find("WallSouth").gameObject.SetActive(true);
}
if (nodeList[i].West == 0)
{
gameObj.transform.Find("DoorWallWest").gameObject.SetActive(false);
gameObj.transform.Find("WallWest").gameObject.SetActive(true);
}
// The magic numbers in the two conditionals below are the maze size. We
// use these to get IDs for a one dimensional array from the indices of a
// two dimensional array
if (nodeList[i].IsStart == 1)
{
startID = nodeList[i].X * 8 + nodeList[i].Y;
// Move the starting room to this room
Vector3 temp = startRoom.transform.position;
temp.x = nodeList[i].X * 22 + 4;
temp.z = nodeList[i].Y * 22 - 4.5f;
temp.y = 7.25f;
startRoom.transform.position = temp;
// Move the player into the starting room
temp = player.transform.position;
temp.x += nodeList[i].X * 22;
temp.z += nodeList[i].Y * 22;
player.transform.position = temp;
// Move the decorations
temp = lightSphere.transform.position;
temp.x += nodeList[i].X * 22;
temp.z += nodeList[i].Y * 22;
lightSphere.transform.position = temp;
temp = hunterPainting.transform.position;
temp.x += nodeList[i].X * 22;
temp.z += nodeList[i].Y * 22;
hunterPainting.transform.position = temp;
temp = cube.transform.position;
temp.x += nodeList[i].X * 22;
temp.z += nodeList[i].Y * 22;
cube.transform.position = temp;
}
if(nodeList[i].IsEnd == 1)
{
endID = nodeList[i].X * 8 + nodeList[i].Y;
}
// Add the room to the list of generated objects
GeneratedObject genObj = new GeneratedObject(i, gameObj);
generatedObjects.Add(genObj);
}
Debug.Log("Done Parsing");
// Update status lights
statusLights.transform.Find("Genning").GetComponent().enabled = false;
statusLights.transform.Find("Genned").GetComponent().enabled = true;
// Open the elevator door
elevator.transform.Find("RightSide").GetComponent().open = true;
elevator.transform.Find("RightSide").GetComponent().Play();
}
// Start is called before the first frame update
void Start()
{
}
// Update is called once per frame
void Update()
{
if (gen && !generated)
{
// Update the status lights
statusLights.transform.Find("NotGen").GetComponent().enabled = false;
statusLights.transform.Find("Genning").GetComponent().enabled = true;
// Set generated to false so that we only generate a single maze
generated = false;
gen = false;
// We technically don't need to do this here, but we need to do it everywhere else so this is
// good practice
StreamReader reader = new StreamReader(Application.streamingAssetsPath + "/MazeCmd/cmd.txt");
string ready = reader.ReadLine();
reader.Close();
if (ready.Equals("None"))
{
// Ask the PIC to make a maze
StreamWriter writer = new StreamWriter(Application.streamingAssetsPath + "/MazeCmd/cmd.txt", false);
writer.Write("Make Maze");
writer.Close();
Debug.Log("Send Make Command");
}
// Now we wait for a response
waiting = true;
}
if (waiting)
{
StreamReader reader = new StreamReader(Application.streamingAssetsPath + "/MazeJSON/valid.txt");
string valid = reader.ReadLine();
reader.Close();
if (valid.Equals("1")) //DEBUG
{
Debug.Log("Parsing JSON");
waiting = false;
StreamReader JSONreader = new StreamReader(Application.streamingAssetsPath + "/MazeJSON/MazeJSON.json");
string json = JSONreader.ReadToEnd();
reader.Close();
Maze gen = JsonUtility.FromJson(json);
Create(ref gen);
StreamWriter writer = new StreamWriter(Application.streamingAssetsPath + "/MazeJSON/valid.txt", false);
writer.Write("0");
writer.Close();
}
}
}
}
//--------------------------------------------------------------------------------------
// MazeGenButton.cs
//--------------------------------------------------------------------------------------
// This script is responsible for setting the variables that start the maze generation
// process.
using UnityEngine;
using System.Collections;
using UnityEngine.SceneManagement;
using System;
namespace Valve.VR.InteractionSystem.Sample
{
public class MazeGenButton : MonoBehaviour
{
// Variable to store the MazeNanny so that we can
// tell it to generate the maze
public GameObject Nanny;
// Start is called before the first frame update
void Start()
{
}
public void OnButtonDown(Hand fromHand)
{
//ColorSelf(Color.green);
//fromHand.TriggerHapticPulse(1000);
Nanny.GetComponent().gen = true;
}
}
}
//--------------------------------------------------------------------------------------
// CheckEnd.cs
//--------------------------------------------------------------------------------------
// This script is responsible for checking whether or not the current room is the end
// of the maze.
using System.Collections;
using System.Collections.Generic;
using UnityEngine;
using Valve.VR;
using Valve.VR.InteractionSystem;
public class CheckEnd : MonoBehaviour
{
// Variables that store sources of information
public SteamVR_Action_Boolean checkAction;
public MazeGenerator nanny;
private Interactable interactable;
private Rigidbody rigid;
// Win and Lose States
public Material winMat;
public Material loseMat;
// Debugging Stuff
public bool check = false;
public bool end = false;
public int X;
public int Y;
// Start is called before the first frame update
void Start()
{
interactable = GetComponent();
rigid = GetComponent();
}
// Update is called once per frame
void Update()
{
// You interact with the sphere to check the end, so it has to be in your
// hand
if (interactable.attachedToHand != null)
{
SteamVR_Input_Sources source = interactable.attachedToHand.handType;
// When the trigger is pulled, check if we're at the end
if (checkAction[source].stateDown)
{
IsEnd();
}
}
}
void IsEnd()
{
int mazeX;
int mazeZ;
// This is super janky. I couldn't figure out how to get a reliable transform
// so I'm using the world center of mass instead.
// The first maze room has it's middle at 0,0 so
// if the sphere is at less than 11, it's in row 0. Otherwise, we subtract
// 11 from the position to account for the offset, divide by 22 (the width
// of the room), floor the result, then add 1 to get the position.
if (rigid.worldCenterOfMass.x < 11)
{
mazeX = 0;
}
else
{
mazeX = Mathf.FloorToInt((rigid.worldCenterOfMass.x - 11) / 22) + 1;
}
if (rigid.worldCenterOfMass.z < 11)
{
mazeZ = 0;
}
else
{
mazeZ = Mathf.FloorToInt((rigid.worldCenterOfMass.z - 11) / 22) + 1;
}
// Now that we've gotten the X and Y as they would be on the PIC,
// we check that against what the PIC said was the end and decide
// what to do from the result.
int mazeID = mazeX * 8 + mazeZ;
X = mazeX;
Y = mazeZ;
if (nanny.endID == mazeID)
{
// Win!!!
transform.GetComponent().color = winMat.color;
transform.GetComponent().intensity = 1;
transform.GetComponent().material = winMat;
end = true;
}
else
{
// Lost :(
transform.GetComponent().material = loseMat;
transform.GetComponent().color = loseMat.color;
transform.GetComponent().intensity -= .1f;
end = false;
}
}
}
//--------------------------------------------------------------------------------------
// ElevatorDoor.cs
//--------------------------------------------------------------------------------------
// This script handles the elevator door, which work a bit differently from the other
// doors. Rather than using a timer, the elevator door is position based.
using System.Collections;
using System.Collections.Generic;
using UnityEngine;
public class ElevatorDoor : MonoBehaviour
{
// Variables to keep track of how the door should be managed
public bool open = false;
public float openSpeed = 1.0f;
public int side = -1;
public float start;
public float offset;
public float stop;
private Rigidbody rigid;
public float doorTime = 5.0f;
private float currTime = 0.0f;
public bool shouldMove = false;
// Start is called before the first frame update
void Awake()
{
rigid = GetComponent();
}
private void FixedUpdate()
{
start = transform.parent.transform.position.x;
stop = start + side + offset;
// Handle the actual movement of the door
Vector3 position = rigid.position;
if (open && position.x < stop)
{
position.x = position.x + openSpeed * side * Time.deltaTime;
rigid.MovePosition(position);
}
else if (!open && position.x > start)
{
position.x = position.x - openSpeed * side * Time.deltaTime;
rigid.MovePosition(position);
}
else if (open && position.x >= stop)
{
position.x = stop;
rigid.MovePosition(position);
}
else if (!open && position.x <= start)
{
position.x = start;
rigid.MovePosition(position);
}
// When the door has been opened, we reset the timer
if (shouldMove && open)
{
open = false;
transform.GetComponent().Play();
}
else if (transform.parent.GetComponent().atBottom && !open)
{
open = true;
transform.GetComponent().Play();
}
}
}
//--------------------------------------------------------------------------------------
// ElevatorDoorButton.cs
//--------------------------------------------------------------------------------------
// This script is to be attached to any button that controls the elevator. It sets
// variables in the elevator game object to control it.
using UnityEngine;
using System.Collections;
using UnityEngine.SceneManagement;
using System;
namespace Valve.VR.InteractionSystem.Sample
{
public class ElevatorDoorButton : MonoBehaviour
{
// Variables to store the door game objects
private GameObject rightDoor;
private GameObject elevator;
void Start()
{
rightDoor = transform.parent.gameObject.transform.Find("RightSide").gameObject;
elevator = transform.parent.gameObject;
}
public void OnButtonDown(Hand fromHand)
{
//ColorSelf(Color.green);
//fromHand.TriggerHapticPulse(1000);
rightDoor.GetComponent().shouldMove = true;
elevator.GetComponent().shouldMove = true;
}
public void OnButtonUp(Hand fromHand)
{
rightDoor.GetComponent().shouldMove = false;
elevator.GetComponent().shouldMove = false;
//ColorSelf(Color.red);
}
private void ColorSelf(Color newColor)
{
Renderer[] renderers = this.GetComponentsInChildren();
for (int rendererIndex = 0; rendererIndex < renderers.Length; rendererIndex++)
{
renderers[rendererIndex].material.color = newColor;
}
}
}
}
//--------------------------------------------------------------------------------------
// ElevatorMove.cs
//--------------------------------------------------------------------------------------
// This script is responsible for moving the elevator and the player downwards.
using System.Collections;
using System.Collections.Generic;
using UnityEngine;
public class ElevatorMove : MonoBehaviour
{
public float speed;
public float waitTime = 5f;
public bool move;
public bool shouldMove;
public float bottom = -10f;
public bool atBottom = false;
public GameObject player;
private Rigidbody rigid;
private float currTime;
private bool waiting = false;
private Rigidbody doorRigid;
private Rigidbody playerRigid;
// Start is called before the first frame update
void Start()
{
rigid = GetComponent();
doorRigid = transform.Find("RightSide").gameObject.GetComponent();
currTime = 0f;
playerRigid = player.GetComponent();
}
private void FixedUpdate()
{
if (shouldMove && !waiting)
{
currTime = waitTime;
waiting = true;
}
if (currTime > 0)
{
currTime -= Time.deltaTime;
}
else if (currTime <= 0 && waiting)
{
move = true;
waiting = false;
transform.Find("Hallway").Find("HallwayFloor").GetComponent().Play();
}
if (rigid.position.y > bottom && move)
{
// Get the positions of the elevator, door, and player and move them
// downwards according to the specified speed
Vector3 pos = rigid.position;
Vector3 doorPos = doorRigid.position;
Vector3 playerPos = playerRigid.position;
pos.y -= speed * Time.deltaTime;
doorPos.y -= speed * Time.deltaTime;
playerPos.y -= speed * Time.deltaTime;
rigid.MovePosition(pos);
doorRigid.MovePosition(doorPos);
playerRigid.MovePosition(playerPos);
}
else if (rigid.position.y <= bottom)
{
// Stop moving once we've hit the bottom
atBottom = true;
move = false;
transform.Find("Hallway").Find("HallwayFloor").GetComponent().Stop();
Vector3 pos = rigid.position;
pos.y = bottom;
rigid.MovePosition(pos);
}
}
}
//--------------------------------------------------------------------------------------
// DoorOpenerTimer.cs
//--------------------------------------------------------------------------------------
// This script is responsible for opening and closing the doors. It uses a timer to
// keep track of how long the doors have been in any state and reacts accordingly
using System.Collections;
using System.Collections.Generic;
using UnityEngine;
public class DoorOpenerTimer : MonoBehaviour
{
// Variables to keep track of how the door should be managed
public bool open = false;
public float openSpeed = 1.0f;
public int side = -1;
private Rigidbody rigid;
public bool moveX;
public float doorTime = 5.0f;
public float openTime = 2.0f;
private float currTime = 0.0f;
public bool shouldOpen = false;
private bool opening = false;
private bool closing = false;
// Start is called before the first frame update
void Start()
{
rigid = GetComponent();
}
private void FixedUpdate()
{
// Handle the actual movement of the door
Vector3 position = rigid.position;
if (moveX)
{
if (shouldOpen && !(opening || open || closing))
{
currTime = openTime;
opening = true;
transform.GetComponent().Play();
}
else if (currTime > 0 && opening)
{
position.x += openSpeed * side * Time.deltaTime;
rigid.MovePosition(position);
currTime -= Time.deltaTime;
}
else if (currTime <= 0 && opening)
{
opening = false;
open = true;
currTime = doorTime;
}
// Handle keeping the door open for a fixed period of time
if (currTime > 0 && open)
{
currTime = currTime - Time.deltaTime;
}
else if (open)
{
closing = true;
open = false;
currTime = openTime;
transform.GetComponent().Play();
}
else if (closing && currTime > 0)
{
position.x -= openSpeed * side * Time.deltaTime;
rigid.MovePosition(position);
currTime -= Time.deltaTime;
}
else if (closing && currTime <= 0)
{
closing = false;
}
}
else
{
if (shouldOpen && !(opening || open || closing))
{
currTime = openTime;
opening = true;
closing = false;
transform.GetComponent().Play();
}
else if (currTime > 0 && opening)
{
position.z += openSpeed * side * Time.deltaTime;
rigid.MovePosition(position);
currTime -= Time.deltaTime;
}
else if (currTime <= 0 && opening)
{
opening = false;
open = true;
currTime = doorTime;
}
// Handle keeping the door open for a fixed period of time
if (currTime > 0 && open)
{
currTime = currTime - Time.deltaTime;
}
else if (open)
{
closing = true;
open = false;
currTime = openTime;
transform.GetComponent().Play();
}
else if (closing && currTime >= 0)
{
position.z -= openSpeed * side * Time.deltaTime;
rigid.MovePosition(position);
currTime -= Time.deltaTime;
}
else if (closing && currTime <= 0)
{
closing = false;
}
}
}
}
//--------------------------------------------------------------------------------------
// DoorButtonTimer.cs
//--------------------------------------------------------------------------------------
// This script is responsible for handling the buttons that control the doors. The buttons
// update variables for each of the doors that cause them to open
using UnityEngine;
using System.Collections;
using UnityEngine.SceneManagement;
using System;
namespace Valve.VR.InteractionSystem.Sample
{
public class DoorButtonTimer : MonoBehaviour
{
// Variables to store the door game objects
private GameObject leftDoor;
private GameObject rightDoor;
void Start()
{
leftDoor = transform.parent.gameObject.transform.Find("LeftSide").gameObject;
rightDoor = transform.parent.gameObject.transform.Find("RightSide").gameObject;
}
public void OnButtonDown(Hand fromHand)
{
//ColorSelf(Color.green);
//fromHand.TriggerHapticPulse(1000);
leftDoor.GetComponent().shouldOpen = true;
rightDoor.GetComponent().shouldOpen = true;
}
public void OnButtonUp(Hand fromHand)
{
leftDoor.GetComponent().shouldOpen = false;
rightDoor.GetComponent().shouldOpen = false;
//ColorSelf(Color.red);
}
private void ColorSelf(Color newColor)
{
Renderer[] renderers = this.GetComponentsInChildren();
for (int rendererIndex = 0; rendererIndex < renderers.Length; rendererIndex++)
{
renderers[rendererIndex].material.color = newColor;
}
}
}
}
//--------------------------------------------------------------------------------------
// Grabby.cs
//--------------------------------------------------------------------------------------
// This script is the part of the grab system that is attached to the right hand of the
// player. It uses a raycast to find object in the "interactables" layer and modifies
// there components to produce the highlight effect and set their jump targets.
using System.Collections;
using System.Collections.Generic;
using UnityEngine;
using Valve.VR;
using Valve.VR.InteractionSystem;
public class Grabby : MonoBehaviour
{
// We need the following to check for a certain controller input and
// to keep track of the controller pose for determining when the
// "flick" has occured.
public SteamVR_Action_Boolean checkAction;
public SteamVR_Action_Pose pose;
// The following can all be tuned in the editor and are general params
public int hitLayer;
public bool connect;
public int distance = 10;
public float sensitivity = .5f;
// These are made public for debugging the raycast
public Transform ray1;
public Transform ray2;
public Vector3 dt;
// We need to keep track of what the raycast has hit
private GameObject target;
private GameObject lastTarget;
// This is the radius of the capsule cast
public float radius;
// Start is called before the first frame update
void Start()
{
// I found that getting a proper direction for the raycast was pretty difficult. To fix
// this, I added two cubes to the player's right hand that point in the direction I want
// the cast to be oriented in. Here I get the transforms of those two cubes.
ray1 = GetComponent().Find("RayPoint1");
ray2 = GetComponent().Find("RayPoint");
}
void FixedUpdate()
{
// Update the action status
bool closed = checkAction[GetComponent().handType].state;
// If the controller is not being gripped (or whatever the chosen action is)
if (!closed)
{
// Reset the target
target = null;
RaycastHit hit;
// Update the direction vector by subtracting the vectors of the two cubes mentioned earlier
Vector3 direction = ray2.position - ray1.position;
dt = direction; //Print to editor
// Get the rotation required to look in the specified direction
Quaternion rotation = Quaternion.LookRotation(direction, Vector3.up);
// Use a capsule cast to tell if the player's hand is pointed at an object. Mask the specified layer to only fetch
// object that are a part of a specifies layer. Place the hit object in the "hit" object. CapsuleCast returns
// true if it hit something.
if (Physics.CapsuleCast(ray1.position, ray2.position, radius, direction, out hit, distance, 1 << hitLayer))
{
// Update target
target = hit.transform.gameObject;
// Make the hit object glow
target.GetComponent().Glow(true);
}
// If the target is null, meaning we haven't hit anything this iteration, save the previous target in lastTarget
if (target != null)
{
lastTarget = target;
}
}
// If the controller is being gripped
else
{
// We can check if the player has flicked their wrist by taking the dot product of the direction the camera is facing and the velocity of the controller.
// I'm not 100% sure about the reason for the subtraction between the forward and up vector, but I think it's because assuming that you're holding you're
// hand out and looking at the object you want to grab, the resultant vector should nearly always be approximately opposite the controller velocity, which
// gives the largest negative dot product. I got the dot product from someone else btw. They're credited in the report.
if (Vector3.Dot(pose[GetComponent().handType].velocity, (Camera.main.transform.forward - Camera.main.transform.up)) < sensitivity && target != null)
{
// When the flick is detected and we have a valid object, set connect (a debug variable) true and set the "hit" variable of the target
// to true, which tells it to jump to the hand. Also turn off the highlight and reset the target.
connect = true;
target.GetComponent().goal = this.gameObject;
target.GetComponent().hit = true;
target.GetComponent().Glow(false);
target = null;
}
}
// If our target is null but and we had a valid target, disable the glow of that target
if (target == null && lastTarget != null)
{
lastTarget.GetComponent().Glow(false);
lastTarget = null;
}
}
}
//--------------------------------------------------------------------------------------
// GrabbyGrab.cs
//--------------------------------------------------------------------------------------
// This script is the part of the grab system that is attached to the object. It causes
// an object to junp towards a specific position
using System.Collections;
using System.Collections.Generic;
using UnityEngine;
public class GrabbyGrab : MonoBehaviour
{
// Some parameters made public for debugging
public bool go = false;
public bool hit = false;
public float flyTime = 3f;
public GameObject goal;
// Need a rigidbody for our physics object and a transform for our goal.
// These will give and set positions and velocities
private Rigidbody rigid;
private Transform pRigid;
// Start is called before the first frame update
void Start()
{
// Set these
rigid = GetComponent();
pRigid = goal.GetComponent();
}
// Update is called once per frame
void FixedUpdate()
{
// Wait for the Grabby script to say the item has been hit
if (hit)
{
// Update hit
hit = false;
// Get the current position of the object and the goal
Vector3 pos = rigid.position;
Vector3 pPos = pRigid.position;
// Determine what vertical velocity to apply using y = Vy*t + .5at^2
float Vy = ((pPos.y - pos.y) + (.5f * 9.8f * Mathf.Pow(flyTime, 2))) / flyTime;
// I took the long way around for this part... I found the magnitude of the vector in the horizontal
// plane, the divided it by time to get a single velocity, then created a unit vector in the desired
// direction, and finally multipled the unit vector by the velocity. What I really should have done
// was divide the get the direction vector and divided the components by time. Essentially:
// Vector3 V = new Vector3((pPos.x - pos.x)/flyTime, Vy, (pPos.z - pos.z)/flyTime);
float Vx = Mathf.Sqrt(Mathf.Pow(pPos.x - pos.x, 2) + Mathf.Pow(pPos.z - pos.z, 2)) / flyTime;
Vector2 dir = new Vector2((pPos.x - pos.x) / (Vx * flyTime), (pPos.z - pos.z) / (Vx * flyTime));
Vector3 V = new Vector3(dir.x * Vx, Vy, dir.y * Vx);
rigid.velocity = V;
}
}
public void Glow(bool high)
{
// Enable the outline game object to make the object appear as if it is glowing
GameObject obj = transform.Find("Highlight").gameObject;
obj.SetActive(high);
}
}