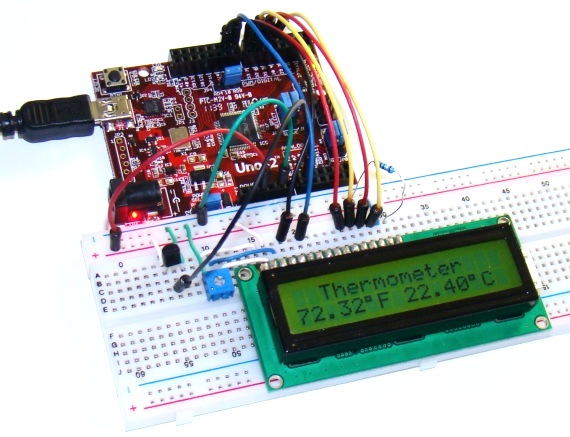
Summary of chipKIT Project 1: Digital thermometer using an LM34 sensor
This project uses a chipKIT Uno32, LM34 temperature sensor, and HD44780-based LCD to build a digital thermometer. The LM34 outputs 10 mV per °F, fed to Uno32 A0. Using a 3.3 V reference and a 10-bit ADC (3.2 mV/count), the sketch computes temperature: T(°F) = 3.2 * ADC_Count / 10, then converts to °C and displays both on the LCD.
Parts used in the Digital thermometer:
- chipKIT Uno32 board
- LM34 temperature sensor
- HD44780-based character LCD (16x2)
- Breadboard
- Jumper wires
- 5V to 3.3V supply (board power)
In Tutorial 3, we learnt how to use chiKIT ADC channels to read an external analog voltage and convert it into a digital number. We also discussed about interfacing a standard Hitachi 44780-based character LCD to the chipKIT Uno32 board in Tutorial 4. Now it’s time to implement the knowledge we have gained so far to make our first practical application using chipKIT, which is a digital thermometer. Since temperature is a non-electrical entity, the first thing we need is a transducer or sensor to convert it into an electrical signal. In this project, we will use the LM34 sensor to do that, which converts the surrounding temperature into an analog electrical voltage. The sensor’s analog output is fed to an ADC channel of the chipKIT Uno32, which then process the signal and displays the temperature on LCD, in both degree Celsius and Fahrenheit scales.
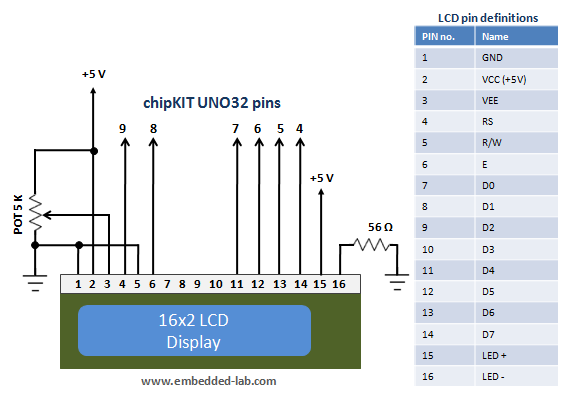
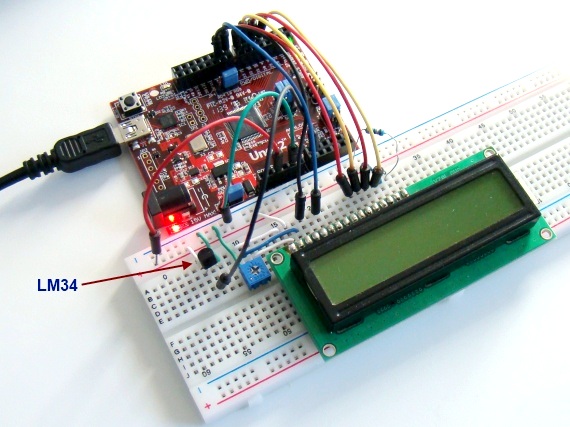
Circuit setup
The circuit diagram of this project is pretty simple and is shown below. The LM34 is a precision temperature sensor that provides an analog output voltage which is linearly proportional to the Fahrenheit temperature. It does not require any external calibration and is rated to operate over -50°F to 300°F. The temperature-to-voltage conversion factor is 10mV/°F. This means it gives an output of 750 mV at 75°F temperature. The LM34 output is connected to analog channel A0 of Uno32 for A/D conversion. The ADC output is manipulated by the chipKIT processor to derive the temperature information, which is later displayed on a standard HD44780-based character LCD. The LCD connection pins are also described in the circuit diagram.

Writing sketch
As mentioned earlier, the LM34 gives analog output voltage linearly proportional to temperature with scale factor of 10mV/°F. The reference voltage used in this project for A/D conversion is the supply voltage, which is 3.3V. Therefore, with 10-bit ADC, the resolution of A/D conversion becomes 3.3/1024 = 3.2mV/count. What this means is you can calculate the input analog voltage (in millivolts) back from an ADC count by multiplying the count by 3.2. Finally, to get Fahrenheit temperature, you need to divide the analog voltage (in millivolts) by 10. So, the overall equation to compute the Fahrenheit temperature from a 10-bit ADC count is,
T(°F) = 3.2 * ADC Count/10
The Fahrenheit to Celsius conversion is straightforward. The following sketch displays the measured temperature on the LCD in both °F and °C scales.
/*
  Project 1:  Digital thermometer using LM34 sensor
  Description: The analog output voltage from the LM34
               temperature sensor is converted into C and F scale
               temperature and is displayed on LCD.
  Board: chipKIT UNO32
 */


// Include the LiquidCrystal library
#include <LiquidCrystal.h>

// Initialize the LCD interface pins in the following sequence
// RS, E, D4, D5, D6, D7

LiquidCrystal lcd(9, 8, 7, 6, 5, 4);
int ADC_OUTPUT;
float tempF, tempC;
void setup() {
  // Define the number of columns and rows of the LCD
  lcd.begin(16, 2);
}

void loop() {
  lcd.setCursor(2, 0);
  lcd.print("Thermometer");
  lcd.setCursor(0, 1);
  ADC_OUTPUT = analogRead(A0);
  tempF = ADC_OUTPUT*3.2/10.0;  // Temperature in degree C
  tempC = 5.0*(tempF-32.0)/9.0; // Temperature in degre F
  lcd.print(tempF);
  lcd.print((char)223);         // Print degree symbol
  lcd.print("F ");
  lcd.print(tempC);
  lcd.print((char)223);         // Print degree symbol
  lcd.print("C");
  delay(2000);
}
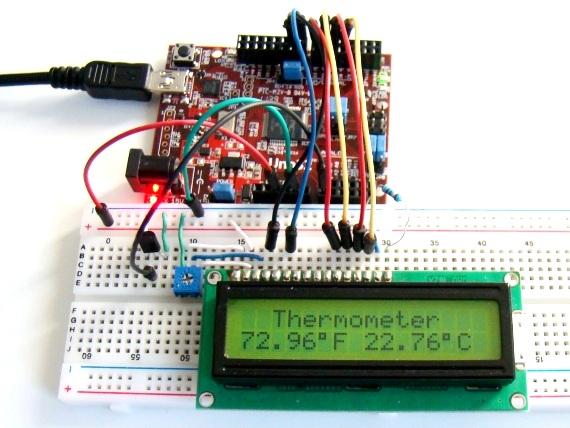
Output
- What sensor is used to sense temperature in the project?
The LM34 temperature sensor is used to convert surrounding temperature into an analog voltage. - Which ADC channel is the LM34 output connected to?
The LM34 output is connected to analog channel A0 of the chipKIT Uno32. - What is the temperature to voltage conversion factor of LM34?
The LM34 outputs 10 mV per degree Fahrenheit. - What ADC reference voltage is used for conversion?
The supply voltage of 3.3 V is used as the ADC reference. - How is Fahrenheit temperature calculated from ADC count?
Using the formula T(°F) = 3.2 * ADC Count / 10. - How is Celsius temperature obtained?
Celsius is computed from Fahrenheit using tempC = 5.0*(tempF-32.0)/9.0 as shown in the sketch. - Which library is used to drive the LCD?
The LiquidCrystal library is used to interface with the HD44780-based LCD. - How often does the sketch update the displayed temperature?
The sketch updates the display every 2000 milliseconds (delay(2000)).