Summary of A PIC Serial LCD Project
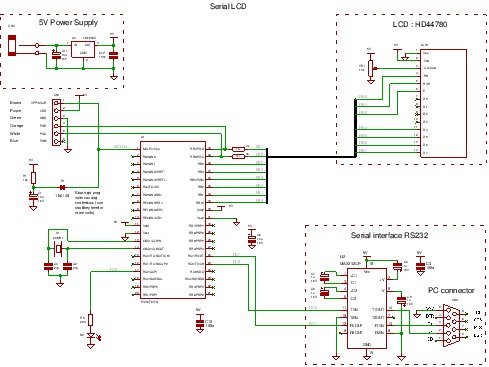
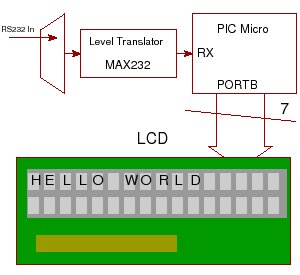
This project demonstrates how to create a serial LCD module controlled via an RS232 serial interface, which remains relevant due to UART integration in microcontrollers, minimal wiring, and robust long-distance communication. It uses ASCII command sequences for easy control from terminal programs. The design targets the PIC16F877A microcontroller with a 20MHz crystal, running at 9600 baud and programmable via MikroC compiler. Commands control cursor position and display functions without complex signaling. The project supports USB-to-RS232 adapters for PC interface and can be adapted for debugging by removing the RS232 level translator.
Parts used in the Serial LCD Project:
- PIC16F877A microcontroller
- 20MHz crystal oscillator
- RS232 serial interface components (MAX232 level translator or equivalent)
- Serial LCD display module
- Power supply components (not detailed but implied)
- Optional USB to RS232 adapter or USB to serial converter
Http iframes are not shown in https pages in many major browsers. Please read this post for details.Http iframes are not shown in https pages in many major browsers. Please read this post for details.This project shows you how to create a serial LCD module that you can drive from any serial RS232 interface.
You may be asking yourself why is this project using RS232 when computers are no longer even produced with a serial port as standard?
There are three reasons:
- Most microcontrollers come with a UART built-in as a hardware module.
- RS232 can be setup with 2 signal wires and one ground connection.
- RS232 can be operated over long distance.
The last point means that signal transmission can be made fairly error free and robust (although you can achieve higher data rates and lower error rates by using the full RS232 spec). However it is probably better to move to a multi-drop interface such as RS485.
Since the hardware module is built in it becomes super-easy to use the internal UART which can use interrupts allowing fast and transparent operation.
The only problem now becomes what to do about the interface in the PC and you either buy an RS232 to USB adaptor cable that presents an RS232 interface as a COM port in the usual way at the PC but allows it to be plugged into a USB port or you can use a Digital to Serial USB converter. This last one does away with RS232 signals altogether and instead provides digital RX/TX signals to plug straight into the microcontroller i.e. you miss out the MAX232 chip. Ultimately both work fine and both look the same at the PC side.
Here is some more information on Serial RS232 to USB adaptors.
Project Design
The design here uses a pure ASCII command set so you can control it easily from a terminal program such as Tera Term (download from web = free).
There are no ‘odd’ command sequences such as 0xef to define a command – you can type all commands at the terminal interface making it very easy to use i.e. this is a purely text based control system.
If you want to use it as a debugging terminal for your PIC projects then it makes sense to remove the level translator and just use the 0-5V input otherwise you would end up having two level translators for no real reason!

Note: Using it like this you will need to invert the RS232 output data so you either need an inverter chip if driven from the built in USART or you can drive it using a software USART (The transmitter part anyway) since you will have full control over the output signal.
Serial LCD Specification
| Baud Rate | 9600 |
| Crystal | 20Mhz -You can use a lower value xtal but must re-compile the files and set the clock value into the MikroC chip settings. |
Serial LCD Project Details
| Compiler | Mikroelectronika MikroC compiler Free! |
| Target | 16F877A (retargetable to other PICs that have enough pins and a built in USART). |
| Software level | Easy. |
| Software notes | Uses unget_char to reverse getchar action. |
| Hardware level | easy. |
| Hardware notes | No special notes. |
| Project version | 1.01 |
| Project files | Enter your details to get the Download Link and get the microcontroller newsletter: (Your email is safe it will never be sold or rented). Note: Check your email for the project code download link. |
You can recompile the serial LCD files if you want examine code operation (using the built in simulator) or change the source code. Note the hex file is contained in the download.
Serial LCD Command set
All commands are prefixed with the hash character ‘#’. In all cases except #X and #Y the single character following the ‘#’ causes a command to execute. For #X and #Y the decimal digits following (up to 2 digits) specify a position on the display.
Note: for #X and #Y the top left position is at 0,0.
Serial LCD Command Set list (uses upper or lower case):
| Serial LCD Commands | |
| #C or #c | Clear screen |
| #H or #h | Cursor Home |
| #L or #l | Cursor Left |
| #R or #r | Cursor Right |
| #U or #u | Cursor Underline mode |
| #B or #b | Cursor Block mode |
| #I or #i | Cursor Invisible |
| #F or #f | Display OFf |
| #O or #o | Display On |
| #Xnn or #xnn | Cursor X position (left nn=0) |
| #Ynn or #ynn | Cursor Y position (top nn=0) |
| #> or #. | Scroll display right (hash dot as easier to type!) |
| #< or #, | Scroll display left (hash commaas easier to type!) |
| ## | Display a ‘#’ character. |
To clear the display you would type:
#C
To set the cursor to block mode type:
#B
For more detail: A PIC Serial LCD Project

