
Summary of Making “The LCD Expansion Board” for PIC18F4520 using pic microcontoller
This tutorial explains how to build a DIY 16×2 LCD expansion board that plugs into a PIC development board, providing alphanumeric LCD support. The board requires a 16×2 LCD module and a 10K variable resistor for contrast; a 47 ohm series resistor for the LED backlight is optional. All PIC I/O pins plus regulated 5V and GND are brought to the top edge, and a 40-pin right-angled male header is soldered to mate the expansion with the PIC core board.
Parts used in the LCD Expansion Board:
- 16×2 Alphanumeric LCD Module
- 10K variable resistor (potentiometer) for contrast
- Optional 47 ohm series resistor for LCD LED backlight
- 40-pin right-angled male header (Burg housing)
- PCB or protoboard for the expansion board
- Wires/solder and general assembly supplies
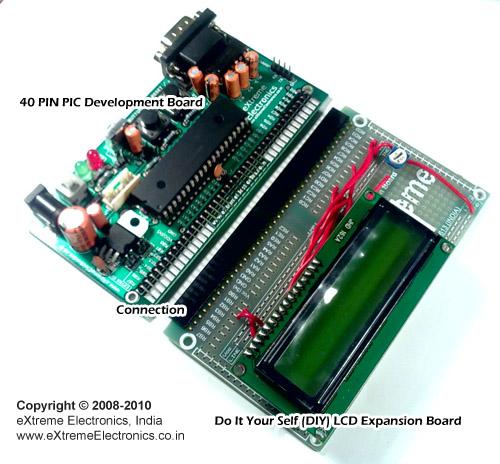
In this tutorial I you show you how to make a very useful expansion board for our PIC development board. It will be a Do It Your self (DIY) LCD Expansion board. The expansion board can be plugged into the PIC development board to add 16×2 Alphanumeric LCD Support to it. Since LCDs are required in many projects and experiments it will be a very helpful board.
 I recommend you to read the LCD Interfacing Tutorial before you proceed. It will give you an Idea how LCD is connected to PIC Microcontrollers. So lets start!
Fig.: LCD Module Interface with PIC Microcontroller.
The board is very easy to make as the MCU core unit is already done for you. So you need to just care about the LCD part. It consists of the 16×2 LCD Module and A variable resistor (10K) only! Optionally you can add a 47ohm series resistor with the LED backlight of the LCD Module, to enable the backlight. The variable resistor is used to adjust the contrast of the module. If NO text is displayed adjust this pot.
All I/O ports and power supply is available at the top of expansion board.
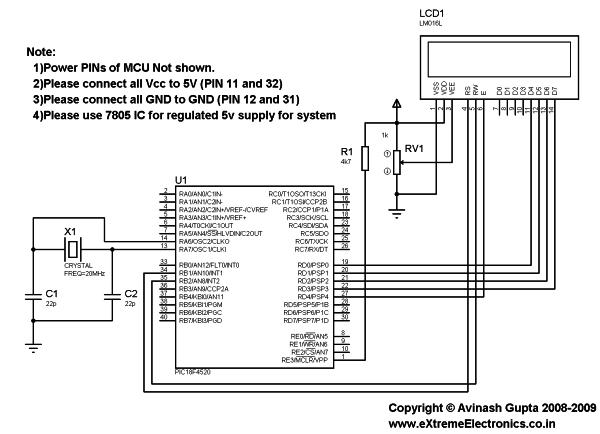
Fig.: A blank expansion.
As you can see the top row in the board lists all I/O port of PIC MCU like, RB7, RA1 etc. For Example, RB7 stands for Port B 7th bit. The row also has regulated 5v supply and GND outputs. So we start by soldering a 40 PIN Right Angled Burg Housing on the Expansion Board. This will help connect it with the PIC development board .
For more detail: Making “The LCD Expansion Board” for PIC18F4520
- What is the purpose of this expansion board?
To add 16×2 alphanumeric LCD support to a PIC development board. - Which main components are required to build the expansion?
A 16×2 LCD module and a 10K variable resistor; a 47 ohm resistor for backlight is optional. - How does the expansion board connect to the PIC development board?
By soldering a 40-pin right-angled male header (Burg housing) to the expansion board to plug into the PIC board. - What is the function of the 10K variable resistor?
It is used to adjust the contrast of the LCD module. - Is the LCD backlight resistor mandatory?
No, the 47 ohm series resistor for the LED backlight is optional. - Where are the PIC I/O pins and power connections located on the expansion?
All I/O ports and regulated 5V and GND are available at the top edge of the expansion board. - What should I do if no text appears on the LCD?
Adjust the 10K potentiometer (contrast pot) until text appears. - Do I need to build the entire MCU core for this expansion?
No, the MCU core unit is assumed already built on the PIC development board; the expansion only handles the LCD part.
