Summary of PIC16F877 LED blinking code and Proteus simulation
This article provides C code and a minimal circuit to blink an LED using a PIC16F877 microcontroller, compiled with HI-TECH C in MPLAB and tested in Proteus. It notes a 20 MHz crystal (any 0–20 MHz allowed), MCLR pulled high, and toggling of RB0. Downloads for code and simulation are available.
Parts used in the PIC16F877 LED blinking project:
- PIC16F877 microcontroller
- LED
- Current-limiting resistor for LED
- 20 MHz crystal (or any 0–20 MHz crystal)
- Capacitors for crystal (as required for oscillator)
- Pull-up resistor for MCLR pin
- Power supply (Vcc and ground connections)
- Connecting wires and breadboard or PCB
This post provides the code to make an LED blink using PIC16F877 microcontroller. This code is written in C language using MPLAB with HI-TECH C compiler. This code is intended to be the first step in learning how to use PIC16F877 microcontroller in your projects. You can download this code from the ‘Downloads‘ section at the bottom of this page.
Following figure shows the minimum circuit required to make an LED blink with PIC16F877.
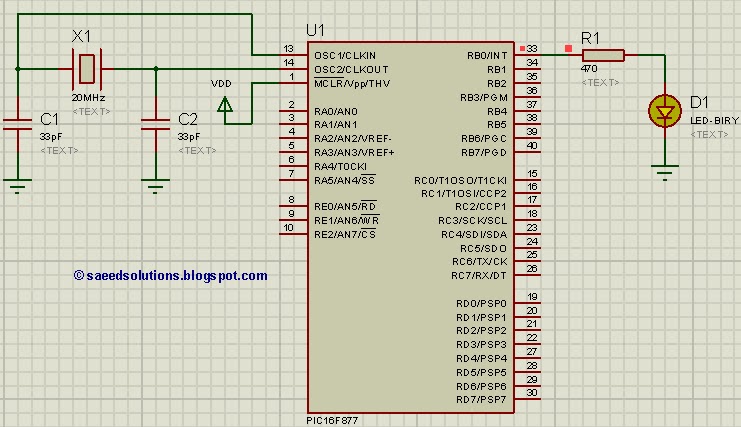
In this figure, first thing to note is that there is a crystal of 20MHz used with PIC16F877[1]. You can use any crystal from 0 to 20MHz with PIC16F877. MCLR master reset pin is pulled high to keep PIC16F877 out of reset. RB0 pin is being toggled in the code.
Code
The code for making LED blink using PIC16F877 is shown below.
Downloads
LED blinking code using PIC16F877 was compiled in MPLAB v8.85 with HI-TECH C v9.83 compiler and simulation was made in Proteus v7.10. To download code and Proteus simulation click here.
For more detail: PIC16F877 LED blinking code and Proteus simulation
- What compiler and IDE were used for the code?
The code was compiled with HI-TECH C v9.83 in MPLAB v8.85. - Which microcontroller pin is toggled to blink the LED?
RB0 pin is being toggled in the code. - What crystal frequency is shown in the example circuit?
The example uses a 20 MHz crystal. - Can I use a different crystal frequency with PIC16F877?
Yes, you can use any crystal from 0 to 20 MHz with PIC16F877 as stated. - How is the MCLR pin configured in the circuit?
MCLR master reset pin is pulled high to keep PIC16F877 out of reset. - Was the project simulated, and if so, in which software?
Yes, the simulation was made in Proteus v7.10. - Where can I get the code and simulation files?
Downloads are available from the Downloads section or by clicking the provided download link. - What is the purpose of this code example?
This code is intended as the first step in learning how to use PIC16F877 microcontroller in projects.