Summary of Timers of PIC microcontroller How to generate delay
This article guides users through setting up a PIC microcontroller project using the PIC18F22K80. It covers hardware assembly with a PICkit 3 debugger, installing MPLAB X IDE and XC8 compiler, and creating a new C template project. The instructions emphasize verifying connections, configuring software tools, and initializing a basic environment to test functions like timers and delays before expanding into advanced features.
Parts used in the PIC Microcontroller Project:
- PIC18F22K80 microcontroller
- PICkit 3 In-Circuit Debugger
- Breadboard and breadboard wires
- LEDs
- Buttons
- Potentiometers
- DPST switch
- 1kΩ resistor
- 0.1μF capacitors
- 10μF capacitor
PIC microcontrollers are a very useful and versatile tool for use in many electronic projects. They are very inexpensive and easy to find. They are also very powerful and many are capable of speeds up to 64 MIPS using the internal oscillator block, about 16 times faster than most comparable AVR microcontrollers. PICs are also easy to program, however getting the project set up can some times be tricky. These instructions will walk through the process of setting up the software, creating a new project, and programming some very simple functions to test the configuration and ensure everything is working. They are designed to be very open ended; after the project is created and the basics are finished the reader is encouraged to explore all the features and extras not covered in these instructions. Also you will find that these instructions will start out walking through step by step, but as the instructions near the end the reader is encouraged to explore other ways of accomplishing the tasks and make the project their own.
What you will need To build a project with a PIC microcontroller only requires a few items.
- PIC microcontroller
- These instructions are for programming a PIC18F series MCU, although others are similar.
- Obtained from Microchips website.
- Microchip allows students with valid .edu email addresses sample PIC’s for free!
- The PIC I am using to create these instructions is a PIC18F22K80
- PICkit 3 In-Circuit Debugger
- Available from Microchip.
- Costs $45 for general public, and #34 with student discount if you have an .edu email address.
- There are also other programmers which will work just as well; however, this is the best one for starting out.
- Breadboard and breadboard wires
- LEDs, buttons, potentiometers, or anything else you would like to connect to the PIC
Step 1: Build Hardware
Before doing any programming the first step is to build the hardware. Although the PIC18F portfolio is very large, many of the chips have several commonalities. For more detailed information see the “Guidelines for Getting Started with PIC18Fxxxx Microcontrollers” section in your devices datasheet. For detailed pin-outs of the PIC microcontroller see the “Pin Diagram” section in your devices datasheet.
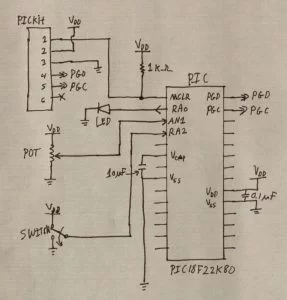
Note: VDD = Positive Voltage and VSS = Ground.
- Connect the MCLR pin through a 1kΩ resistor to VDD.
- Connect a 0.1μF capacitor between every pair of adjoining VDD-VSS pairs or AVDD-AVSS pairs.
- Connect a 10μF capacitor between VCAP and Vss.
- Connect MCLR pin to pin 1 of the PICkit 3.
- Connect VDD to pin 2 of the PICkit 3.
- Connect VSS to pin 3 of the PICkit 3.
- Connect PGD pin to pin 4 of the PICkit 3.
- Connect PGC pin to pin 5 of the PICkit 3.
- Leave pin 6 of the PICkit 3 unconnected.
- Connect any analog inputs to pins with ANx functionality where x is a number.
- Connect any digital inputs or outputs to pins with Rxy functionality where x is a letter identifying the port, and y is a number identifying the bit.
For my example I have an LED connected between RA0 and ground, the wiper of a potentiometer connected to AN1, and a DPST switch connected to RA2. You may find it easier to program the PIC if you have sketched down a schematic of your circuit.
Step 2: Get Software
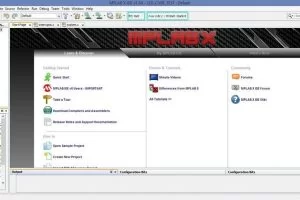
These instructions will use XC8 compiler and MPLAB X IDE by Microchip. This step will explain how to get these tools and ensure they have been installed correctly.
- To get the latest version of the software visit Microchips website at http://www.microchip.com/pagehandler/en-us/family/mplabx/
- Select the software for your OS and follow the standard installation instructions.
Note: If you are using Windows 8 you may need to run the installers in compatibility mode for Windows 7.
- Once the software is installed, start MPLAB X
- In the menu bar select Tools->Options
- In the Options dialog select the Embedded tab and ensure XC8 is listed in the Toolchain list.
- If it is listed select OK and move on the next step.
- If it is not listed ensure that instillation has completed, and click Scan for Build Tools button.
- If still not listed, look on Microchips forum for help with your specific problem.
Step 3: Create New Project
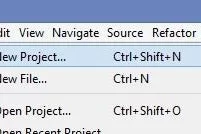
In this step we will create a new project based on a template from Microchip.
- On the menu bar select File->New Project…
- In the new file dialog box expand Samples and select Microchip Embedded
- In the project box select PIC18 C Template
- Select Next
- Give the project any name you like
- Choose a location to save the project to in the Project Location box
- Leave the Project Folder as default options
- Check “Set as Main Project” box
- Select Finish
The project will now show up in Project Explore on the left hand side of the screen.
Source: Timers of PIC microcontroller How to generate delay
- What is the maximum speed of the PIC microcontrollers mentioned?
They are capable of speeds up to 64 MIPS using the internal oscillator block. - How can students obtain free sample PICs?
Microchip allows students with valid .edu email addresses to get sample PICs for free. - Does the PICkit 3 offer a student discount?
Yes, it costs $34 with a student discount if you have an .edu email address. - Which software tools are required for this project?
The instructions use XC8 compiler and MPLAB X IDE by Microchip. - What should Windows 8 users do during installation?
They may need to run the installers in compatibility mode for Windows 7. - How do you verify the XC8 toolchain in MPLAB X?
Select Tools Options, go to the Embedded tab, and ensure XC8 is listed in the Toolchain list. - What template should be selected when creating a new project?
You should select the PIC18 C Template from the Microchip Embedded samples. - What is the recommended first step before programming?
The first step is to build the hardware according to the pin-out guidelines.