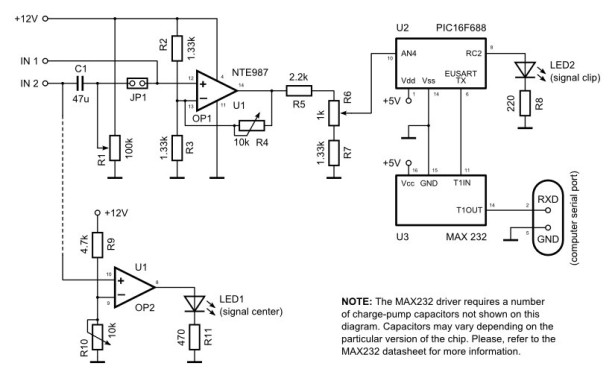
The data logger consists of a simple op-amp amplifier circuit that amplifies the signal and sends it to be digitized by a PIC16F688 microcontroller, serialized, and sent to the computer’s serial port via a MAX232 serial driver:
I guess you are already wondering about some of the unusual arrangmenents in the analog part in the schematic diagram above. Part of it is because of the voltage differences between the analog and digital part: the op-amps work on 12V while the microcontroller and the serial driver require 5V. Part of it is to make the different kind of sensors I plan to use easier to connect. Finally, this is partly because I’m really lazy and when I got the things to work to my satisfaction I refused to change anything. The point is – unusual or not, it works.
Operation
The logger has two inputs:
IN1 is a DC-input with a range of 1-11V. Whatever voltage is applied to IN1 is directly passed to the amplifier. Try to keep the voltage centered around the 6V point for best results.
IN2 is an AC (self-centering) input with a range of ±5V. The trimmer potentiometer R1 connected to this input centers the signal at 6V when the sensor signal is not changing.
Switching between inputs is done by shorting the JP1 jumper. You can either use a switch there and do this manually, or wire JP1 into the connectors you use to plug-in your sensors (which is the way I did it).
Before finishing with the input part, notice the optional amplifier OP2 in the lower part of the diagram. Some sensors based on a voltage divider work best when the voltage is split close to the half point – in other words, if you have a resistor/photoresistor bridge and in the particular conditions the photoresistor has 10kΩ resistance, the signal will be stronger if the other resistor in the bridge is also around 10kΩ. Use the trimmer potentiometer R10 to set the desired center point. Afterwards, LED1 will switch on and off when the center point is crossed, helping you adjust your sensor correspondingly.
Amplification is controlled by adjusting R4. If you wish, you can use a higher value for this potentiometer – this will give you higher amplification, but at the cost of more noise.
The output from OP1 is passed to the microcontroller through the voltage divider composed of R5, R6, and R7. The voltage divider is here to assure that the signal passed to the analog input AN4 never goes above 5V. Before plugging in the microcontroller, adjust R6 so when the output from OP1 is at it’s top range, the voltage out of R1 is just below 5V.
The PIC16F688 microcontroller digitizes the signal from AN4, applies checksum information and passes the serialized data at 1200 bps to the MAX232 serial driver. From there, it’s just a matter of plugging a serial cable in your computer and running the logger script logger.pl to record the data.
For more detail: Serial Data Logger with PIC microcontroller


