Summary of Marantz CD63SE laser transport mechanism replacement
The article details the repair of a Marantz CD63SE where the original Philips CDM12.1 laser failed due to age. It guides DIYers through replacing it with a VAM1202 mechanism, covering safety precautions, disassembly of the chassis and tray, disconnecting cables, desoldering motor wires, and swapping the old laser for the new drop-in unit.
Parts used in the Marantz CD63SE Laser Replacement:
- VAM1202 CD mechanism
- Copper screws (for lid and mechanism)
- Anti-static wristband
- Soldering iron
- Flat blade screwdriver
- Pozidrive screwdriver
- RF amplifier PCB
- Flexi-foil cable
An elderly, but still sought after Marantz CD63SE was bought into the shop last week, with the fault reported that CD’s would no longer play. After approximately 15 years of use, this is a common situation, as the laser power will gradually reduce over time to the point where it can no longer focus reliably on the spinning CD disc – however with the easy availability of VAM1202 CD mechanisms for below £20, repair is a viable option over and above the purchase of a new CD player.
The original Philips CDM12.1 laser mech is no longer available, however the VAM1202 is an approved drop in replacement – how often have I heard those three words only to find out there are complications? Well, this repair went pretty smoothly, but as always there were a few unexpected complications which I’ll get on to later.
With thousands of Marantz CD63/ CD63SE/CD63KI Signature CD players still in regular use or turning up on eBay as ‘spares or repairs’ for a very low sum, I thought it would be useful to would-be DIY’ers to have a step by step guide to removing, replacing and aligning a replacement VAM1201 laser transport in the CD63 and varients. So, without further ado, get your anti-static wristbands on, and fire up that soldering iron! (Note: only those readers with electrical and electronic experience should attempt to service the CD63 – there are lethal AC mains voltages in the power supply which could kill if touched. All dis-assembly and re-assembly of the CD player should be conducted with the mains plug removed from the mains socket.)
OK, scary bit over! On with the repairs…. firstly, make sure your anti-static wristband is attached to your wrist, as ESD damage can easily affect the sensitive laser mechanism.
After removing the steel lid (four copper screws either side of the lid, and two copper screws in the top lip of the back panel) with the front of the CD player facing you, you will see the CDM12.1 CD transport to the left hand side, as in the picture above.
The CD12.1 laser mechanism is connected to the main PCB via three cables/ plugs, highlighted in red in the picture below – the smaller white plastic plugs can be removed by gently pulling them out of their sockets (do NOT pull on the wires, put all force on the white plastic connectors.
The flexi-foil is removed from it’s black plastic socket by firstly lifting the black collar of the socket nearest the CD mechanism, and then gently pulling the flexi-foil out of it’s socket, as illustrated in the next two photos.
Here is a pic of the flexi-foil successfully released – as you can imaging, it is very easy to damage if due care is not taken.
This next photo shows the motor control wiring plug disconnected from it’s socket on the main PCB – there are two motors on the VAM1202, one for moving the laser sled as it traverses the CD whilst playing (blue and white wires), and another to spin the CD disc at the correct speed to allow the playing of CD’s (green and orange wires). The brown and black wires are connected to a sensor which detects when a CD is loaded and gives a true or false signal to microprocessor on the main CD player PCB.
At this stage, it is a good idea to remove the CD loading tray, which makes it much easier to extract the CD mechanism from the player. As shown in the photo below, eject the CD drawer fully, then locate the rectangular hole, and with a flat blade screwdriver, carefully release the plastic tab which secures the CD tray. Put the CD tray safely to one side for later.
Once all three sets of cables have been removed between the CD laser mechanism and the main PCB, simply unscrew the three copper pozidrive screws (highlighted in red below) which retain the CD mechanism to the CD player enclosure floor, and retain them somewhere safe when re-assembly is due.
Now that the CD transport is removed from the CD player, carefully place it on your workbench and invert it, so that you can see all of the soldered connections to the various motors and sensor. First of all, release the white collar of the socket which connects to the brown flexi-foil connector and gently pull the flexi-foil out of it’s socket. Make sure you are still wearing your anti-static wristband.
The next job is to remove the two copper screws highlighted in red below, to allow release of the RF amplifier PCB and it’s small metal retaining bracket.
Lift away the RF amplifier PCB (leaving the red/ black/ brown/ grey wires attached as shown in the pic) – you now need to desolder the six connections highlighted below in red which connect to the spindle motor (yellow/ green), the sled motor (blue/ white) and CD sensor (orange/ black). Be careful to use a moderate temperature on your soldering iron, as the wires are easily damaged by excess heat. Note down where the various coloured wires are connected, to aid fitting of the replacement laser mechanism.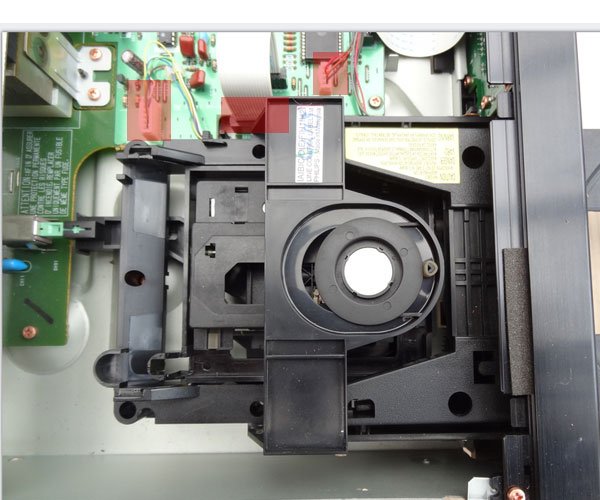
In this next pic you can see the motor spindle and CD present sensor wires carefully desoldered, without any heat damage having occurred.
To remove the old CD laser mechanism from the transport, it is necessary to push out the four rubber mechanical suspension points from the laser mech – there are two near the spindle as shown in red here, and then two more – one at the back and one on the side of the laser mech – they are easily split by too much force, so take your time, a flat bladed screwdriver helps to persuade them out. Once all four are released, the old laser mech can be removed completely.
For more detail: Marantz CD63SE laser transport mechanism replacement
- Why do CDs stop playing on older Marantz players?
Laser power gradually reduces over time, preventing reliable focus on spinning discs. - Is the VAM1202 a direct replacement for the original laser?
Yes, the VAM1202 is an approved drop-in replacement for the unavailable Philips CDM12.1. - What safety precaution is mandatory before starting repairs?
Wear an anti-static wristband to prevent ESD damage and ensure the mains plug is removed. - How many copper screws hold the steel lid in place?
There are four copper screws on each side of the lid and two in the top lip of the back panel. - How should cables be disconnected from the main PCB?
Apply force only to the white plastic connectors, never pull on the wires themselves. - Which components must be desoldered during the swap?
You must desolder six connections for the spindle motor, sled motor, and CD sensor. - How do you remove the rubber suspension points from the laser mech?
Push them out carefully using a flat bladed screwdriver without applying too much force. - Why should you note wire colors before desoldering?
Noting colors aids in correctly fitting the replacement laser mechanism later.