Summary of LED Blinking with PIC Microcontroller
Summary: This tutorial shows how to build a PIC16F877A LED blinking circuit on a perf board, program the MCU using MPLAB IPE and a PicKit3 via ICSP, and explains what happens when code is compiled into HEX and burned into the microcontroller, plus PIC memory types and required ICSP connections.
Parts used in the LED Blinking with PIC Microcontroller:
- PicKit 3
- PIC16F877A IC
- 40-Pin IC holder
- Perf board
- 20 MHz Crystal oscillator
- Female and male bergstick pins
- 33 pF capacitors (2 Nos)
- 100 µF capacitor
- 10 µF capacitor
- 680 ohm resistor
- 10K resistor
- 560 ohm resistor
- LED (any color)
- Soldering kit
- IC 7805 (voltage regulator)
- 12V adapter
In our previous two tutorials we discussed How to Get Started with PIC using MPLABX and XC8 compiler, we have also made our First LED Blinking Program with PIC and verified it by simulation. Now it’s time for us to get our hands on to the hardware. In this tutorial we will build a small circuit on a Perf Board for Blinking the LED using PIC. We will dump the program to our PIC microcontroller and verify the LED Blinking. To Program the PIC MCU we will be using MPLAB IPE.
Materials Required:
As discussed in our previous tutorial we will need the following materials:
- PicKit 3
- PIC16F877A IC
- 40 – Pin IC holder
- Perf board
- 20 MHz Crystal OSC
- Female and Male Bergstick pins
- 33pf Capacitor – 2Nos, 100uf and 10uf cap.
- 680 ohm, 10K and 560ohm Resistor
- LED of any color
- 1Soldering kit
- IC 7805
- 12V adapter
What happens when we “Burn” a Microcontroller!!
It is a usual practise to upload the code into a MCU and get it working inside the MCU.
But what really happens inside the MCU how does few lines of C-Program get into a silicon chip and gets executed?
In, order to understand this lets have a look at our program

As we can see this code is written in C-Language and it will make no sense to our MCU. This is where the part of our compiler comes in; a Compiler is one which converts this code into a Machine readable form. This machine readable form is called the HEX code, every project that we create will have a HEX code which will be in the following directory
**Your location**\Blink\Blink.X\dist\default\production\Blink.X.production.hex
If you are so interested to know how this HEX code looks like, just open it using the notepad. For our Blink program, the HEX code will look like the following:
Since we have just compiled a small LED blinking program, the memory summary shows that we have just consumed 0.5% of the available program space and 1.4% of Data space.
Memory of the PIC16F877 microcontroller is basically divided into 3 types:
Program Memory: This memory contains the program (which we had written), after we’ve burned it. As a reminder, Program Counter executes commands stored in the program memory, one after the other. Since we have written a very small program, we have consumed only 0.5% of the total space. This is a non-Volatile memory, means the stored data won’t be lost after the power off.
Data Memory: This is RAM memory type, which contains a special registers like SFR (Special Function Register) that includes Watchdog timer, Brown out Reset etc. and GPR (General Purpose Register) that includes TRIS and PORT etc. The variables that are stored in the Data Memory during the program are deleted after we turn off the MCU. Any variable declared in the program will be inside the Data memory. This is also a volatile memory.
Data EEPROM (Electrically Erasable Programmable Read-Only Memory): A memory that allows storing the variables as a result of burning the written program. For example if we assign a variable “a” to save a value of 5 in it and store it in the EEPROM this data will not be lost even if the Power is turned OFF. This is a non-Volatile memory.
Program Memory and EEPROM are non-volatile memories, and called as Flash Memory or EEPROM.
ICSP (In Circuit Serial Programming):
We will be programming our PIC16F877A using the ICSP option that is available in our MCU.
Now, What is ICSP?
ICSP is a simple way which helps us to program an MCU even after it is placed inside our Project board. There is no need to have a separate programmer board to program the MCU, all we need is 6 connections from the PicKit3 programmer to our board as follows:
|
1 |
VPP (or MCLRn) |
To enter programming mode. |
|
2 |
Vcc |
Power Pin 11 or 32 |
|
3 |
GND |
Ground PIN 12 or 31 |
|
4 |
PGD – Data |
RB7. PIN40 |
|
5 |
PGC – Clock |
RB6. PIN 39 |
|
6 |
PGM – LVP enable |
RB3/RB4. Not mandatory |
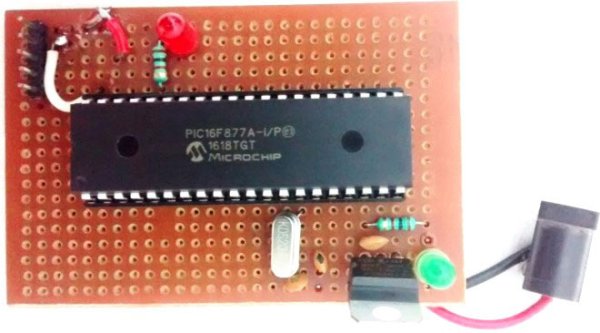
Circuit and Hardware:
Now, we have our HEX code ready and we also know how to connect our PicKit 3 to our PIC MCU using ICSP. So, let’s go ahead and solder the circuit with help of the below schematics: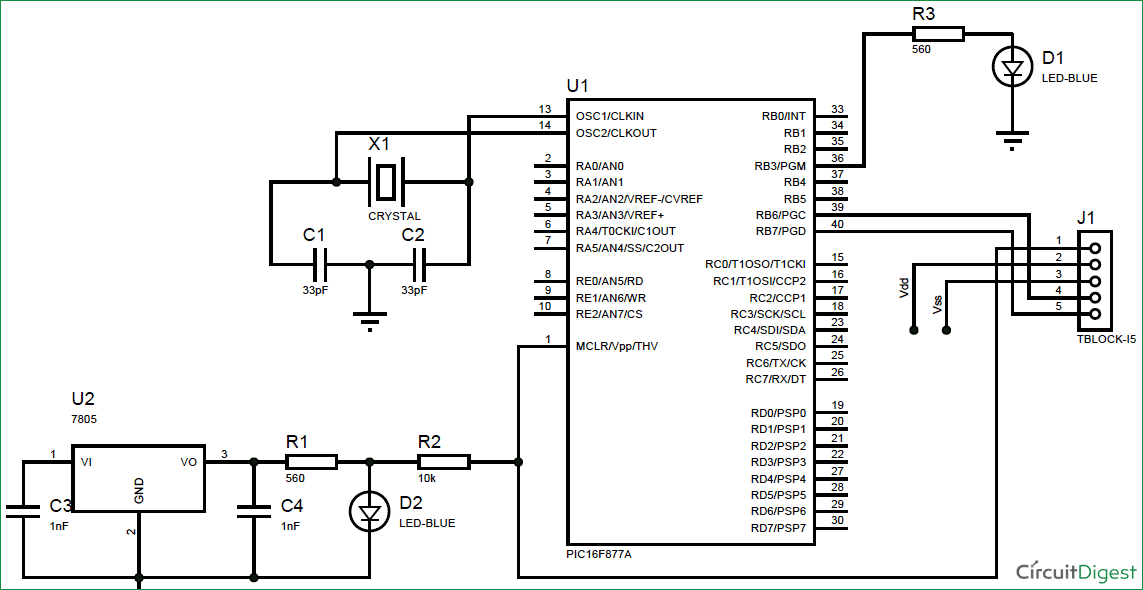
For more detail: LED Blinking with PIC Microcontroller
- What do we use to program the PIC16F877A in this project?
We use PicKit 3 and MPLAB IPE via ICSP to program the PIC16F877A. - Where is the compiled HEX file located?
The HEX file is in Your locationBlinkBlink.XdistdefaultproductionBlink.X.production.hex. - What does the compiler produce for the MCU to execute?
The compiler converts C code into a machine readable HEX code that is burned into the MCU. - Which PIC memory types are explained in the article?
Program Memory, Data Memory (RAM), and Data EEPROM are explained. - Is Program Memory volatile or non-volatile?
Program Memory is non-volatile and retains data after power off. - What is ICSP and why is it used?
ICSP is In Circuit Serial Programming, allowing programming the MCU while it is placed on the project board using six connections from PicKit 3. - Which pins are used for PGD and PGC for ICSP on PIC16F877A?
PGD is RB7 (pin 40) and PGC is RB6 (pin 39). - Which ICSP connection is used to enter programming mode?
VPP (or MCLRn) is used to enter programming mode. - Is PGM LVP enable mandatory for ICSP connection?
No, PGM (LVP enable) on RB3/RB4 is not mandatory.