Summary of Interfacing 7 segment display with pic16f877 microcontroller
This article explains interfacing a 7-segment display with a PIC16F877 microcontroller to create a counter that cycles from 0 to 5. It details the LED arrangement (a-g), the requirement for active-low signals to glow specific segments, and provides the exact bit patterns for each digit. The project utilizes Port B of the microcontroller to send these patterns, supported by Proteus simulation diagrams and Embedded C code.
Parts used in the Interfacing 7 segment display with pic16f877 microcontroller:
- PIC16F877 microcontroller
- 7-segment display
- Port B of microcontroller
- Proteus simulation circuit
- Embedded C code
This post will describe that how easily we can do Interfacing 7 segment display with pic16f877 microcontroller. 7 segment display is a basically array of 7 leds with some proper arrangement. From this fig it can be seen that 7 leds arranged with an array starting from a, b, c, d, e, f, g, and h. So from every LED we get one pin and another Pin for providing active high voltage to every pin. Now whatever LEDs we have to glow we have to send active low on corresponding LED pin.
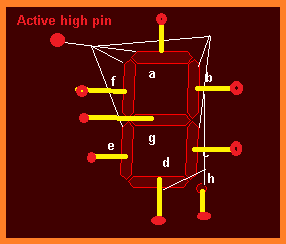
Now let take an example to clear all, suppose we have to display 5 at 7segment display then what should be our bit pattern? For display5 we have to glow a, f, g, c and d LEDs and off rest. As I discuss earlier, whatever LEDs we have to glow we have to send active low on corresponding LED pin because all others pin of LED got active high signal. So in our case we have to send bit pattern like
Project description:
Now in my project to make you easily understandable the process, Interfacing 7 segment display with pic16f877 microcontroller, I made a counter which will count 0-5 and repeat. For that I used port B of microcontroller pic16f877 as an out port send different bit pattern for different digit to display at 7 segment display. So to display 0-5 we have to create exact bit pattern for every digit which are given bellow .
For 0 = 01000000.
For 1 = 01111001.
For 2 = 00100100.
For 3 = 00110000.
For 4 = 00011001.
For 5 = 00010010.
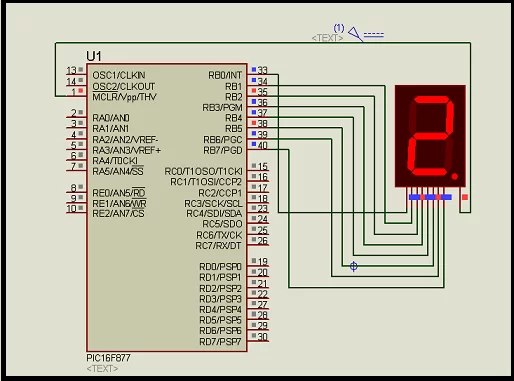
Here I give you the Proteus simulation circuit and see how I connect the 7 segment display pin with port B of microcontroller pic16f877.
In bellow you will find complete embedded C code on PIC Micro C Pro. From this code you will understand how i send particular bit pattern for individual digit.
For more detail: Interfacing 7 segment display with pic16f877 microcontroller
- How is the 7-segment display arranged?
It is an array of 7 LEDs arranged starting from a, b, c, d, e, f, g, and h. - What signal level is required to glow an LED pin?
You must send an active low signal to the corresponding LED pin to glow it. - Which port is used for sending bit patterns in this project?
Port B of the microcontroller is used as an output port to send different bit patterns. - What range does the counter display in the described project?
The counter counts from 0 to 5 and then repeats. - What bit pattern is needed to display the number 5?
The bit pattern for displaying 5 is 00010010. - Can I see the connection diagram for this project?
Yes, a Proteus simulation circuit showing the connection between the 7-segment display pins and Port B is provided. - Where can I find the code for this project?
The complete embedded C code on PIC Micro C Pro is available in the article.