Summary of How to Install ChipKIT Core
This article guides users on programming chipKIT boards using the Arduino IDE via the chipKIT-core beta. It details a three-step process: installing Arduino IDE 1.6.5, manually adding the chipKIT core to the hardware folder, and selecting the board in the IDE tools. The guide confirms compatibility with most chipKIT libraries and notes updates for Arduino 1.6.7 and later versions.
Parts used in the chipKIT Core Installation:
- chipKIT board
- Arduino IDE (version 1.6.5 or 1.6.7+)
- chipKIT-core software package
- WinRAR (for extraction)
- Documents folder (C:UsersNameDocuments)
- Arduino libraries directory
- Arduino hardware directory
- chipKIT core Wiki
For those of you with a chipKIT board, I have good news! If you like using the Arduino IDE instead of MPIDE, your dreams have become a reality with chipKIT-core (currently in beta). You can now program all of the chipKIT boards directly from within the Arduino IDE and the most-used libraries included with the chipKIT platform have already been updated to be compatible with the Arduino 1.6.x.
**UPDATE** chipKIT core has been updated to work with Arduino 1.6.7 and later! Check out this Digilent blog post for updated instructions on how to install chipKIT core!
Step 1: Install the Arduino IDE
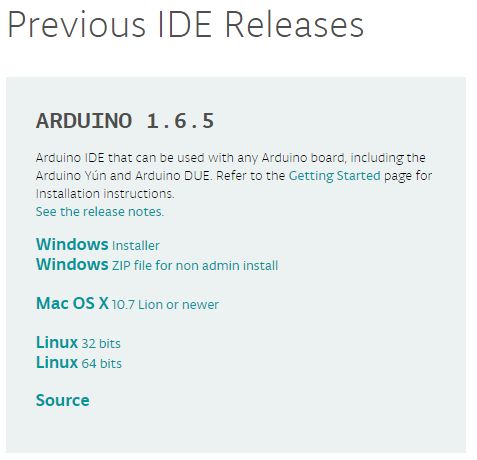
First, we need to install the Arduino IDE. As of 12/11/2015, chipKIT-core only works on Arduino version 1.6.5 (not 1.6.6) but this should be fixed soon. Head to this page to grab 1.6.5 and click on the corresponding installer for your OS.
Once the download is finished, follow the on-screen instructions to install.
When the install completes, go ahead and open up the Arduino IDE so it can generate some files in your documents folder. Close it once it opens and move on to the next step!
Step 2: Install ChipKIT Core
First, head over to the chipKIT core Wiki where they keep the current information on the chipKIT core project.
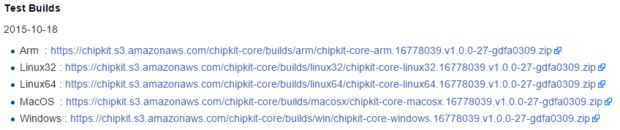
There are three methods to install chipKIT core all with instructions on the Wiki. In this case, I’ll be going over the manual installation process.
Scroll down to the test builds section and download the most recent version for your OS.
While that is downloading, head over to your documents folder (usually C:\Users\Name\Documents on Windows). Open the Arduino folder and you should see one folder called libraries. Create a new folder in the main Arduino directory called hardware. Check out the picture above to make sure you made it in the correct directory.
Use a program like WinRAR to extract the chipKIT core folder and all of its contents to the hardware folder you just created.
Make sure you extracted correctly by heading to the hardware folder and making sure that the folders are correct. It should be Arduino\hardware\chipkit-core\pic32\ with more contents in that folder.
Step 3: Test It Out!
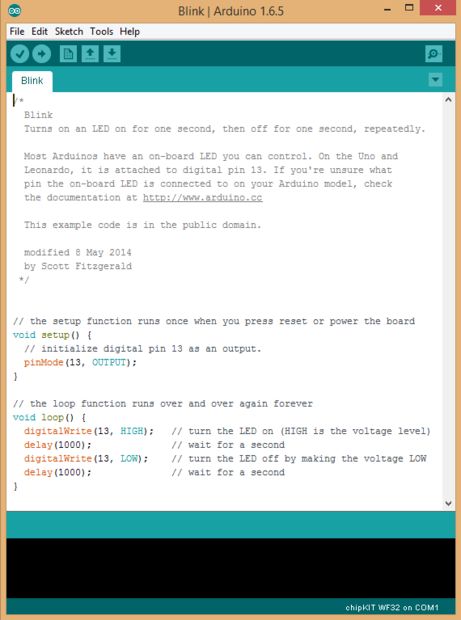
Now that we are done installing chipKIT core, open the Arduino IDE. Under Tools -> Board you should now see a whole chipKIT section with most if not all of the chipKIT boards! Select the chipKIT board you are using and you are ready to go. Check out the blink example above or do it yourself by going to file -> examples -> basics -> blink.
Let me know if you have any questions and stay tuned on the chipKIT core Wiki for coming updates.
- Can I program chipKIT boards directly from the Arduino IDE?
Yes, you can now program all chipKIT boards directly from within the Arduino IDE using chipKIT-core. - What is the best way to install chipKIT core manually?
Download the test build, create a hardware folder in your Documents/Arduino directory, and extract the core contents there. - Does chipKIT core work with Arduino version 1.6.6?
No, as of December 11, 2015, chipKIT-core only works on version 1.6.5, though this was expected to be fixed soon. - Where should I download the latest chipKIT core information?
You should head over to the chipKIT core Wiki where they keep current information on the project. - How do I verify that the installation folders are correct?
Check the hardware folder to ensure it contains Arduinohardwarechipkit-corepic32 with more contents inside. - Which menu option allows me to select my chipKIT board?
Go under Tools -> Board in the Arduino IDE to see the chipKIT section and select your specific board. - Are the chipKIT libraries compatible with the Arduino IDE?
Yes, the most-used libraries included with the chipKIT platform have been updated to be compatible with Arduino 1.6.x. - What example code can I use to test the setup?
You can check out the blink example by going to file -> examples -> basics -> blink.