Summary of Incredible DIY iPhone Macro
This project demonstrates how to create a free, double-sided macro lens for an iPhone using salvaged disposable camera lenses. By constructing a lightweight carriage from balsa wood and securing it with rubber bands, users can easily switch between two magnification levels by flipping the device. The build requires basic tools like an X-Acto knife and focuses on achieving a press-fit for the lenses to ensure stability during close-up photography.
Parts used in the DIY iPhone Macro Lens:
- Lenses (from disposable cameras or laser pointers)
- Balsa Wood
- Rubber Band
- X-Acto knife
After taking apart dozens of disposable cameras over the years, I found myself with a lot of lenses of varying sizes and nothing to use them for… until now!
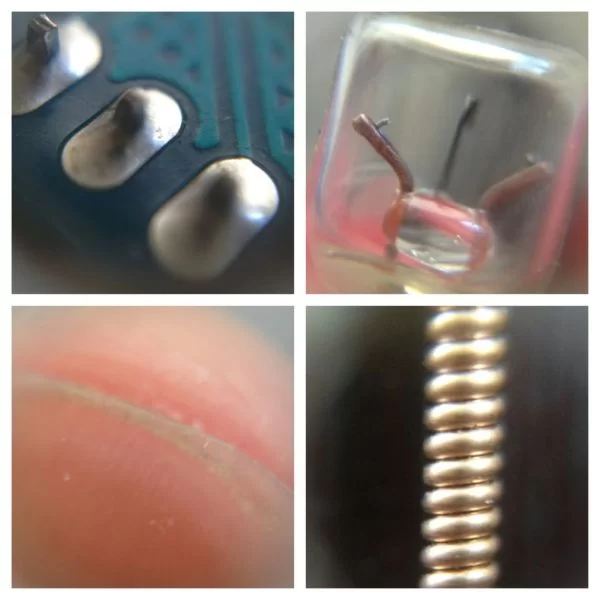 By making a simple carriage that would hold the lens and attach to my iPhone via rubber band, I was able to make a virtually free macro lens that takes amazingly close shots in practically no time at all. In this Instructable, I will build one with 2 lenses, one on each end, so you can take shots of different macro level just by flipping the carriage around! Let’s get started…
Step 1: Parts N Stuff
[box color=”#985D00″ bg=”#FFF8CB” font=”verdana” fontsize=”14 ” radius=”20 ” border=”#985D12″ float=”right” head=”Major Components in Project” headbg=”#FFEB70″ headcolor=”#985D00″]To make this lens assembly, we’ll only need a few parts, but each part could conceivably by swapped out for something similar with no ill effects:
Lens(es) – To be honest, I think I got these lenses out of disposable cameras. They had been sitting on my desk for a while, but I’m pretty sure they are. As a general rule of thumb, the smaller the diameter, the more macro you’ll get out of it. You may also find good lenses to use from cheap laser pointers.
Balsa Wood – This is the material I chose to make the carriage for my macro lenses because it’s incredibly easy to cut and work with, and I had it lying around. Optimally, your carriage material would be the same thickness as your lens so you don’t capture it in your pictures, but for me I found that a bit of overhang actually creates sort of a cool vignette.
Rubber Band –This is to attach the carriage to your iPhone (or any phone, for that matter). Probably the best thing for the job, as I wouldn’t suggest duct tape. Or Gorilla Glue…
You’ll also need an X-Acto knife or something similarly sharp to cut the balsa wood.
[/box]Step 2: Carriage Fitment
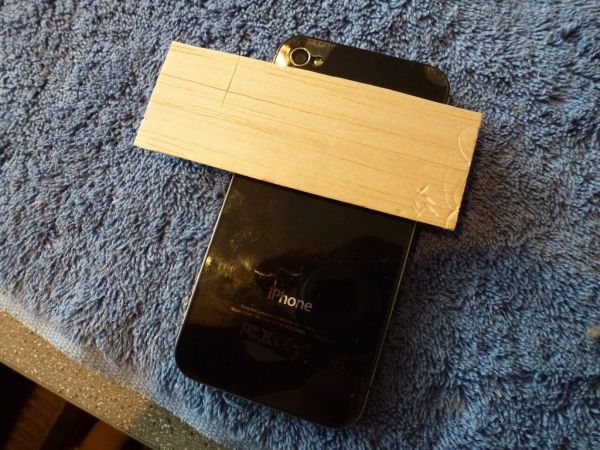
The first thing we’re going to want to do is fit the balsa wood to the iPhone to size it up properly. We’ll want about 1/4″ to 1/2″ on each side, and enough height to comfortably fit the lens (about 1/4″ of balsa surrounding the lens). It’s probably worth scoring or marking the balsa while it’s on your phone before moving it away to actually cut it.
Step 3: Slotting the Sides
Now that the balsa is sized correctly, it’s time to slot it for rubber band placement and hole it (?) for lens placement.
Make a slot near each corner as shown for the rubber band to ensure it sits properly and doesn’t slip out. Be careful while cutting, though, because it’s easy to break the corner of the balsa wood during this step.
Step 4: Fitting the Lenses
This is probably the most critical step.. we need to cut holes for the lenses to fit, but the trick here is to make the lenses a press fit. Because balsa is a squishy sort of wood, we can make the hole a tiny bit too small for the lens, then press the lens into the hole to make it stay.
I used my X-Acto knife here, but if you have a very sharp drill bit, that may work as well. Just start small and work your way larger, trying to fit the lens along the way. It’s okay if your hole is square. In fact, it’ll probably be easier and look cleaner if it is.
Do the same process for both lenses, taking care that each fit snugly with little overhang from stringy bits of overhanging balsa wood.
For more detail: Incredible DIY iPhone Macro
- What materials are needed to build this macro lens?
You need lenses from disposable cameras or laser pointers, balsa wood, a rubber band, and an X-Acto knife. - How do you attach the carriage to the iPhone?
The carriage is attached to the phone using a rubber band that fits into slots cut near the corners of the wood. - Can I use other materials instead of balsa wood?
Yes, any similar material can be swapped out, though balsa is chosen for its ease of cutting and working. - How should the lenses fit into the carriage?
The lenses must be a press fit, meaning the hole is cut slightly smaller than the lens so it stays snugly in place. - Does the shape of the lens hole matter?
No, it is okay if the hole is square; it may even look cleaner and be easier to cut. - What is the benefit of having two lenses?
Having two lenses allows you to take shots at different macro levels simply by flipping the carriage around. - Why is a rubber band better than duct tape for this project?
A rubber band is suggested as the best option because adhesives like duct tape or Gorilla Glue are not recommended. - How much balsa wood should overhang the lens?
About 1/4 inch of balsa should surround the lens, though some overhang can create a vignette effect.