Introduction
This LCD terminal provide two modes of operation by selecting jumper J1. When J1 is open the terminal operate as a normal ascii display terminal, when J1 is closed the terminal displays the input serial data in hexadecimal format. This mode is useful for viewing raw data from the serial port output.
Hardware
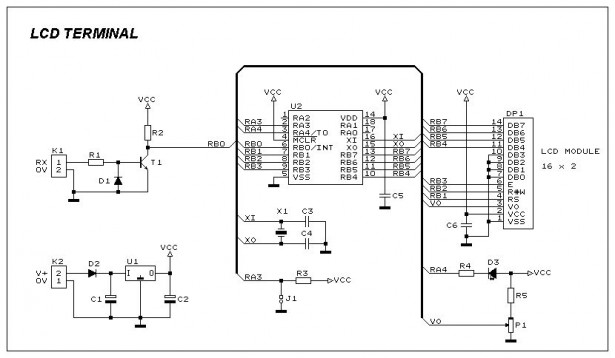
Figure 1 shows the circuit diagram of the Easy Debugging Terminal. IC U2 a PIC16F84 micro controller is used to control the operation of the terminal. Input signal is applied to connector K1. The circuit can be powered either by 9V dc adapter or by using a 9V battery. Jumper J1 select the operating mode of the terminal, J1 open for ascii terminal mode, closed for hexdecimal display mode. LED D3 can be controlled by software command provided in ascii mode. This LED output can also be used (with buffer circuit) to control the backlight of the LED backlit display. Variable P1 is used to adjust the contrast of the display. The circuit uses a 16×2 line LCD module, while a 16×1 module can also be used.
Constructing the Circuit
The prototype board may be built using universal PCB having the same size as of LCD module so that LCD module can be mounted on top of universal PCB using SIP connectors.
For the parts list of the circuit view the file Lcdbom.txt
For more detail: Easy Debugging Terminal using PIC16F84

