Summary of DIY Double Sided 60W LED UV Radiation Unit With Vacuum Pump
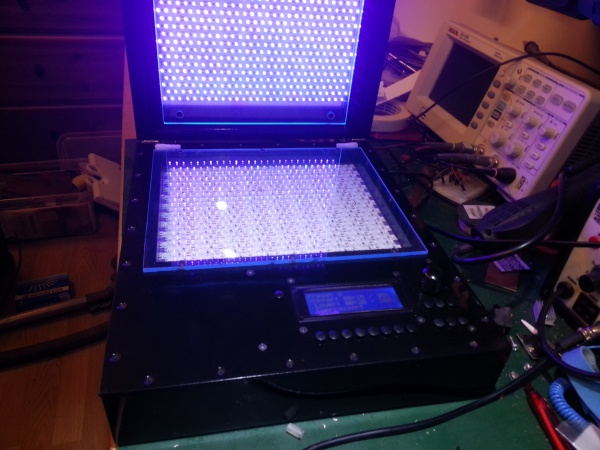
This article describes designing and building a compact, powerful UV exposure box for making PCBs using inexpensive 395–405 nm UV LED strip rolls. The unit uses an ATmega328P controller, dual 594-LED/30W panels (1188 LEDs total, ~60W), a built-in vacuum pump for artwork lamination, advanced timer/power controls with presets, calibration, runtime tracking, EEPROM wear balancing, and an LCD/user interface with buttons, rotary encoder, and audible alarm. The project is work in progress and the author offers CAD and firmware on request.
Parts used in the UV exposure box:
- ATmega328P microcontroller
- Two 5M Ultraviolet 395nm 3528 SMD LED strips (total 1188 LEDs)
- LED panels (each 594 LEDs / 30W)
- Power supply sufficient for ~60W LED load
- Vacuum pump
- Rotary knob with push-button (rotary encoder)
- 15 standalone push buttons
- 20x4 character backlit LCD display
- Piezo beeper (audible alarm)
- PCB or wiring harness for control electronics
- Enclosure for UV exposure unit
- Vacuum lamination platen or sealing hardware
- EEPROM (onboard or external for persistent storage)
Summary
This is a description of how I designed and built my UV exposure box. After experimenting a bit with dry-laminate photo-resist and liquid UV hardened solder mask I decided to stop trying to improve my toner transfer technique and rather build a proper UV radiation unit for making printed circuit boards.
I wanted it to be powerful and compact so I decided to use UV LEDs as the UV source. The preferred wavelength for the LEDs would probably be 365nm, but those LEDs turned out to be hard to find, and very expensive. The 395nm-405nm LEDs on the other hand are very inexpensive. And best of all, can be bough as high-density LED-strip’s on 5-meter rolls. So I bought two “5M Ultraviolet 395nm 3528 SMD LED” rolls that have 120 LEDs per meter for a total of 600 LEDs per roll. From what I could tell from a bit of googling the wavelength should work even though it is not ideal. Initial tests proved that the 395nm LEDs worked very well.
This page (and the unit itself) is still very much work in progress. If you have any questions about the design, or would like access to any of the CAD drawings or firmware used for this project please feel free to contact me. I have not yet decided whether to make it all available here or not, but if you are interested just let me know and I will think it through. I can be reached at [email protected].
Features
The UV exposure unit is controlled by an ATmega328P microcontroller and have the following features:
- Single and double sided exposure. Each side radiated by a 594LEDs / 30W UV LED panel (The unit has a total of 1188 LEDs providing 60W of LED light).
- The light panels can be calibrated to give even exposure on both sides.
- Built-in vacuum pump for laminating artwork and copper-clad.
- The user can define 2-18 speed steps for the vacuum pump.
- The vacuum pump can be set to automatically turn off a specified time after the radiation finish.
- Advanced programmable timer / power control for the light panels with 8 persistent presets.
- Each of the presets can in addition be backed up to a “hidden” location and later restored.
- Audible alarm when radiation is complete.
- User input through a rotary knob that also act like a push button plus 15 standalone push buttons.
- User feedback through a 20×4 character backlit LCD display with adjustable backlight and contrast plus a piezo beeper.
- Tracking of runtime. The total on time is tracked. And the runtime of the two light panels and the vacuum pump are tracked with two values each. The absolute time running and the time scaled by the power/speed they where running at.
- Wear balancing of the EEPROM. Some values in the EEPROM is updated fairly often. Like the currently selected preset. And the runtime counters. So each of those values have multiple locations allocated for them in the EEPROM and new values are written to a new location each time until all slots for the value has been used. Then it will start over. This ensures that the guaranteed 100.000 erase/write cycles will last as long as possible.
For more detail: DIY Double Sided 60W LED UV Radiation Unit With Vacuum Pump
- What UV LED wavelength was chosen for the exposure box?
The project used 395nm 3528 SMD UV LED strips (395–405nm range). - Why were 395nm LEDs used instead of 365nm?
365nm LEDs were hard to find and expensive, while 395nm LEDs were inexpensive and available in high-density strips. - How many LEDs and how much power does the unit have?
The unit has 1188 LEDs total, providing about 60W of LED light (two 594-LED/30W panels). - What microcontroller controls the unit?
An ATmega328P microcontroller controls the unit. - Does the unit support double sided exposure?
Yes, it supports single and double sided exposure with separate light panels for each side. - Is there a vacuum function for laminating artwork?
Yes, the unit includes a built-in vacuum pump for laminating artwork and copper-clad. - Can the vacuum pump speed and timing be configured?
Yes, the user can define 2–18 speed steps and set the pump to turn off automatically after a specified time following radiation. - What user interface features are provided?
User input is via a rotary knob (with push) and 15 push buttons; feedback is via a 20x4 backlit LCD and a piezo beeper. - Are there programmable presets for exposure?
Yes, there are 8 persistent presets and backup to a hidden location for restore. - How is EEPROM wear managed?
EEPROM wear balancing is used by allocating multiple locations for frequently updated values and cycling writes to extend erase/write life.